
1. Push MENU button 1.
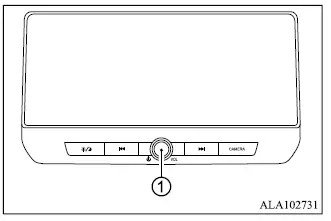
2. Touch the "Settings" key, then select the "Camera" key.
3. Touch the "Display Settings" key to open the available camera display adjustments.
4. Select the "Brightness", "Contrast", "Tint", "Color", or "Black Level" setting you want to change.
5. Adjust the selected item by touching the "+" or "-" key on the touch screen display until the desired setting is reached.
NOTE
- Do not adjust the Multi Around Monitor display settings while the Mitsubishi Outlander is moving. Stop the vehicle in a safe location and make sure the parking brake is firmly applied before changing any settings.
How to turn on and off predictive course lines
When the shift lever is in the P (Park) position, the predictive course lines can be switched ON or OFF using the following procedure.
1. Push the MENU button. 2. Touch the "Settings" key, then touch the "Camera" key.
3. Touch the "Predictive Course Lines" key to switch the function ON or OFF.
The predictive course lines can also be turned ON or OFF by pushing the CAMERA button while the shift lever is in the R (Reverse) position.
Multi Around Monitor system limitations
WARNING
- The following are limitations of the Multi Around Monitor system. Failure to operate the Mitsubishi Outlander with these limitations in mind could result in serious injury or death.
- Do not use the Multi Around Monitor while the door mirrors are folded. Make sure the mirrors are in their normal operating position and confirm that the liftgate is securely closed before maneuvering the vehicle with the aid of the system.
- The apparent distance between objects displayed on the Multi Around Monitor may differ from their actual distance from the vehicle.
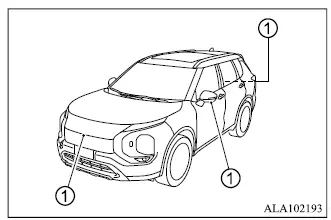
- The system cameras are installed above the front grille, on the door mirrors, and above the rear license plate. Do not cover the cameras or place objects on them.
- When washing the vehicle with high-pressure water, do not spray directly at or around the cameras. Water entering a camera unit may cause condensation on the lens, improper operation, fire, or electric shock.
- Do not strike or subject the cameras to strong impact. They are precision components, and damage could cause a malfunction, fire, or electric shock.
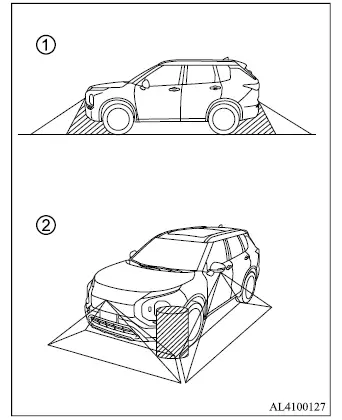
The Multi Around Monitor cannot display every area around the vehicle and does not provide a warning for every moving object. In front or rear camera views, objects located below the bumper or directly on the ground may not appear in area 1. In the bird's-eye view, a tall object positioned near seam 2 between adjoining camera images may be partially displayed or may not appear on the monitor at all.
The following conditions are normal operating limitations and do not necessarily indicate a Multi Around Monitor malfunction:
- A brief delay may occur when switching from one camera view to another.
- When the ambient temperature is extremely high or extremely low, objects may not appear clearly on the display.
- If strong light shines directly into a camera, the image may become washed out or objects may be difficult to distinguish.
- The display may flicker under fluorescent lighting.
- The colors of objects shown on the Multi Around Monitor may differ slightly from their actual colors.
- In dark surroundings, objects may appear less clear and their displayed colors may differ from their actual appearance.
- The sharpness and image quality may vary slightly between the individual camera images combined to create the bird's-eye view.
- Do not apply wax to any camera lens. If wax contacts a lens, remove it using a clean cloth dampened with a diluted mild cleaning agent, then wipe the surface with a clean, dry cloth.
System maintenance
CAUTION
- Do not use alcohol, benzine, thinner, or similar strong solvents to clean the cameras, as these products may discolor or damage their surfaces.
- Do not scratch, strike, or otherwise damage a camera, as damage may adversely affect the image displayed by the Multi Around Monitor.
If dirt, rainwater, or snow accumulates on any camera 1, the Mitsubishi Outlander Multi Around Monitor may no longer display surrounding objects clearly. Clean the affected camera with a soft cloth dampened with a diluted mild cleaning agent, then wipe it carefully with a clean, dry cloth.
