
Before installing a forward-facing child restraint in the Mitsubishi Outlander, review all warnings and cautions in the "Child safety" and "Child restraints" sections. A correctly selected and securely installed restraint is essential for protecting the child during normal driving, sudden braking and a collision.
Do not use the lower anchors when the combined weight of the child and child restraint exceeds 65 lb (29.5 kg). If the total weight is greater than 65 lb (29.5 kg), install the restraint with the vehicle seat belt rather than the LATCH lower anchors. Always follow the weight limits, attachment instructions and installation procedures provided by the child restraint manufacturer.
Follow these steps to install a forward-facing child restraint using the LATCH system. Before installation, remove the head restraint if necessary to obtain the correct fit between the child restraint and the vehicle seatback. Store the removed head restraint securely so it cannot move around inside the vehicle. Reinstall it after the child restraint is removed. Refer to "Head restraints" for information about removal, installation and adjustment.
1. Position the child restraint on the selected second row outboard seat.
Always follow the child restraint manufacturer's instructions for orientation, recline setting and contact with the vehicle seat.
- Move the seat where the child restraint will be installed to its most rearward position.
- Adjust the seatback three positions rearward from its most upright setting.
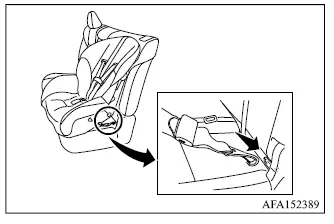
Forward-facing web-mounted - step 2
Forward-facing rigid-mounted - step 2
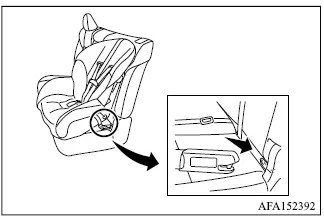
2. Connect both child restraint anchor attachments to the LATCH lower anchors for the selected seating position.
Check each connector to make sure it is attached to the correct lower anchor and has engaged securely.
Do not install the child restraint in the second row center seating position using the LATCH lower anchors.
If the child restraint includes a top tether strap, route the strap as instructed and attach it to the tether anchor assigned to that seating position. Do not install a restraint that requires a top tether in any seating position without a designated top tether anchor.
3. Position the rear surface of the child restraint firmly against the Mitsubishi Outlander seatback, as required by the restraint manufacturer.
If the vehicle seat shape, head restraint area or seatback position prevents the child restraint from fitting correctly, use another approved seating position or select a different compatible restraint.
Forward-facing - step 4
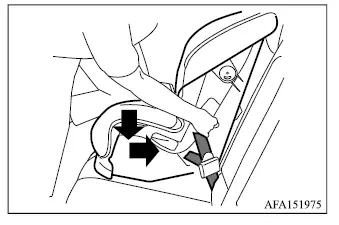
4. If the child restraint uses webbing-mounted LATCH attachments, remove all unnecessary slack from the connector straps. Press firmly downward and rearward at the center of the restraint with your knee while tightening the webbing. Compressing the vehicle seat cushion and seatback helps the restraint sit securely and reduces movement at the attachment path.
5. Tighten the top tether strap according to the child restraint manufacturer's instructions until all unnecessary slack has been removed. Make sure the strap is routed correctly and is not twisted, trapped or obstructed.
Forward-facing - step 6
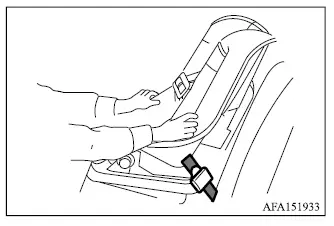
6. Test the installation before placing the child in the restraint. Hold the child restraint close to the LATCH attachment path and push it firmly from side to side. Movement at the attachment point must not exceed 1 inch (25 mm). Pull the restraint forward as well to confirm that the LATCH connectors and top tether hold it securely.
If the restraint moves too far, tighten the lower attachments and tether strap, then test it again. If a secure installation cannot be achieved, try another approved seating position or a different child restraint that fits the Mitsubishi Outlander seat and anchorage arrangement correctly. Not every child restraint is compatible with every vehicle or seating position.
7. Check the child restraint before every use to confirm that it remains properly installed. If the restraint has loosened, shifted or no longer passes the movement test, repeat steps 1 through 6 before placing the child inside.
