
WARNING
- The three-point seat belt must be placed in Automatic Locking Retractor [ALR] mode when installing a child restraint. If ALR mode is not activated, the restraint may remain loose or tip over during sudden braking or a collision, increasing the risk of serious injury to the child.
An incorrectly installed restraint on the front passenger seat may also affect operation of the front passenger airbag system.
Do not use the lower anchors when the combined weight of the child and child restraint exceeds 65 lb (29.5 kg). If the combined weight is greater than 65 lb (29.5 kg), install the restraint with the vehicle seat belt rather than the lower anchors. Follow all weight limits, belt-routing instructions and installation procedures provided by the child restraint manufacturer.
Use the following procedure to install a forward-facing child restraint with the vehicle seat belt in the front passenger seat or an appropriate second row or third row seating position. Before installation, remove the head restraint if necessary to obtain proper contact between the restraint and the vehicle seatback. Store the removed restraint securely and reinstall it when the child restraint is taken out. When installing a child restraint in the center position of the second row seat, lower the head restraint to its lowest position.
Forward-facing (front passenger seat) - step 1
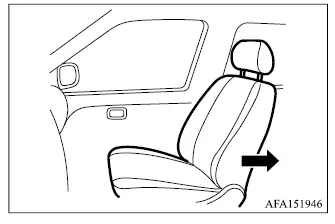
1. If a child restraint must be installed in the front passenger seat, use only a forward-facing restraint and move the passenger seat to its rearmost position. An infant restraint must be used rear-facing and therefore must never be installed on the front passenger seat.
2. Position the child restraint firmly on the selected seat.
Follow the child restraint manufacturer's instructions for its orientation, recline setting and required contact with the seatback.
- Move the seat where the child restraint will be installed to its most rearward position.
- Adjust the seatback three positions rearward from its most upright setting.
The back of the child restraint should rest securely against the Mitsubishi Outlander seatback as specified by the restraint manufacturer.
Forward-facing - step 3
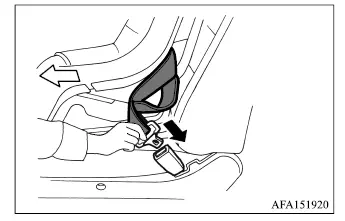
3. Route the seat belt through the designated belt path on the child restraint, then insert the tongue into the correct buckle until you hear and feel the latch engage.
Follow the child restraint manufacturer's belt-routing instructions carefully. Make sure the webbing lies flat and is not twisted, folded or passed through an incorrect opening.
If the child restraint is equipped with a top tether strap, route the strap correctly and attach it to the designated tether anchor point when the restraint is installed in a rear seating position.
Do not install a child restraint that requires a top tether strap in any seating position that does not have a designated tether anchor.
Forward-facing - step 4
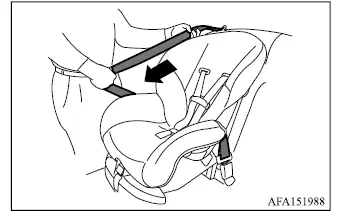
4. Slowly pull the shoulder belt from the retractor until it is fully extended. Full extension activates Automatic Locking Retractor [ALR] mode, also known as child restraint mode. The belt returns to Emergency Locking Retractor [ELR] mode after it is unbuckled and allowed to retract completely.
Forward-facing - step 5
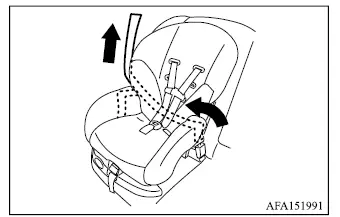
5. Allow the seat belt to retract while pulling upward on the shoulder portion to remove loose webbing from the child restraint belt path. Confirm that the ALR mechanism prevents the belt from being pulled out again.
Forward-facing - step 6
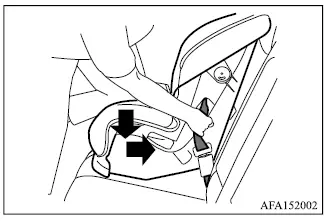
6. Remove any remaining slack from the seat belt. Press firmly downward and rearward at the center of the child restraint with your knee to compress the vehicle seat cushion and seatback while pulling upward on the shoulder belt. Continue tightening until the restraint sits firmly against the seat.
7. Tighten the top tether strap according to the child restraint manufacturer's instructions. Remove unnecessary slack while making sure the strap remains correctly routed and free from twists or obstructions.
Forward-facing - step 8
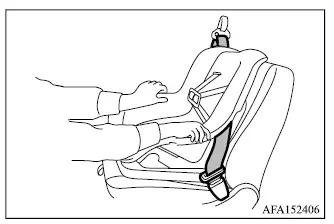
8. Test the installation before placing the child in the restraint. Hold the child restraint close to the seat belt path and push it firmly from side to side. Movement at the belt path must not exceed 1 inch (25 mm). Pull the restraint forward as well to confirm that the locked seat belt holds it securely in position.
If the restraint moves too far, tighten the seat belt and tether strap as necessary, then repeat the test. If a secure installation cannot be achieved, try another approved seating position or use a different child restraint that fits the Mitsubishi Outlander seat and belt arrangement correctly. Not every restraint is compatible with every vehicle or seating position.
9. Inspect the child restraint before every use to confirm that it remains securely installed and that the seat belt is still locked in ALR mode. If the belt extends freely or the restraint has become loose, repeat steps 2 through 8.
Forward-facing - step 10
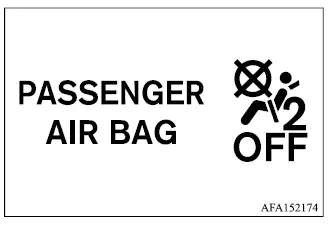
10. If the child restraint is installed on the front passenger seat, place the ignition switch in the ON position. The front passenger airbag status light
 should illuminate.
The front passenger airbag status light is located near the inside rearview mirror.
If the status light does not illuminate, refer to "Front passenger airbag status light." Move the child restraint to another suitable seating position and have the system inspected. Mitsubishi Motors recommends visiting an authorized Mitsubishi Motors dealer for this service.
After the child restraint is removed, unfasten the seat belt and allow it to retract completely. Full retraction cancels ALR child restraint mode and returns the belt to normal ELR operation.
