Mitsubishi Outlander: Headlamp levelling
Except for vehicles with discharge headlamps
The angle of the headlamp beam varies depending upon the load carried by the vehicle.
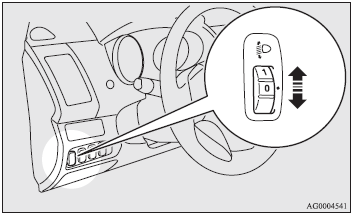
The headlamp levelling switch can be used to adjust the headlamp illumination distance (when the lower beam is illuminated) so that the headlamps’ glare does not distract other drivers.
Set the switch according to the following table.
5 - person seat

•: 1 person  :Full luggage loading
Switch position 0- Driver only / Driver + 1 front passenger.
Switch position 2- 5 passengers (including driver).
Switch position 3- 5 passengers (including driver) + Full luggage loading.
Switch position 4- Driver + full luggage loading.
7 - person seat
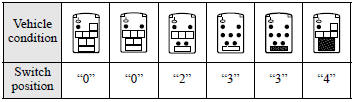
•:1 person : Full luggage loading
Switch position 0- Driver only/Driver + 1 front passenger.
Switch position 2- Driver + 1 front passenger + 2 passengers on third seat.
Switch position 3- 7 passengers (including driver) / 7 passengers (including driver) + Full luggage loading.
Switch position 4- Driver + Full luggage loading.
Automatic headlamp levelling
Vehicles with discharge headlamps
This mechanism automatically adjusts the direction of the headlamps (beam position) depending on changes in the condition of the vehicle, such as the number of occupants or luggage weight. When the headlamps are illuminated with the ignition switch in the “ON” position, the beam position of the headlamps is automatically adjusted when the vehicle
Headlamps (with beam position adjustment system) warning display
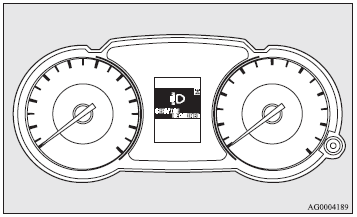
If there is a fault in the automatic headlamp levelling system, “SERVICE REQUIRED” is displayed on the information screen in the multi-information display.
CAUTION:
● If the warning is displayed, the system may be malfunctioning, so we recommend you to have your vehicle inspected.
READ NEXT:
 Turn-signal lever
1- Turn-signals.
When making a normal turn, use position (1). The lever will return automatically
when cornering is completed.
2- Lane-change signals.
When moving the lever to (2) slightly to c
Hazard warning flasher switch
Use the hazard warning flasher switch when the vehicle has to be parked on the
road for any emergency.
The hazard warning flashers can always be operated, regardless of the position
of the igni
Fog lamp switch
Front fog lamp switch
The front fog lamps can be operated while the headlamps and tail lamps are on.
Turn the knob in the “ON” direction to turn on the front fog lamps. An indicator
lamp in
SEE MORE:
DTC B1B1A, B1B1B, B1B20, B1B21, B1B22, B1B23
DTC B1B1A: Curtain Air Bag Module (LH) (Squib) System (Squib Circuit
Open)
Curtain Air Bag Module (Squib) (LH) Circuit
CAUTION
If DTC B1B1A is set in the SRS-ECU, always diagnose
the CAN main bus line.
CIRCUIT OPERATION
The SRS-ECU judges how severe a collision is
by detecting signals from the
Doors
CAUTION:
● Make sure the doors are closed: driving with doors not completely closed is
dangerous.
● Never leave children in the vehicle unattended.
● Be careful not to lock the doors while the keys is inside the vehicle.
NOTE:
● When the driver’s door is open, neithe
