Mitsubishi Outlander: Window Glass Runchannel and Door Opening Weatherstrip
REMOVAL AND INSTALLATION
<Front door>
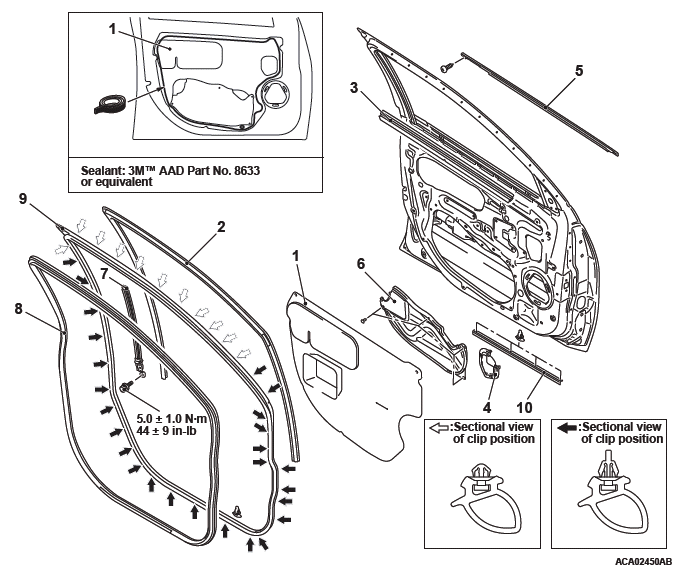
Waterproof film removal steps
- Pull handle bracket
- Waterproof film
Door window glass runchannel removal steps
- Door window glass runchannel
Door belt line weatherstrip inner removal steps
- Door trim assembly
- Door belt line weatherstrip inner
Door belt line moulding removal steps <Standard>
- Door mirror assembly
- Door belt line moulding
Door beltline moulding removal steps <Bright>
- Door mirror assembly
- Door trim assembly
- Waterproof film
- Door beltline weatherstrip inner
- Door speaker cover
- Door beltline moulding
Speaker bracket removal steps <vehicles with Rockford Fosgate Premium Sound System>
- Pull handle bracket
- Waterproof film
- Speaker bracket
Rear lower sash removal steps
- Pull handle bracket
- Waterproof film
- Speaker bracket <vehicles with Rockford Fosgate Premium Sound System>
- Rear lower sash
Speaker cover removal steps <vehicles with Rockford Fosgate Premium Sound System>
- Pull handle bracket
- Waterproof film
- Door speaker cover
Door opening weatherstrip inner removal steps
- Cowl side trim and scuff plate
- Door opening weatherstrip inner
Door opening weatherstrip outer removal steps
- Door channel mounting bolt (door-side)
- Door opening weatherstrip outer
Door opening weatherstrip lower removal
- Door opening weatherstrip lower
<Rear door>
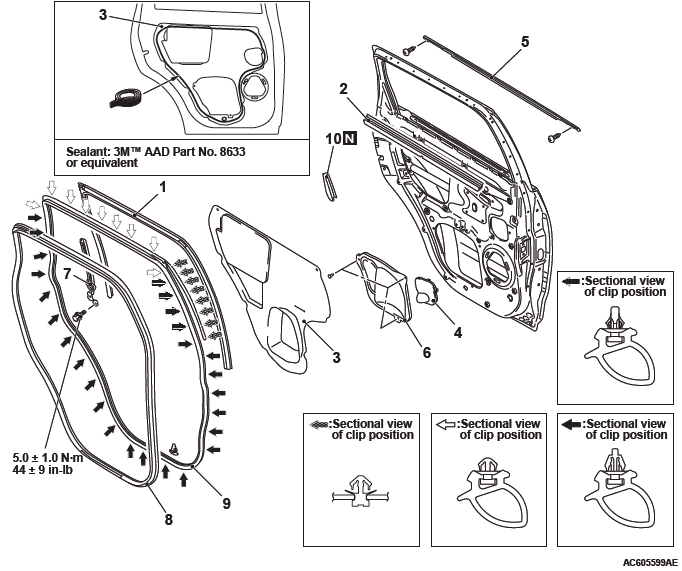
Door window glass runchannel removal
- Door window glass runchannel
Door belt line weatherstrip inner removal steps
- Door trim assembly
- Door belt line weatherstrip inner
Door belt line moulding removal <Standard>
- Door belt line moulding
Door beltline moulding removal steps <Bright>
- Door trim assembly
- Door beltline weatherstrip inner
- Waterproof film
- Door speaker cover
- Door beltline moulding
Waterproof film removal steps
- Rear door arm rest bracket
- Waterproof film
Speaker bracket removal steps <vehicles with Rockford Fosgate Premium Sound System>
- Rear door arm rest bracket
- Waterproof film
- Speaker bracket
Rear lower sash removal steps
- Rear door arm rest bracket
- Waterproof film
- Speaker bracket <vehicles with Rockford Fosgate Premium Sound System>
- Rear lower sash
Speaker cover removal steps <vehicles with Rockford Fosgate Premium Sound System>
- Rear door arm rest bracket
- Waterproof film
- Door speaker cover
Door opening weatherstrip inner removal steps
- Cowl side trim, scuff plate, centre pillar trim
- Door opening weatherstrip inner
Door opening weatherstrip outer removal
- Door check mounting bolt (body-side)
- Door opening weatherstrip outer
Door tape removal steps
- Door window glass runchannel
- Door belt line weatherstrip inner
- Rear door arm rest bracket
- Waterproof film
- Door tape
REMOVAL SERVICE POINTS
DOOR BELTLINE MOULDING REMOVAL
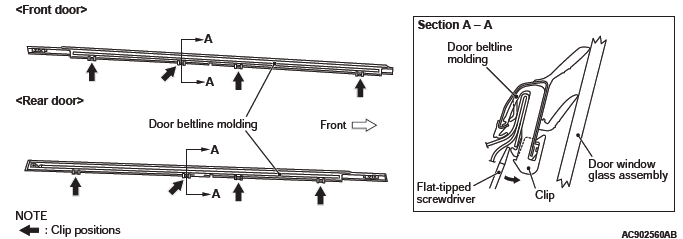
Pry the door beltline moulding clip positions with a flat-tipped screwdriver and remove the door beltline moulding upward.
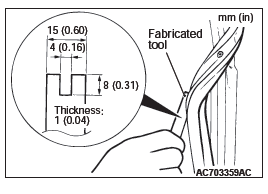
DOOR OPENING WEATHERSTRIP OUTER REMOVAL
Make the tool as shown in the figure, and remove the weatherstrip from the door panel.
INSTALLATION SERVICE POINTS
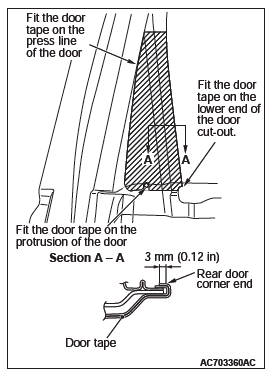
DOOR TAPE INSTALLATION
Apply the specified adhesive to the water-proof film as shown in the figure and stick the film.
WATERPROOF FILM INSTALLATION
CAUTION When a waterproof film is applied, guide the butyl rubber tape under the inner panel drain hole.
Apply the specified adhesive to the water-proof film as shown in the figure and stick the film.
Butyl rubber tape: 3M AAD Part number 8633 or equivalent

READ NEXT:
 Liftgate
GENERAL INFORMATION
LIFTGATE OPENER CONTROL FUNCTION
When the liftgate lock release handle is operated to
open the liftgate (the liftgate lock release handle
open switch turns ON) while the vehicle
Sunroof
SPECIFICATIONS
SERVICE SPECIFICATION
SEALANT
GENERAL INFORMATION
SUNROOF FUNCTION
A motor-driven inner slide-type glass sunroof with a
tilt-up mechanism is available in some models as
optional equip
SEE MORE:
Seat belt pre-tensioner system and forcelimiter system
The driver’s seat and front passenger’s seat each have a seat belt equipped with
a pre-tensioner system.
Pre-tensioner system
The pre-tensioner system will retract their respective seat belts instantaneously,
thus maximizing the seat belt’s effectiveness, if there is a frontal impact sev
Engine Mechanical - 2.4L Engine
General Information
The 4B12 (2.4 L) engine is an in-line four-cylinder
engine. The cylinder numbers are assigned as
1-2-3-4 from the front of the engine (timing belt side).
The firing order is 1-3-4-2.
Engine Diagnosis
Service Specifications
Sealants and Adhesive
Special Tools
