Mitsubishi Outlander: Maintenance Service
1. FUEL SYSTEM (TANK, PIPE LINE AND CONNECTION, AND FUEL TANK FILLER TUBE CAP) (CHECK FOR LEAKS)
Check for damage or leakage in the fuel lines and connections.
2. FUEL HOSES (CHECK CONDITION)
1. Inspect the surface of fuel hoses for heat and mechanical damage. Hard and brittle rubber, cracking, tears, cuts, abrasions and excessive swelling indicate deterioration of the rubber.
2. If the fabric casing of the rubber hose is exposed by cracks and abrasions in the fuel system, the hoses should be replaced.
3. AIR CLEANER ELEMENT (REPLACE)
The air cleaner element will become dirty during use, reducing its effectiveness. Replace it with a new one.
Replacement of air cleaner element:
1. Unclasp the air cleaner housing.
2. Remove the air cleaner element and install a new one.
3. When clamping the air cleaner housing in place, be sure that the cover is completely closed.
4. EVAPORATIVE EMISSION CONTROL SYSTEM (EXCEPT EVAPORATIVE EMISSION CANISTER) (CHECK FOR LEAKS AND CLOGGING)
If the fuel-vapor vent line is clogged or damaged, fuel vapor will escape into the atmosphere causing excessive emissions. Disconnect the line at both ends, and blow it clean with compressed air. Remove the fuel tank filler tube cap from the filler tube and check to see if there is evidence that the seal makes improper contact to the filler tube.
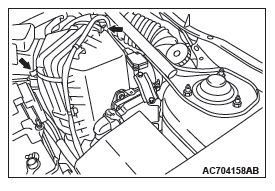
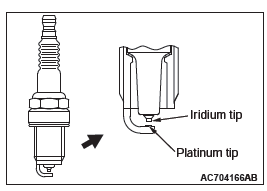
5. SPARK PLUGS (REPLACE)
CAUTION
Iridium plugs are used. Use care not to damage the iridium tips of the plugs. Do not adjust the spark plug gap.
1. Spark plugs must spark properly to assure proper engine performance and reduce exhaust emission level. Therefore, they should be replaced periodically with new ones.
Spark plug type

2. The new plugs should be checked for the proper gap.
Spark plug gap: 0.7 − 0.8 mm (0.028 − 0.031 inch)
3. Install the spark plugs and tighten to the specified torque.
Tightening torque:
25 +- 5 N*m (19 +- 3 ft-lb) <2.4L>
18 +- 2 N*m (13 +- 1 ft-lb) <3.0L>
6. INTAKE AND EXHAUST VALVE CLEARANCE (INSPECT AND ADJUST)
<2.4L ENGINE>
NOTE: Perform the valve clearance check and adjustment at the engine cold state.
1. Remove all of the ignition coils.
2. Remove the cylinder head cover.
CAUTION
Turn the crankshaft always clockwise.
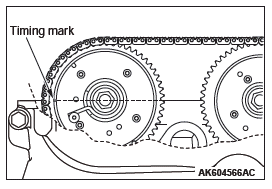
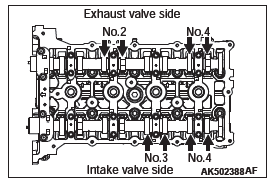
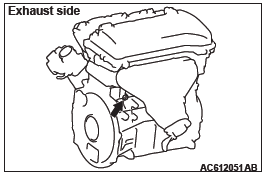
3. Turn the crankshaft clockwise, and align the timing mark on the exhaust camshaft sprocket against the upper face of the cylinder head as shown in Figure. Therefore, No.1 cylinder goes to the compression top dead center.

4. Using a thickness gauge, measure the valve clearance with the arrow shown in Figure. If deviated from the standard value, make note for the valve clearance.
Standard value:
Intake valve 0.20 +- 0.03 mm (0.008 +- 0.0012 inch)
Exhaust valve 0.30 +- 0.03 mm (0.012 +- 0.0012 inch)
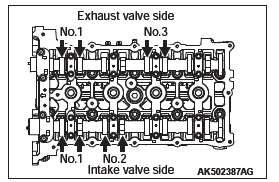
5. Turn the crankshaft clockwise 360 degrees, and put the timing mark on the exhaust camshaft sprocket in position shown in Figure. Therefore, No.4 cylinder goes to the compression top dead center.
6. Check the valve clearance with the arrow shown in Figure.
In the same procedure as 4.
7. If the valve clearance is deviated from the standard value, remove the camshaft and the valve tappet. For the camshaft removal, refer to Camshaft Removal and Installation.
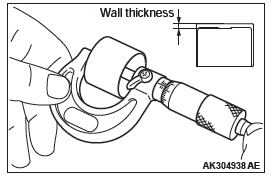
8. Using a micrometer, measure the thickness of the removed valve tappet.
9. Calculate the thickness of the newly installed valve tappet through the following equation.
- thickness of newly installed valve tappet
- thickness of removed valve tappet
- measured valve clearance
Equation
Intake valve: A = B + [C − 0.20 mm (0.008 inch) ]
Exhaust valve: A = B + [C − 0.30 mm (0.012 inch) ]
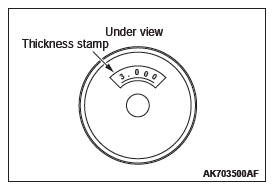
NOTE: The valve tappet ranges 3,000 − 3,690 mm (0.1181 − 0.1453 inch) and has 47 types per 0.015 mm (0.0006 inch).
The thickness below a decimal point is stamped on the reverse side of the valve tappet.
10. Install the valve tappet selected through the procedure 9, and put the camshaft in position. For the camshaft installation, refer to Camshaft Removal and Installation.
11. After installing the timing chain, measure the valve clearance using the procedure 3 to 6. Confirm the clearance is within the standard value.
CAUTION
Completely remove all the old liquid gasket, which might be remaining among the components.
12. After completely removing the liquid gasket adhering on the timing chain case, cylinder block and cylinder head, degrease them with white gasoline.
CAUTION
The cylinder head cover should be installed within 3 minutes of applying liquid gasket.
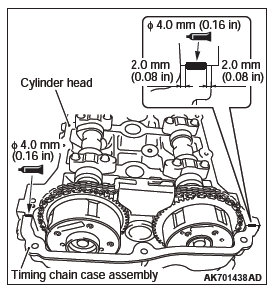
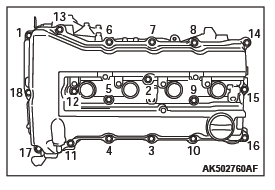
13. Apply a 4 mm bead of liquid gasket as illustrated.
Specified sealant: THREE BOND 1217G or equivalent
14. Install the cylinder head cover and tighten the tightening bolts using the following procedures.
- Temporarily tighten to the following torque in order shown in the illustration.
Tightening torque: 3.0 +- 1.0 N*m (27 +- 9 in-lb)
- Tighten to the specified torque in order shown in the illustration.
Specified torque: 5.5 +- 0.5 N*m (49 +- 9 in-lb)
15. Install the ignition coils.
<3.0L ENGINE (INTAKE SIDE ONLY) >
NOTE: Perform the valve clearance check and adjustment at the engine cold state.
1. Remove all of the ignition coils.
2. Remove the rocker cover.
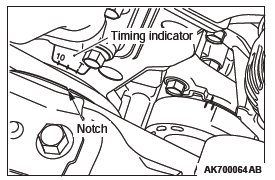
3. Turn the crankshaft clockwise until the notch on the pulley is lined up with the "T" mark on the timing indicator.
4. Valve clearance inspection and adjustment can be performed on rocker arms indicated by white arrow mark when the No. 1 cylinder piston is at the top dead center on the compression stroke, and on rocker arms indicated by black arrow mark when the No. 4 cylinder piston is at the top dead center on the compression stroke.
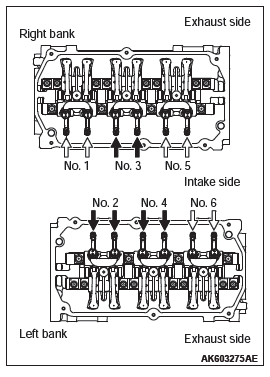
NOTE: If the rocker arm of No. 6 cylinder at the intake side is moved up and down and the rocker arm is moved, No. 1 cylinder is at top dead center on compression stroke. If the rocker arm of No. 6 cylinder at the intake side is moved up and down and the rocker arm is not moved, No. 4 cylinder is at top dead center on compression stroke.
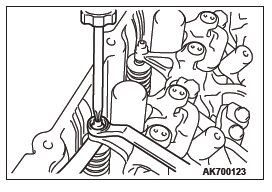
5. Measure the valve clearance for intake side.
If the valve clearance is not as specified, loosen the rocker arm lock nut and adjust the clearance using a thickness gauge while turning the adjusting screw.
Standard value (cold engine): 0.10 mm (0.004 inch)
NOTE: Valve clearance check and adjustment is unnecessary for exhaust side due to auto lash adjuster installed.
6. While holding the adjusting screw with a screwdriver to prevent it from turning, tighten the lock nut to the specified torque.
Tightening torque: 9 +- 1 N*m (80 +- 9 in-lb)
7. Turn the crankshaft 360 degrees to line up the notch on the crankshaft pulley with the "T" mark on the timing indicator.
8. Repeat steps 5 and 6 on other valves for clearance adjustment.
9. Install the rocker cover.
10. Install the ignition coils.
7. TIMING BELT (REPLACE)
Replace the belt with a new one according to the maintenance schedule to assure proper engine performance.
For removal and installation procedures, refer to GROUP 11C, Engine Mechanical − Timing Belt − Removal and Installation.
8. DRIVE BELT (FOR GENERATOR, POWER STEERING OIL PUMP) (CHECK CONDITION)
<2.4L ENGINE>
1. Remove the radiator condenser tank mounting bolts.
2. Move the radiator condenser tank to a place where it will not be a hindrance when checking the generator and others belt tension.
CAUTION
Check the generator and others belt tension after turning the crankshaft clockwise one turn or more.
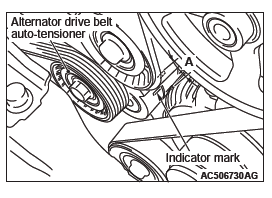
3. Make sure that the indicator mark on the generator drive belt auto-tensioner is within the area marked with A in the illustration.
4. If the mark is out of the area A, replace the generator and others belt.
NOTE: The generator and others belt tension check is not necessary as the generator drive belt auto-tensioner is adopted.
5. Tighten the radiator condenser tank mounting bolts to the specified torque.
Tightening torque: 12 +- 2 N*m
<3.0L ENGINE>
CAUTION
Check the drive belt tension after turning the crankshaft clockwise one turn or more.
1. Make sure that the indicator mark is within the area marked with A in the illustration.
2. If the mark is out of the area, replace the drive belt.
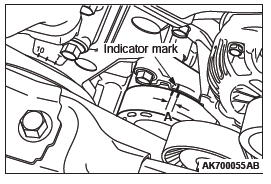
NOTE: The drive belt tension adjustment is not necessary, as the engine is equipped with an auto-tensioner.
9. EXHAUST SYSTEM (CONNECTIONS PORTION OF MUFFLER, MUFFLER PIPES AND CONVERTER HEAT SHIELDS) (CHECK AND SERVICE AS REQUIRED)
1. Check for holes and exhaust gas leaks due to damage, corrosion, etc.
2. Check the joints and connections for looseness and exhaust gas leaks.
3. Check the rubber hangers and brackets for damage.
10. ENGINE OIL (CHANGE)
1. Start the engine and allow it to warm up until the temperature of the coolant reaches 80 − 90ºC (176 − 194ºF).
WARNING Use care as oil could be hot.
2. Remove the engine oil filler cap.
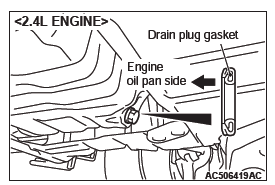
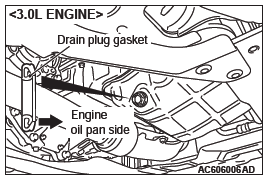
3. Remove the drain plug to drain oil.
4. Install a new drain plug gasket so that it faces in the direction shown in the illustration, and then tighten the drain plug to the specified torque.
Tightening torque: 39 +- 5 N*m (29 +- 3 ft-lb)
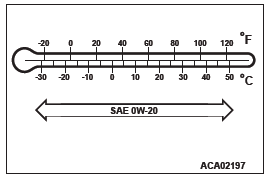
5. Refill the specified quantity of engine oil <2.4L ENGINE>.
Specified Engine Oil: Engine oils displaying the ILSAC certification symbol ("Starburst" symbol) or conforming to the API classification SM
Total quantity (Includes volume inside engine oil filter): 4.6 dm3 (4.82 quarts)
6. Refill the specified quantity of engine oil <3.0L ENGINE>.
Specified Engine Oil: Engine oils displaying the ILSAC certification symbol ("Starburst" symbol) or conforming to the API classification SM
Total quantity (Includes volume inside engine oil filter): 4.3 dm3 (4.52 quarts)
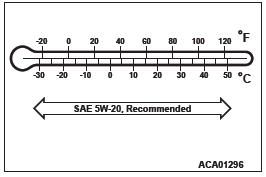
NOTE: SAE 5W-20 engine oil is strongly recommended for optimum fuel economy and cold starting.
7. Install the engine oil filler cap.
8. Let the engine run for a few minutes.
9. Stop the engine, and then check the oil level using the oil dipstick after a few minutes.
11. ENGINE OIL FILTER (REPLACE)
The quality of replacement filters varies considerably. Only high quality filters should be used to assure most efficient service.
Genuine oil filters require that the filter is capable of withstanding a pressure of 1,765 kPa (256 psi) are high quality filters and are recommended as follows:
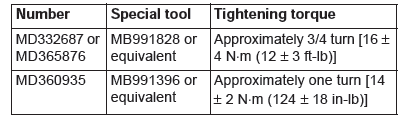
Mitsubishi Oil Filter Part Number: MD332687, MD365876, MD360935 or equivalent
Engine Oil Filter Selection
This vehicle is equipped with a full-flow, throw-away oil filter.
The same type of filter is recommended as a replacement filter for this vehicle. It is possible, particularly in cold weather, that this vehicle may develop high oil pressure for a short duration.
Make sure that any replacement filter used on this vehicle is a high-quality filter. The filter must withstand a pressure of 1,765 kPa (256 psi) [manufacturer's specifications] to avoid filter and ultimately engine damage. The following is a high-quality filter and is strongly recommended for use on this vehicle: Mitsubishi Engine Oil Filter Part number MD332687, MD365876 and MD360935.
Any replacement oil filter should be installed in accordance with the oil filter manufacturer's installation instructions.
Oil Filter Replacement
Start the engine and allow it to warm up until the temperature of the coolant reaches 80 − 90ºC (176 − 194ºF)
WARNING Use care as oil could be hot.
1. Remove the engine oil filler cap.
2. Remove the drain plug to drain oil.
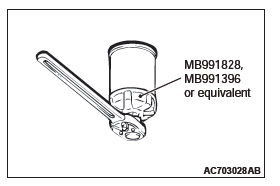
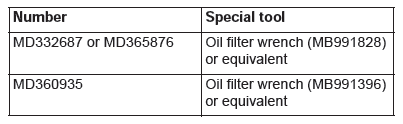
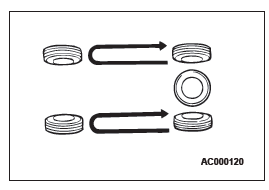
3. Use the respective tool in the following table to remove the engine oil filter.
4. Clean the filter bracket side mounting surface and ensure the old O-ring has been removed.
5. Apply a small amount of engine oil to the O-ring of the new oil filter.
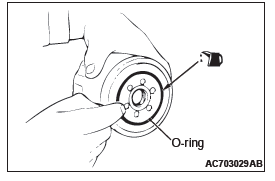
6. Screw on the oil filter by hand until it touches the surface of the flange and then tighten it with an oil filter wrench.
7. Install the drain plug and refill engine oil.
8. Rev the engine a few times, and check to be sure that no engine oil leaks at the oil filter.
12. TRANSMISSION FLUID (CVT FLUID) (CHECK FLUID LEVEL AND CONDITION/CHANGE)
CHECK FLUID LEVEL AND CONDITION
CAUTION
Replace the transmission fluid whenever the transaxle is replaced with a new one or the vehicle is driven in harsh conditions.
1. Drive the vehicle until the transmission fluid is warmed up to the normal operating temperature 70 − 80ºC (158 − 176ºF).
NOTE: Use scan tool to measure the transmission fluid temperature.
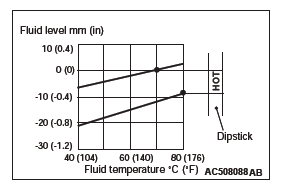
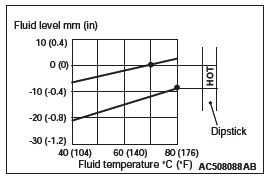
NOTE: When a certain amount of time is required to warm up the transmission fluid to the normal operating temperature 70 − 80ºC (158 − 176ºF), check the oil level referring to the characteristics chart.
2. Park the vehicle on a level surface.
3. Move the selector lever to every position to fill the torque converter and the hydraulic circuit with the transmission fluid, and then move the selector lever to P or N range.
4. Wipe clean the area around the oil level gauge, and then remove the oil level gauge to check the condition of the transmission fluid.
NOTE: If the transmission fluid smells burnt or is excessively deteriorated or dirty, the transmission fluid is contaminated with particles of the metal bushings and friction material. In these cases, the transaxle must be overhauled.
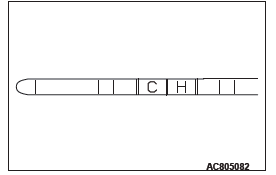
5. Check that the transmission fluid level is within the "H" area on the oil level gauge. If the fluid level is low, add the transmission fluid to the "H" level.
Transmission fluid: DIA QUEEN CVTF-J1
NOTE: When the transmission fluid level is low, the oil pump sucks air together with the transmission fluid, and produces air bubbles in the hydraulic circuit. The air bubbles in the hydraulic circuit decreases the hydraulic pressure, causing the delayed gearshift or slippage of the belt, clutch, and brake. When the transmission fluid level is too high, the fluid is stirred by the gear and foams up, and the problems similar to those when the transmission fluid level is low will occur. In either case, air bubbles cause the overheat and oxidation of the transmission fluid, which prevents normal operation of the valve, clutch, and brake. Beside, when the transmission fluid is foamy, it flows out of the transaxle vent hole. This may be taken as the fluid leakage by mistake.
6. Insert the oil level gauge securely.
CHANGE
If you have a transmission fluid (CVT fluid) changer, use this changer to replace the transmission fluid. If you do not have a transmission fluid changer, replace the transmission fluid by the following procedure.
<2.4 L ENGINE>
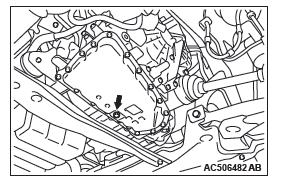
1. Remove the drain plug on the bottom of the transaxle case to drain the transmission fluid.
Draining amount: Approximately 5.5 dm3 (5.81 qt)
2. Install the drain plug with a new gasket to the transaxle case, and tighten it to the specified torque.
Tightening torque: 34 +- 2 N*m (25 +- 1 ft-lb)
CAUTION
If the transaxle case becomes full before filling 5.5 dm3 (5.81 qt) of transmission fluid, stop filling the transmission fluid.
3. Fill in the new transmission fluid through the oil filler tube.
Filling amount: Approximately 5.5 dm3 (5.81 qt)
Transmission fluid: DIA QUEEN CVTF-J1
4. Start up the engine and let it idle for 1 to 2 minutes.
5. Move the selector lever to every position, and then move it to the P or N range.
6. Stop the engine and perform the above steps 1 to 5 again.
7. Stop the engine, and discharge a small amount of transmission fluid to check for fouling. If fouling is found, repeat steps 1 to 5 until clean transmission fluid comes out.
8. Drive the vehicle until the transmission fluid is warmed up to the normal operating temperature 70 − 80ºC (158 − 176ºF), and check the transmission fluid level. It must be within the "H" area on the oil level gauge.
8. Drive the vehicle until the transmission fluid is warmed up to the normal operating temperature 70 − 80ºC (158 − 176ºF), and check the transmission fluid level. It must be within the "H" area on the oil level gauge.
NOTE: The "C" level is for reference only. Use the "H" level as the criteria.
NOTE: Use scan tool to measure the transmission fluid temperature.
NOTE: When a certain amount of time is required to warm up the transmission fluid to the normal operating temperature 70 − 80ºC (158 − 176ºF), check the oil level referring to the characteristics chart.
9. Adjust the transmission fluid level to the specified level.
Refill the transmission fluid when the fluid level is low, and drain the transmission fluid through the drain plug when the fluid level is high.
10. Securely insert the oil level gauge into the oil filler tube.
11.TCM records the deterioration level of the transmission fluid.
After replacing the transmission fluid with new one, use scan tool to reset the deterioration level recorded in TCM.
<3.0 L ENGINE>
If you have a transmission fluid changer, use this changer to replace the transmission fluid. If you do not have a transmission fluid changer, replace the transmission fluid by the following procedure.
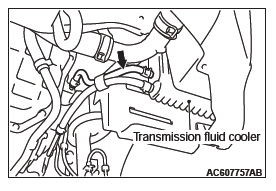
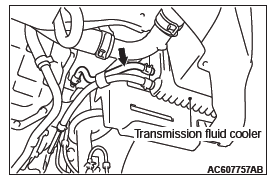
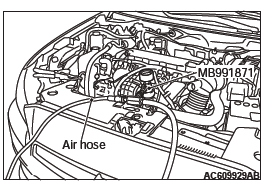
1. Disconnect the hose shown in the illustration which connects the transaxle and the oil cooler (inside the radiator). Place a container under the hose to collect the discharge.
CAUTION
The engine should be stopped within one minute after it is started. If all the transmission fluid has drained out before then, the engine should be stopped at that point.
2. Start the engine and let the transmission fluid drain out.
(Running conditions: "N" range with engine idling)
Approximately 3.5 dm3 (3.7 quarts) of transmission fluid should be removed.
3. Remove the drain plug from the bottom of the transaxle case to drain the transmission fluid.
Approximately 2.0 dm3 (2.1 quarts) of transmission fluid should be removed.
4. Install the drain plug with a new gasket, and tighten it to the specified torque.
Tightening torque: 7.4 +- 2.4 N*m (65 +- 21 in-lb)
CAUTION
Stop pouring if the full volume of transmission fluid cannot be added.
5. Add new transmission fluid (DIA QUEEN ATF- J3) through the oil filter tube.
Approximately 5.5 dm3 (5.8 quarts) of transmission fluid should be added.
6. Repeat the procedure in Step 2. (to pump out the rest of the contaminated transmission fluid) 7. Add new transmission fluid (DIA QUEEN ATF- J3) through the oil filter tube.
Approximately 3.5 dm3 (3.7 quarts) of transmission fluid should be added.
NOTE: Check for contamination or a burnt odor. If the transmission fluid is still contaminated or burnt, repeat Steps 6 and 7 before proceeding to Step 8.
8. Reconnect the hose which was disconnected in step 1 above, and firmly insert the dipstick.
9. Start the engine and run it at idle for one to two minutes.
10. Move the selector lever through all positions, and then move it to the "N" position.
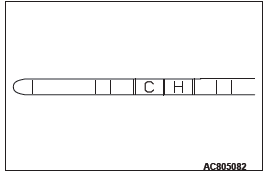
11.Check that the transmission fluid level is at the "C" mark on the dipstick. If the level is less than this, add transmission fluid.
12.Drive the vehicle until the transmission fluid temperature rises to the normal operating temperature [70 − 80ºC (158 − 176ºF) ], and then check the transmission fluid level again.
The transmission fluid level must be at the "H" mark.
NOTE: The transmission fluid temperature is measured with scan tool MB991958 (M.U.T.-III sub assembly).
NOTE: The "C" level is for reference only; the "H" level should be regarded as the standard level.
NOTE: If it takes some amount of time until the transmission fluid reaches its normal operating temperature [70 − 80ºC (158 − 176ºF) ], check the transmission fluid level by referring to the left diagram.

13.When the transmission fluid is less than the specified level, add transmission fluid.
When the transmission fluid is greater than the specified level, drain the excess fluid through the drain plug to adjust the transmission fluid to the specified level.
14.Firmly insert the dipstick into the oil filler tube.

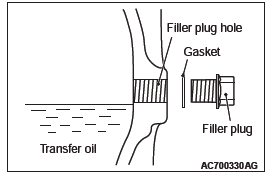
13. TRANSFER OIL (CHECK OIL LEVEL AND CONDITION/CHANGE)
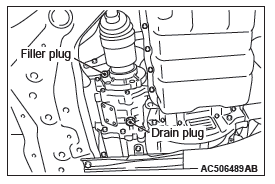
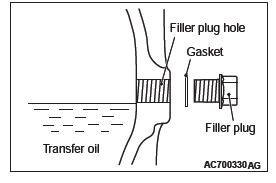
1. Remove the filler plug and gasket.
2. Check that the oil level is just below the lower edge of the filler plug hole.
3. Check that the oil is not excessively foul and has moderate viscosity.
4. Install the filler plug and new gasket, then tighten them to the specified torque.
Tightening torque: 32 +- 2 N*m (24 +- 1 ft-lb)
CHANGE
<2.4L ENGINE>

1. Remove the drain plug and gasket, and gasket to drain the transfer oil.
2. Install the drain plug and new gasket, and new gasket, then tighten them to the specified torque.
Tightening torque: 32 +- 2 N*m (24 +- 1 ft-lb)
3. Remove the filler plug and gasket, then fill the oil up to the lower edge of the filler plug hole.
Brand name: Hypoid gear oil API classification GL-5
SAE 90
Filling amount: 0.54 dm3 (0.57 qt)
4. Install the filler plug and new gasket, then tighten them to the specified torque.
Tightening torque: 32 +- 2 N*m (24 +- 1 ft-lb)
<3.0L ENGINE>
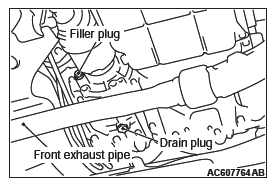
1. Remove the drain plug and gasket, to drain the transfer oil.
2. Install the drain plug and new gasket, and tighten to the specified torque.
Tightening torque: 32 +- 2 N*m (24 +- 1 ft-lb)
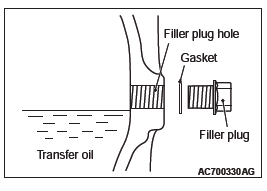
3. Remove the filler plug and gasket and fill the transfer oil up to the lower edge of the filler plug hole.
Brand name: Hypoid gear oil API classification GL-5
SAE 90
Filling amount: 0.53 dm3 (0.56 quarts)
4. Install the filler plug and new gasket and tighten to the specified torque.
Tightening torque: 32 +- 2 N*m (24 +- 1 ft-lb)
14. ENGINE COOLANT
CHANGE
Check the cooling system parts such as the radiator, heater and oil cooler hoses, thermostat and their connections for leakage and damage.
WARNING
When removing the radiator cap, use care to avoid contact with hot engine coolant or steam. Place a shop towel over the radiator cap and turn the radiator cap counterclockwise a little to let the pressure escape through the vinyl tube. After relieving the steam pressure, remove the radiator cap by slowly turning it counterclockwise.
1. Drain the engine coolant from the radiator, heater core and engine after unplugging the radiator drain plug and removing the radiator cap.
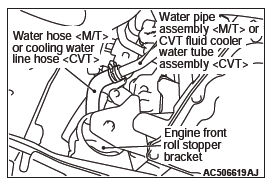
2. Disconnect the water hose <M/T> or cooling water line hose <CVT>, and drain the engine coolant in the water jacket.
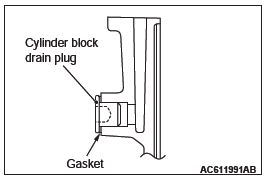
3. Drain the water in the water jacket by unplugging the drain plug of the cylinder block.
4. Remove the radiator condenser tank and drain the engine coolant.
5. Connect the water hose <M/T> or cooling water line hose <CVT>.
6. Replace the cylinder block drain plug gasket, and tighten the drain plug to the specified torque.
Tightening torque: 39 +- 3 N*m (29 +- 2 ft-lb)
7. Securely tighten the radiator drain plug.
8. Reinstall the radiator condenser tank.
CAUTION
Do not use alcohol or methanol anti-freeze or any engine coolants mixed with alcohol or methanol anti-freeze. The use of an improper anti-freeze can cause corrosion of the aluminum components.
9. Use special tool MB991871 to refill the engine coolant up to the top of the radiator port.
Recommended antifreeze: DIA QUEEN SUPER LONG LIFE COOLANT PREMIUM or equivalent*
*: similar high quality ethylene glycol based non-silicate, non-amine, non-nitrate and non-borate coolant with long life hybrid organic acid technology
Quantity: 7.5 dm3 (7.9 quarts)
[includes 0.65 dm3 (0.69 quarts) in the radiator condenser
tank]
NOTE: For how to use special tool MB991871, refer to its manufacturer's instructions.
10.Tighten the radiator cap securely.
11.Remove the radiator condenser tank cap, and add the engine coolant up to the "FULL" line.
12.Turn the A/C switch to OFF position to start the engine and warm up until the radiator fan operates.
NOTE: This work is to open the thermostat fully.
13.Rev the engine several times and then stop it. Check that there are no engine coolant leaks.
14.Remove the radiator cap with the engine cool, and then refill the engine coolant up to the top of the radiator port.
15.Tighten the radiator cap securely.
CAUTION
Do not overfill the radiator condenser tank.
16.Remove the radiator condenser tank cap, and add the engine coolant up to the "FULL" line.
15. COOLANT HOSES (RADIATOR HOSE, HEATER HOSE) (INSPECT)
Inspect the surface of radiator hoses and heater hoses for heat and mechanical damage. Hard and brittle rubber, cracking, tears, cuts, abrasions and excessive swelling indicate deterioration of the rubber.
16. DISK BRAKE PADS, ROTORS (INSPECT FOR WEAR)
BRAKE PAD CHECK
CAUTION
If there is a significant difference in thickness between the brake pads at right and left, check the sliding area and the runout of the brake disk.
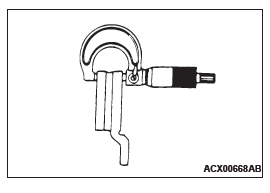
1. Visually check the thickness of brake pad from the inspection hole of the caliper body.
Standard value: 10.0 mm (0.39 inch)
Limit: 2.0 mm (0.08 inch)
2. If the brake pad thickness is less than the limit value, replace the brake pad.

BRAKE DISK THICKNESS CHECK
1. Using a micrometer, measure disk thickness at eight positions, approximately 45 degrees apart and 10 mm (0.4 inch) in from the outer edge of the disk.
Standard value:
26.0 mm (1.02 inch) <Front>
10.0 mm (0.39 inch) <Rear>
Limit:
24.4 mm (0.96 inch) <Front>
8.4 mm (0.33 inch) <Rear>
NOTE: Thickness variation (at least 8 positions) should not be more than 0.015 mm (0.0006 inch).
FRONT BRAKE DISK RUN-OUT CHECK AND CORRECTION
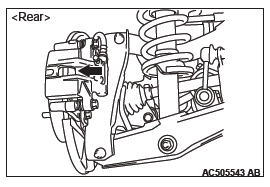
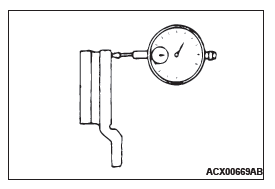
Place a dial gauge approximately 5 mm (0.2 inch) from the outer circumference of the brake disk, and measure the run-out of the disk.
Limit:
0.06 mm (0.0024 inch) <Front>
0.08 mm (0.0032 inch) <Rear>
17. BRAKE HOSES (CHECK FOR DETERIORATION OR LEAKS)
Inspection of brake hoses should be included in all brake service operations.
The hoses should be checked for:
1. Incorrect length, severe surface cracking, pulling, scuffing or worn spots. (If the fabric casing of the hoses is exposed by cracks or abrasion in the rubber hose cover, the hoses should be replaced. Eventual deterioration of the hose and possible bursting failure may occur).
2. Incorrect installation, twisting or interference with wheel, tire or chassis.
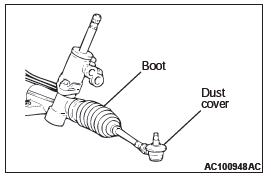
18. BALL JOINT AND STEERING LINKAGE SEALS (INSPECT FOR GREASE LEAKS AND DAMAGE)
1. These components, which are permanently lubricated at the factory, do not require periodic lubrication. Damaged seals and bellows should be replaced to prevent leakage or grease contamination.
2. Inspect the dust cover and bellows for proper sealing, leakage and damage, and replace them if defective.
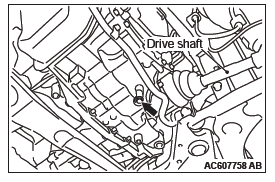
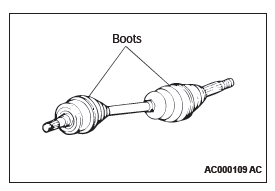
19. DRIVE SHAFT BOOTS (INSPECT FOR GREASE LEAKS AND DAMAGE)
1. These components, which are permanently lubricated at the factory, do not require periodic lubrication. Damaged seals and boots should be replaced to prevent leakage or grease contamination.
2. Inspect the boots for proper sealing, leakage and damage.
Replace them if defective.
20. SUSPENSION SYSTEM (INSPECT FOR LOOSENESS AND DAMAGE)
Visually inspect the front/rear suspension components for deterioration and damage. Re-tighten the front/rear suspension components retaining bolts to specified torque.
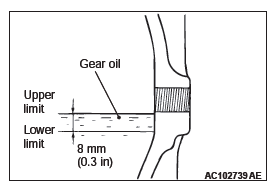
21. REAR AXLE OIL (CHECK OIL LEVEL)
1. Remove the filler plug.
2. Check that gear oil level is not 8 mm (0.3 inch) below the bottom of filler plug hole.
3. Tighten the filler plug to the specified torque.
Tightening torque: 32 +- 2 N*m (23 +- 2 ft-lb)
22. TIRES (ROTATE)
Rotate tires regularly to equalize tire wear and help extend tire life. Recommended tire rotation is every 12,000 km (7,500 miles).
Timing for the rotation may vary according to vehicle condition, road surface conditions, and individual driver's habits.
When rotating tires, check for uneven wear, damage, and wheel alignment. Abnormal wear is usually caused by incorrect tire pressure, improper wheel alignment, out-of balance wheels, or severe braking.
The first rotation is the most important, to achieve more uniform wear for all tires on the vehicle.
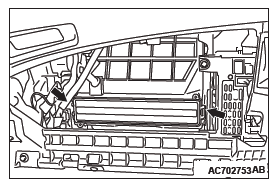
23. AIR FILTER (REPLACE)
1. Remove the glove box.
2. Loosen the two lugs as shown to replace the clean air filter.
3. Install the glove box.
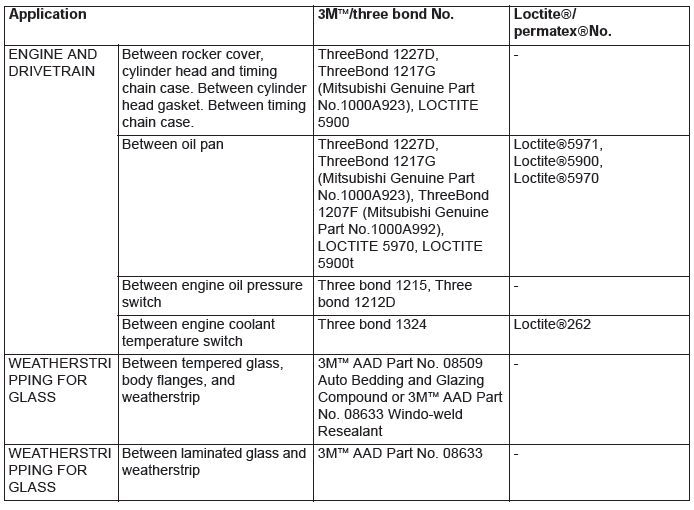
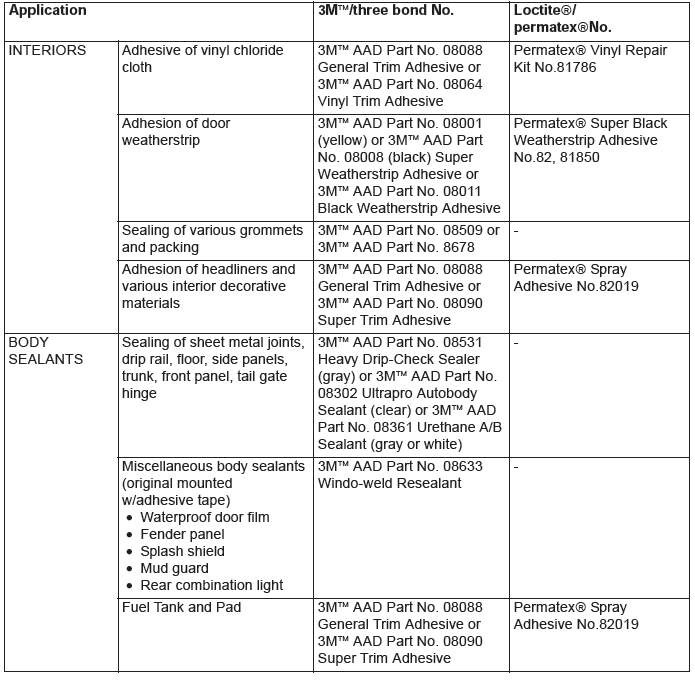
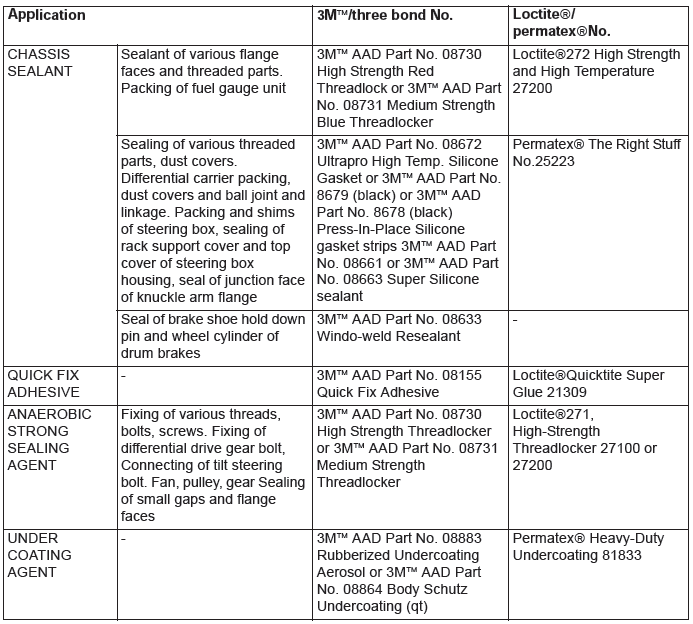
Main Sealant and Adhesive Table
READ NEXT:
 Harness Connector Inspection (Electrical)
CONNECTOR CONTINUITY AND VOLTAGE TEST
Required Special Tools:
MB991219: Test Harness Set
MD998459: Test Harness
Follow the steps below to avoid causing poor connector contact
and/or reduced waterp
How To Diagnose (Electrical)
HOW TO DIAGNOSE
The most important point in troubleshooting is to
determine "Probable Cause". Once the probable
causes are determined, parts to be checked can be
limited to those associated with such
SEE MORE:
Diagnosis
STANDARD FLOW OF DIAGNOSTIC
TROUBLESHOOTING
Refer to GROUP 00 − How to Use Troubleshooting/Inspection
Service Points, Contents of Troubleshooting.
DIAGNOSTIC FUNCTION
HOW TO CONNECT THE SCAN TOOL (M.U.T.-III)
Required Special Tools:
MB991958: Scan Tool (M.U.T.-III Sub Assembly)
MB991824:
Symptom Procedures
Inspection Procedure 1: None of headlights (low-beam) illuminates.
CAUTION
Whenever the ECU is replaced, ensure that the
power supply circuit, the ground circuit and the
communication circuit are normal.
Headlight Relay (Low-Beam) Circuit <Halogen Type>
Headlight Relay (Low-Beam) Circuit <
