Mitsubishi Outlander: Child restraint
When transporting children in your vehicle, some type of child restraint system should always be used according to the size of the child. This is required by law in most countries.
The regulations concerning driving with children in the front seat may differ from country to country. You are advised to comply with the relevant regulations.
WARNING:
● When possible, put children in the rear seat. Accident statistics indicate that children of all sizes and ages are safer when properly restrained in the rear seat rather than in the front seat.
● Holding a child in your arms is no substitute for a restraint system. Failure to use a proper restraint system can result in severe or fatal injury to your child.
● Each child restraint device or fixing is to be used only by one child.
● When attaching a child restraint to the rear seat, place the front seatbacks in the upright position.
Otherwise, the child could be seriously injured in the event of hard braking or a collision.
Caution for installing the child restraint on vehicle with front passenger airbag

The label shown here is attached on vehicles with front passenger airbag.
WARNING:
● Extreme hazard! Do not use a rearward facing child restraint on a seat protected by an airbag in front of it!

Use rearward facing child restraints in the rear seat or turn off the front passenger’s airbag ON-OFF switch (refer to “To turn an airbag off”).
WARNING:
● A REARWARD FACING CHILD RESTRAINT must NOT be used in the front passenger seat if the front passenger’s airbag has not been deactivated.
The force of an inflating airbag could kill or cause serious injuries to the child. A rearward facing child restraint should be used in the rear seat.
● A REARWARD FACING CHILD RESTRAINT should be used in the rear seat whenever possible; if used in the front seat, adjust the seat to the most rearward position.

Infants and small children
When transporting infants and small children in your vehicle, follow the instruction given below.

Instruction:
● For small infants, an infant carrier should be used. For small children whose height when seated allows the shoulder belt to lie in contact with the face or the throat, a child seat should be used.
● The child restraint system should be appropriate for your child’s weight and height and properly fit the vehicle. For a higher degree of safety: THE CHILD RESTRAINT SYSTEM SHOULD BE INSTALLED IN THE REAR SEAT.
NOTE:
● Before purchasing a child restraint system, try installing it in the rear seat to make sure there is a good fit. Because of the location of the seat belt buckles and the shape of the seat cushion, it may be difficult to securely install some manufacturer’s child restraint systems.
If the child restraint system can be pulled forward or to either side easily on the seat cushion after the seat belt has been tightened, choose another manufacturer’s child restraint system.
WARNING:
● When installing a child restraint system, refer to the instructions provided by the manufacturer of the restraint system. Failure to do so can result in severe or fatal injury to your child.
● After installation, push and pull the child restraint system back and forth, and side to side, to see that it is positively secured. If the child restraint system is not installed securely, it may cause injury to the child or other occupants in the case of accident or sudden stops.
● When the child restraint system is not in use, keep your child restraint system secured with the seat belt or remove it from the vehicle in order to prevent it from being thrown around inside the vehicle during an accident.
Depending on the seating position in the vehicle and the child restraint system that you have, the child restraint can be attached using one of the following two locations:
• To the lower anchorage in the rear seat ONLY if the child restraint has ISOFIX mountings (see page 2-59).
• To the seat belt. See pages 2-33, 2-51.
Older children
Children who have outgrown the child restraint system should be seated in the rear seat and wear combination lap shoulder belt.
The lap portion of the belt should be snug and positioned low on the abdomen so that it is below the top of the hip-bone. Otherwise, the belt could intrude into the child’s abdomen during an accident and cause injury.
Suitability for various ISOFIX positions

Key of letters to be inserted in the above table:
● IUF- Suitable for ISOFIX forward child restraints systems of universal category approved for use in the mass group.
● IL- Suitable for particular ISOFIX child restraint systems (CRS) given in the attached list.
These ISOFIX CRS are those of the “specific vehicle”, “restricted” or “semiuniversal” categories.
● X- ISOFIX position not suitable for ISOFIX child restraint systems in this mass group and/or this size class.
IL (Genuine part information)

NOTE:
● MITSUBISHI MOTORS Europe B.V. reserves the right to changes without any prior announcement.
For detail information, consult your MITSUBISHI MOTORS Authorised Service Point.

1: With front passenger’s airbag deactivated by means of front passenger’s airbag ON-OFF switch
Key of letters to be inserted in the above table:
● U- Suitable for “universal” category restraints approved for use in this mass group.
● UF- Suitable for forward-facing “universal” category restraints approved for use in this mass group.
● L- Suitable for particular child restraints (MITSUBISHI MOTORS genuine parts).
● B- Built-in restraint approved for this mass group.
● X- Seat position not suitable for children in this mass group.
L (Genuine part information)

NOTE:
● There is no applicable MITSUBISHI MOTORS Genuine Parts to the Mass Group “0-Up to 10 kg”.
For detail information, consult your MITSUBISHI MOTORS Authorised service point.
Installing a child restraint system to the lower anchorage (ISOFIX child restraint mountings) and tether anchorage
Lower anchorage location

Your vehicle’s rear seat is fitted with lower anchorages for attaching a child restraint system with ISOFIX mountings.
Tether anchorage locations

There are 3 child restraint anchorage points located on the back of the rear seatbacks. These are for fastening the child restraint tether straps to the 3 second seat seating positions.
WARNING:
● Child restraint anchorages are designed to withstand only those loads imposed by correctly fitted child restraints. Under no circumstances are they to be used for adult seat belts, or harnesses, or for attaching other items or equipment to the vehicle.
Child restraint system with ISOFIX mountings
The child restraint system is designed only for seats that incorporate lower anchorages. Retain the child restraint system using the lower anchorages.
It is not necessary to retain the child restraint system using the vehicle’s seatbelts.

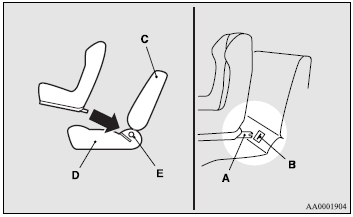
A: Child restraint system connectors
To install
1. Remove any foreign material in or around the connectors and ensure the vehicle seat belt is in its normal storage position.
2. Insert the child restraint system’s connectors (A) into the slits (B) in accordance with the instructions provided by the child restraint system manufacturer.

A: Connector.
B: Slit.
C: Vehicle seatback.
D: Vehicle seat cushion.
E: Lower anchorage.

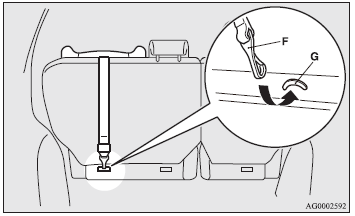
3. Remove the head restraint from the location in which you wish to install a child restraint.
4. Latch the tether strap hook (F) of the child seat to the tether anchor bar (G) and tighten the top tether strap hook so it is securely fastened.
5. Push and pull the child restraint in all directions to be sure it is secure.
To remove
Remove the child restraint system in accordance with the instructions provided by the child restraint system manufacturer.
Installing a child restraint system to a 3-point type seat belt (with emergency locking mechanism)

Installation:
1. Fasten the seat belt to secure the child restraint system.
Make sure you hear a “click” when you insert the latch plate in the buckle.
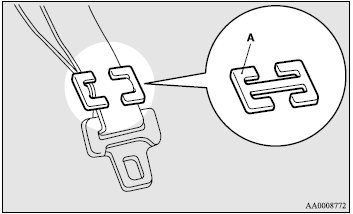
2. Use the locking clip to completely eliminate any slackness.
3. Push and pull the child restraint in all directions to be sure it is secure.
WARNING:
● For some types of child restraint, the locking clip (A) should be used to help avoid personal injury during a collision or sudden manoeuvre.
It must be fitted and used in accordance with the child restraint manufacturer’s instructions.
The locking clip must be removed when the child restraint is removed.


