Mitsubishi Outlander: Compressor Assembly
REMOVAL AND INSTALLATION
Pre-removal Operation
- Refrigerant Discharging
- Front bumper under cover
- Front under cover RH
- Drive belt removal <2.4L>
- Drive belt removal <3.0L>
Post-installation Operation
- Drive belt installation <2.4L>
- Drive belt installation <3.0L>
- Drive belt tension adjustment <2.4L>
- Drive belt tension adjustment <3.0L>
- Refrigerant Charging
- Front bumper under cover
- Front under cover RH
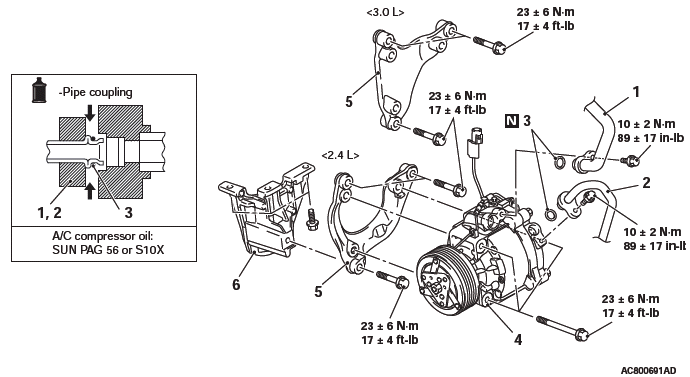
Removal steps
- Flexible suction hose connection
- Flexible discharge hose connection
- O-ring
- A/C compressor and clutch assembly
- A/C compressor bracket A
- A/C compressor bracket B
NOTE: The service points which are not described are the same as before.
REMOVAL SERVICE POINTS
FLEXIBLE DISCHARGE HOSE / FLEXIBLE SUCTION HOSE DISCONNECTION
CAUTION As the compressor oil and receiver are highly moisture absorbent, use a non-porous material to plug the hose and nipples.
To prevent the entry of dust or other foreign bodies, plug the dismantled hoses and compressor nipples.
A/C COMPRESSOR REMOVAL
Take care not to spill any compressor oil when removing the compressor.
INSTALLATION SERVICE POINT
A/C COMPRESSOR AND CLUTCH ASSEMBLY INSTALLATION
If a new compressor is installed, first adjust the amount of oil according to the procedures described below, and then install the compressor.
1. Measure the amount [X cm3 (X fl.oz) of oil within the removed compressor.
2. Drain (from the new compressor) the amount of oil calculated according to the following formula, and then install the new compressor.
New compressor oil amount = 70cm3 (2.4 fl.oz)
70 cm3 − X cm3 = Y cm3 (2.4 fl.oz. − X fl.oz. = Y fl.oz)
NOTE: Y cm3 (Y fl.oz) indicates the amount of oil in the refrigerant line, the condenser, the evaporator, etc.
NOTE: When replacing the following parts at the same times as the compressor, subtract the rated oil amount of each part from Y cm3 (Y fl.oz) and discharge from the new compressor.
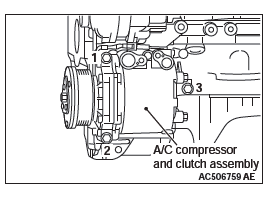
3. Tighten A/C compressor and clutch assembly mounting bolts to the specified torque in the order of number shown in the figure.
Tightening torque: 23 +- 6 N*m
INSPECTION
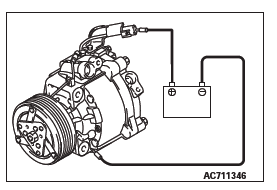
A/C COMPRESSOR CLUTCH OPERATION CHECK
Connect the compressor connector terminal to the battery positive (+) terminal and ground the battery's negative (-) terminal to the compressor unit. At that time, the A/C compressor clutch should make a definite operating sound.
DISASSEMBLY AND REASSEMBLY
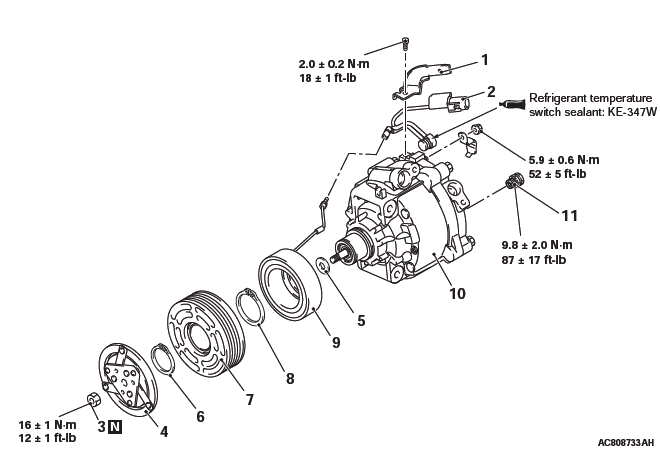
A/C refrigerant temperature switch disassembly steps
- A/C refrigerant temperature switch
- Bracket
A/C compressor clutch disassembly steps
- Air gap adjustment
- Self-locking nut
- Armature
- Shim
- Snap ring
- Rotor
- Snap ring
- Field core
- A/C compressor
- A/C compressor high pressure relief valve
NOTE: The service points which are not described are the same as before.
DISASSEMBLY SERVICE POINT
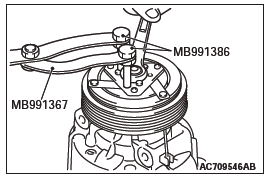
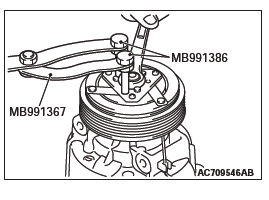
SELF-LOCKING NUT REMOVAL
Use special tools MB991367 and MB991386 to hold the A/C compressor, and remove the nut.
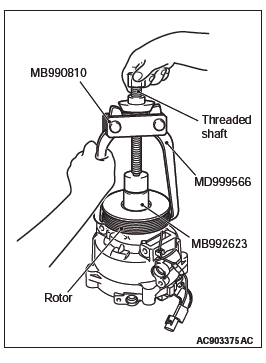
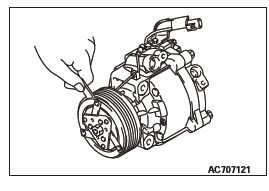
ROTOR REMOVAL
CAUTION
- Be sure to use the guide (MB992623) when the side bearing puller (MB990810) are used to prevent the damage of A/C compressor.
- If the threaded shaft of side bearing puller (MB990810)
is turned than necessary, the rotor may be distorted.
Therefore, turn the threaded shaft lightly only by hand without using any tools.
Rotor can be removed by hand, but if it is difficult to remove it, use the guide (MB992623) and the side bearing puller (MB990810) as shown.
ASSEMBLY SERVICE POINTS
A/C COMPRESSOR HIGH PRESSURE RELIEF VALVE INSTALLATION
CAUTION Be careful not to damage the O-ring when installing the high-pressure relief valve. Apply the specified refrigerating machine oil the high-pressure relief valve mounting hole before installation
Check that O-ring is installed to the high-pressure relief and use the adjust torque wrench to install the high-pressure relief valve to the main body of the compressor.
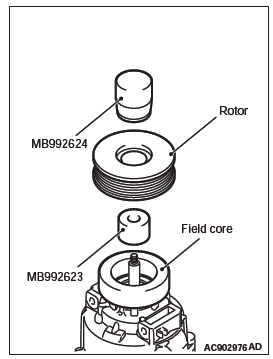
FIELD CORE ATTACHMENT
Line up the pin hole on the compressor unit with the field core projection and attach.

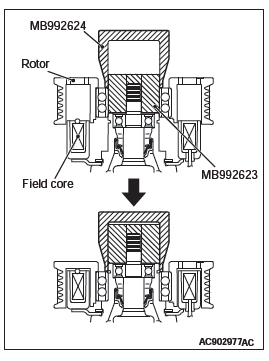
ROTOR INSTALLATION
CAUTION If the outer wheel side of the rotor is pushed, an abnormal noise can be generated because the inside of the rotor is damaged, therefore, always push the inner wheel side.
Install the rotor while pushing the inner wheel side slowly using the pusher (MB992624) and the guide (MB992623).
NOTE: Insert the rotor in a direction perpendicular to the A/C compressor.
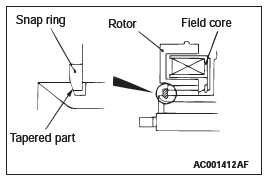
SNAP RING INSTALLATION
Using snap ring pliers, fit the snap ring so that the snap ring's tapered part is on the outside.
SNAP RING INSTALLATION
Using snap ring pliers, fit the snap ring so that the snap ring's tapered part is on the outside.
AIR GAP ADJUSTMENT
Check whether or not the air gap of the clutch is within the standard value.
Standard value: 0.25 − 0.45 mm (0.010 − 0.017 inch)
NOTE: If there is a deviation of the air gap from the standard value, make the necessary adjustment by adjusting the number of shims.
INSPECTION
A/C REFRIGERANT TEMPERATURE SWITCH
CAUTION Do not heat more than necessary.
1. Dip the metal part of the A/C refrigerant temperature switch into engine oil and increase the oil temperature using a gas burner or similar.
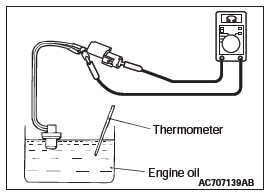
2. When the oil temperature reaches the standard value, check that voltage is supplied between the terminals.
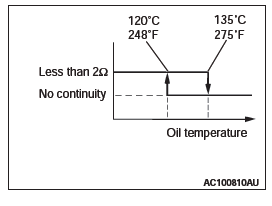
Standard value:
NOTE: When the oil temperature is 135ºC (275ºF) or more and there is no continuity, the resistance will not be 2Ω or lower until the oil temperature reduces to 120ºC (248ºF) or less.
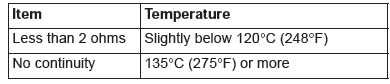
Condenser Assembly
REMOVAL AND INSTALLATION
Pre-removal and Post-installation Operation
- Refrigerant Draining and Refilling
- Air Duct Removal and Installation
Condenser removal steps
- Flexible discharge hose connection
- Liquid pipe A connection
- O-ring
- Condenser assembly
REMOVAL SERVICE POINTS
FLEXIBLE DISCHARGE HOSE AND LIQUID PIPE A DISCONNECTION
CAUTION As the compressor oil and receiver are highly moisture absorbent, use a non-porous material to plug the hose and nipples.
To prevent the entry of dust or other foreign bodies, plug the dismantled hose and condenser assembly nipples.
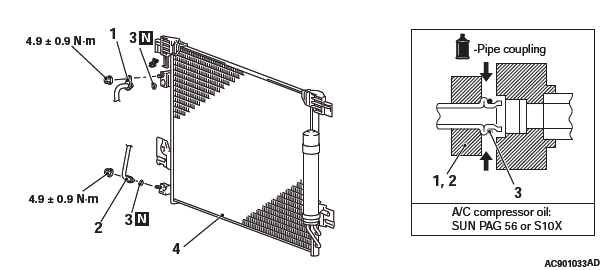
Refrigerant Line
REMOVAL AND INSTALLATION
Pre-removal and Post-installation Operation
- Refrigerant Draining and Refilling
Removal steps
- A/C pressure sensor
- Discharge flexible hose
- Liquid pipe A
- Suction flexible hose
- Liquid pipe B
- Expansion valve
- O-ring
REMOVAL SERVICE POINT
HOSE AND PIPE REMOVAL
CAUTION As the compressor oil and receiver are highly moisture absorbent, use a non-porous material to plug the hose and nipples.
To prevent the entry of dust or other foreign bodies, plug the dismantled hose and condenser assembly nipples.
Ducts
REMOVAL AND INSTALLATION
CAUTION
- For the removal of the front passenger's air bag module, refer to GROUP 52B − Service Precautions, Driver's and Front Passenger's Air Bag Module, and Clock Spring before operation.
- Do not subject SRS-ECU to any shocks when removing or installing the instrument panel.
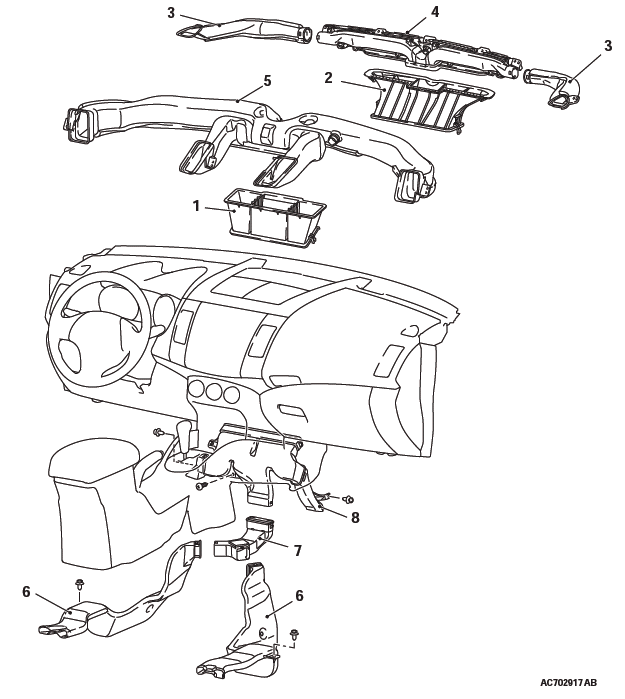
Removal steps for rear center duct, front center duct, side defroster duct, defroster nozzle, ventilation air distribution duct
- Instrument panel assembly
- Rear center duct
- Front center duct
- Side defroster duct
- Defroster nozzle
- Ventilation air distribution duct
Rear heater duct removal steps
- Front scuff plate inner and cowl side trim
- Selector lever, selector lever panel, glove box, lower panel, console side cover and center console
- Front seat assembly
- Rear heater duct B
- Rear heater duct A
Foot duct removal steps
- Heater unit and blower assembly
- Foot duct
Ventilators
REMOVAL AND INSTALLATION
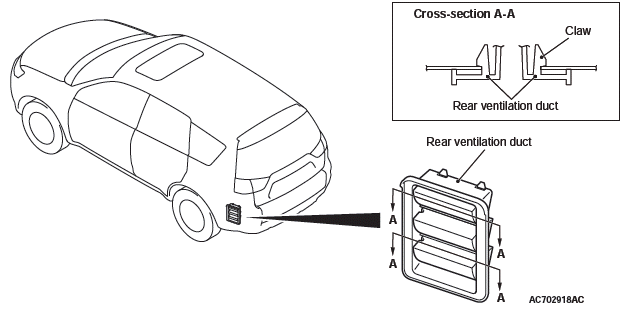
Rear ventilation duct removal steps
- Rear bumper assembly
- Rear ventilation duct
READ NEXT:
 Automatic Air Conditioning
General Information
The blower, heater, and evaporator have been integrated
with the heater and A/C system to achieve
greater fan power and noise reduction.
SAFETY PRECAUTIONS
WARNING
Wear safety gog
SEE MORE:
Cup holder
CAUTION:
● Do not drink beverages while driving. This is distracting and could cause an
accident.
For the driver’s seat
There is a built-in cup holder in the instrument panel on the driver’s side.
Pressing the centre of the lid causes the tray to pop out a little.
Pull it out comp
Reduction Gear
DISASSEMBLY AND ASSEMBLY
Nut
Reduction gear bearing
Reduction gear bearing
Reduction gear sub-assembly
Adjusting shim
Required special tools:
MB990810: Side bearing puller
MB990947: Lower arm push arbor
MD999566: Crow
MB990984: Mount bushing lower roll insulator
arbor
MD998917: Bearin
