Mitsubishi Outlander: Digital clock
Automatic mode and manual mode is available for digital clock adjustment:
Select the automatic mode or the manual mode by performing the following operations:
1. Press the PWR switch (A) to turn ON the audio system.
2. Enter the function setup mode by pressing the TUNE switch (B) for 2 seconds or longer.
3. Press the TUNE switch (B) repeatedly to select the CT (Clock Time) mode.
The order is: AF → CT → REG → TP-S → Language of PTY display → SCV → PHONE → Function setup mode OFF (refer to “Function setup mode”, 5-52).
NOTE:
● Although “PHONE” appear on the display, the PHONE function is inoperative.
4. Turn the TUNE switch (B) left and right and select either ON or OFF.
CT ON- Automatic mode.
CT OFF- Manual mode.
NOTE:
● After selecting a mode, you can leave the function setup mode by taking either of the following steps:
• Press the TUNE switch (B) for at least 2 seconds.
• Make no entry for 10 seconds.
Automatic mode
The automatic mode can set the local time automatically by using the signal from the local RDS stations. In this mode, CT (A) is shown in the display. Refer to “Radio data system (RDS)”, 5-46.
Manual mode
The manual mode is also available in case the “Automatic mode” shows the incorrect time when the adjacent local RDS stations are located in a different time zone. Refer to “Radio data system (RDS)”, 5-46.
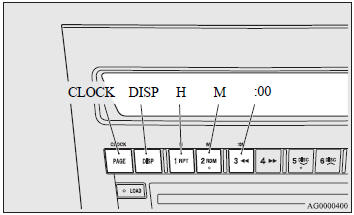
Set the time by pressing the various buttons as described below.
1. Keep the CLOCK button pressed until the time display flashes.
2. Press the appropriate buttons to adjust the time.
3. Once the time is set, press the “DISP” button, and the time display will stop flashing.
When a time adjustment has been made, the flashing stops automatically.
NOTE:
● If the battery cables are disconnected during repairs or for any other reason, reset the clock to the correct time after they are reconnected.
● The digital clock does not have a second display. When the “minute” display is adjusted and reset to zero, the clock begins at zero seconds for the selected minute.
“H” button - To adjust the hour.
“M” button - To adjust the minutes.
“:00” button - To reset the minutes to zero.
10:01 - 10:29...... Changes to 10:00.
10:30 - 10:59...... Changes to 11:00.
READ NEXT:
 Hands-free Bluetooth® cellular phoneinterface system with voice recognition
The Hands-free Bluetooth® cellular phone interface system with voice recognition
uses a wireless communication technology known as Bluetooth® to allow you to make
hands-free calls in your vehicl
Sun visors
1- To eliminate front glare 2- To eliminate side glare.
Card holder
Cards can be slipped into the front (A) of the vanity mirror lid.
Vanity mirror
The vanity mirrors are located on the back of the sun visor.
SEE MORE:
Door Diagnosis
INTRODUCTION TO GLASS AND DOOR DIAGNOSIS
Glass and door faults include water leaks and
improper opening and closing. Causes for these
faults can include faults in the glass, weatherstrip,
drain hole or door installation.
GLASS AND DOOR DIAGNOSTIC TROUBLESHOOTING STRATEGY
Use these steps to plan you
DTC B1000, B1003, B1018, B1021, B1031, B1032, B1034, B1035, B1079,
B2214, B223B
DTC B1000: Control Panel Communication Error
DTC SET CONDITION
DTC B1000 will be set when the communication
between A/C-ECU and A/C control panel cannot be
performed.
TECHNICAL DESCRIPTION (COMMENT)
Current trouble
The A/C-ECU, the A/C control panel, or connector(
s) or wiring between the two m
