Mitsubishi Outlander: Shock Absorber Assembly
REMOVAL AND INSTALLATION
CAUTION
- The parts indicated by *1 should be temporarily tightened, and then fully tightened with the vehicle standing on the ground and the curb weight condition.
- The parts indicated by *2 are the bolts/nuts with friction coefficient stabilizer. In removal, ensure there is no damage, clean dust and soiling from the bearing and thread surfaces, and tighten them to the specified torque.
Pre-removal operation
- Quarter Trim Removal
Post-installation operation
- Using your fingers, press the Ball Joint Dust Cover to check for a crack or damage.
- Quarter Trim Installation
<2.4L Engine: 5 persons seat>
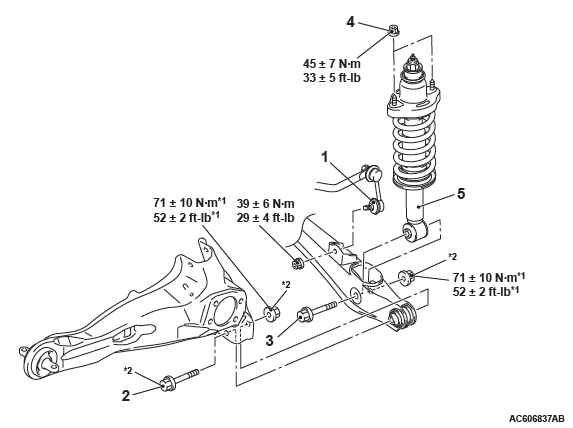
Removal steps
- Stabilizer link connection
- Lower arm and trailing arm connection
- Shock absorber and lower arm connection
- Shock absorber mounting nut
- Shock absorber assembly
<2.4L ENGINE: 7 persons seat, 3.0L ENGINE>
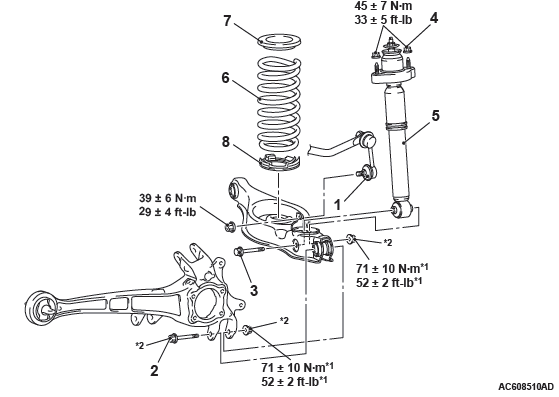
Shock absorber removal steps
- Stabilizer link connection
- Lower arm and trailing arm connection
- Shock absorber and lower arm connection
- Shock absorber mounting nut
- Shock absorber assembly
Coil spring removal steps
- Stabilizer link connection
- Lower arm and trailing arm connection
- Shock absorber and lower arm connection
- Coil spring
- Coil spring upper pad
- Coil spring lower pad
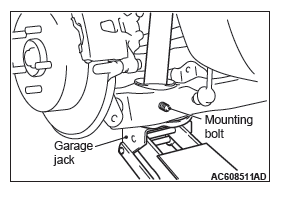
REMOVAL SERVICE POINT
LOWER ARM AND TRAILING ARM/SHOCK ABSORBER AND LOWER ARM DISCONNECTION
While jacking-up the lower arm with the garage jack, remove the mounting bolts.
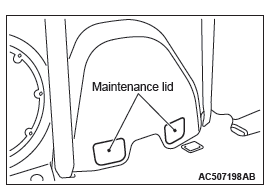
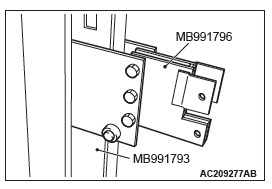
SHOCK ABSORBER MOUNTING NUT REMOVAL
Remove the maintenance lid as shown in the figure, and then remove the shock absorber mounting nut.
INSTALLATION SERVICE POINT
SHOCK ABSORBER ASSEMBLY INSTALLATION
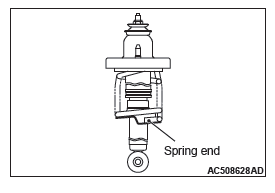
Install the shock absorber assembly so that the coil spring end faces the rear of the vehicle.
INSPECTION
- Check the rubber parts for cracks and wear.
- Check the shock absorber for malfunctions, oil leakage, or abnormal noise.
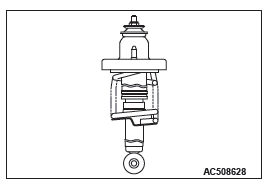
DISASSEMBLY AND ASSEMBLY <2.4L ENGINE: 5 PERSONS SEAT>
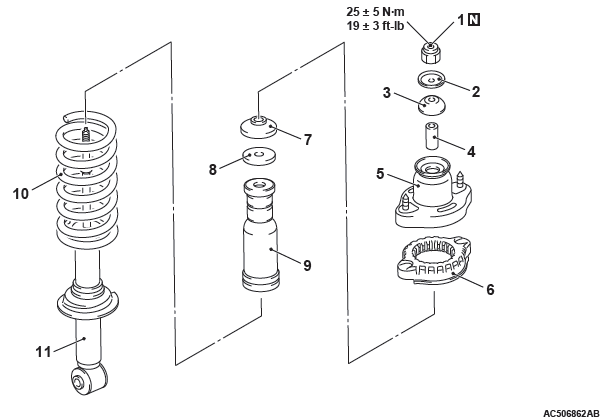
Disassembly steps
- Self-locking nut
- Washer
- Bushing B
- Collar
- Spring upper bracket assembly
- Spring upper pad
- Bushing A
- Plate
- Bump rubber
- Coil spring
- Shock absorber
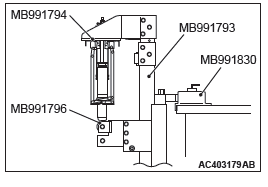
Required Special Tools:
- MB991793: Spring compressor
- MB991796: Attachment B
- MB991794: Upper plate
- MB991830: Fixture
DISASSEMBLY SERVICE POINTS
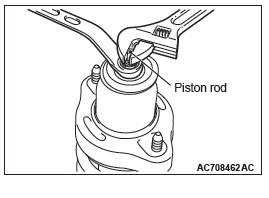
SELF-LOCKING NUT REMOVAL
CAUTION The locking nut for the piston rod inside the shock absorber may be loose. Do not use an impact wrench to loosen the self-locking nut.
1. Install the special tool MB991796 to the special tool MB991793 as shown in the figure.
2. Set the strut assembly to special tools: MB991793, MB991796, MB991794 and MB991830.
NOTE: Use the bolts and nuts removed from the vehicle to secure the shock absorber assembly and tighten them lightly by hand.
3. After setting the shock absorber assembly, operate the spring compressor and compress the coil spring by approximately 5 mm (0.20 in).
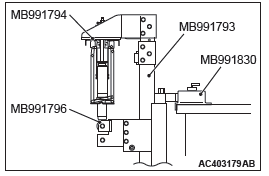
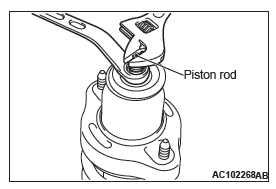
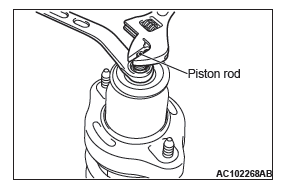
4. While holding the piston rod as shown in the figure, remove the self-locking nut.
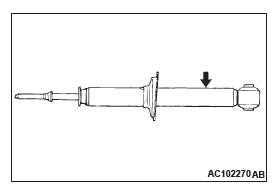
SHOCK ABSORBER DISPOSAL PROCEDURES
CAUTION Wear the protective glasses. Although the gas is harmless, drilling chips may be blown out by the gas.
Before disposal of the shock absorber, place the shock absorber on the level surface with the piston rod extended, and make a hole of approximately 3 mm (0.12 in) in diameter at the point shown in the figure to discharge the gas.
ASSEMBLY SERVICE POINTS
COIL SPRING INSTALLATION
1. Install the coil spring end as shown in the figure, so that it should face the vehicle rearward
2. Set the shock absorber to special tools: MB991793, MB991796, MB991794 and MB991830, and slowly compress the coil spring while guiding the shock absorber piston rod through the hole on the upper spring bracket by hand:
NOTE: Use the bolts and nuts removed from the vehicle to secure the shock absorber assembly and tighten them lightly by hand.
SELF-LOCKING NUT INSTALLATION
CAUTION The locking nut for the piston rod inside the shock absorber may be loose. Do not use an impact wrench to tighten the self-locking nut.
Counter the piston rod of the shock absorber as shown in the figure, and tighten the self-locking nut to the specified torque.
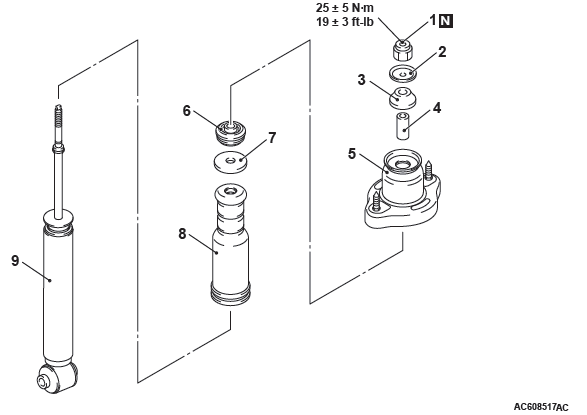
Tightening torque: 25 +- 5 N*m (19 +- 3 ft-lb)
DISASSEMBLY AND ASSEMBLY <2.4L ENGINE: 7 PERSONS SEAT, 3.0L ENGINE>
Disassembly steps
- Self-locking nut
- Washer
- Bushing B
- Collar
- Spring upper bracket assembly
- Bushing A
- Plate
- Bump rubber
- Shock absorber
DISASSEMBLY SERVICE POINT
SELF-LOCKING NUT REMOVAL
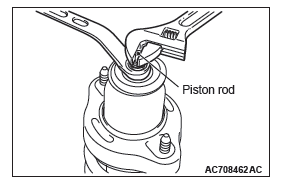
Counter the piston rod of the shock absorber as shown in the figure to remove the self-locking nut.
ASSEMBLY SERVICE POINT
SELF-LOCKING NUT INSTALLATION
CAUTION The locking nut for the piston rod inside the shock absorber may be loose. Do not use an impact wrench to tighten the self-locking nut.
Counter the piston rod of the shock absorber as shown in the figure, and tighten the self-locking nut to the specified torque.
Tightening torque: 25 +- 5 N*m (19 +- 3 ft-lb)
READ NEXT:
 Stabilizer Bar
REMOVAL AND INSTALLATION
<2.4L Engine: 5 persons seat>
<2.4L Engine: 7 persons seat, 3.0L Engine>
Removal steps
Stabilizer link
Stabilizer bracket
Bushing
Rear differential
Front Axle
General Information
For the front axle, the unit ball bearing (double-row
angular contact ball bearing) with an integral oil seal
is used as a wheel bearing, and EBJ-PTJ type constant
velocity joint a
Front Axle Diagnosis
TROUBLESHOOTING STRATEGY
Use these steps to plan your diagnostic strategy. If
you follow them carefully, you will be sure that you
have exhausted most of the possible ways to find a
front axle fault.
SEE MORE:
Dead Lock System
The Dead Lock System helps to prevent theft. When the keyless entry system has
been used to lock all of the doors and the tailgate, the Dead Lock System makes
it impossible to unlock the doors using the inside lock knobs.
CAUTION:
● Do not set the Dead Lock system when someone is inside
Wheel and Tire
Specifications
The wheels and tires of the following specifications
have been established.
SPECIFICATIONS
ROAD WHEEL AND TIRE
<EXCEPT FOR CANADA>
<VEHICLES FOR CANADA>
SPARE WHEEL AND TIRE
NOTE: The * mark indicates optional item.
NOTE: PCD (Pitch Circle Diameter) indicates the pitch
