
Tire Pressure Monitoring System [TPMS]
The Mitsubishi Outlander is equipped with a Tire Pressure Monitoring System [TPMS] that monitors the inflation pressure of all tires. If the low tire pressure warning light illuminates and the "Tire Pressure Low - Add Air" message appears in the multi-information display, one or more tires are significantly under-inflated. When the vehicle is driven with low tire pressure, the TPMS activates the warning light to alert the driver. The system operates when vehicle speed exceeds approximately 16 MPH (25 km/h).
WARNING
- If the low tire pressure warning light illuminates while driving, avoid sudden steering inputs and hard braking. Reduce vehicle speed, move off the road to a safe location, and stop the Mitsubishi Outlander as soon as possible.
Driving with significantly under-inflated tires can permanently damage the tires and increase the risk of tire failure. This may also cause serious vehicle damage, contribute to a collision, and result in serious personal injury. Check the inflation pressure of all four tires and adjust each tire to the recommended COLD tire pressure specified on the Tire and Loading Information placard. After the correct pressure has been restored, the low tire pressure warning light should turn off. If the warning light remains illuminated or comes on again while driving, a tire may be flat or the TPMS may have a malfunction. If a tire is punctured, use the tire repair kit when appropriate. If no tire is flat and all four tires are correctly inflated, it is recommended that you have the system checked by an authorized Mitsubishi Motors dealer.
- If a wheel without a compatible TPMS sensor is installed, the Tire Pressure Monitoring System will not operate correctly. The low tire pressure warning light will flash for approximately 1 minute and then remain illuminated. Have the tire and wheel installation corrected and/or the TPMS reset as soon as possible. It is recommended that you visit an authorized Mitsubishi Motors dealer for these services.
- Do not inject liquid tire repair products or aerosol sealants into the tires except for the sealant supplied with the genuine tire repair kit. Other sealants may damage or cause a malfunction of the tire pressure sensors.
Tire repair kit
The tire repair kit can be used to make a temporary repair to a minor puncture in the tire tread caused by a nail, screw, or similar object.
WARNING
- The tire repair kit provides only a temporary repair and may not permanently seal a punctured tire. Have the damaged tire professionally inspected and repaired as soon as possible.
- Using the tire repair kit may damage the wheel and/or the tire inflation pressure sensor. After the repair kit has been used, the Mitsubishi Outlander should be inspected and repaired promptly by an authorized Mitsubishi Motors dealer.
- Use only the Mitsubishi Motors genuine tire repair kit. Sealants supplied with other repair kits may not adequately seal the puncture or may not be compatible with the vehicle's tire pressure monitoring components.
Storage
The tire repair kit is stored beneath the luggage floor board in the luggage compartment of the Mitsubishi Outlander.
Become familiar with the location of the tire repair kit in advance so it can be accessed quickly if a tire emergency occurs.
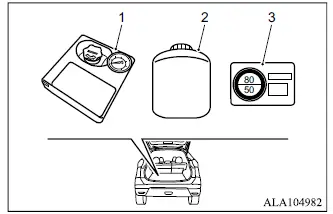
- Tire compressor*
- Tire sealant bottle
- Speed restriction sticker
*: The shape and appearance of the compressor may vary depending on the Mitsubishi Outlander model.
How to use the tire repair kit
WARNING
- Do not use the tire repair kit under any of the conditions listed below because the tire cannot be safely repaired using the kit. If any of these situations applies, contact an authorized Mitsubishi Motors dealer or other appropriate roadside assistance service.
- More than one tire is punctured.
- The puncture opening is 1/7 inch (4 mm) or greater in either length or width.
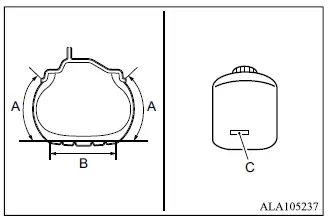
- The damage is located in the tire sidewall (A) rather than in the tread area (B).
- The Mitsubishi Outlander has been driven while the tire was almost completely flat.
- The tire has separated from the wheel rim or slipped completely off the wheel.
- The wheel itself is damaged.
- The tire has a bulge, cut, crack, or other significant structural damage.
- The expiration date of the tire sealant has passed. The expiration date is printed on bottle label (C).
- The ambient temperature is below -22 ºF (-30 ºC) or above 140 ºF (60 ºC).
- Tire sealant can be harmful if swallowed. If it is accidentally swallowed, drink as much water as possible and seek medical attention immediately.
- If tire sealant comes into contact with the eyes or skin, rinse the affected area thoroughly with plenty of water. If irritation, pain, or any other abnormal condition remains, seek medical attention.
- Seek medical attention immediately if an allergic reaction occurs after contact with the tire sealant.
- Keep the tire sealant out of the reach of children and do not allow children to handle it.
CAUTION
- If tire sealant gets onto the body of the Mitsubishi Outlander, wipe it off immediately with a clean, damp cloth to help prevent staining or surface damage.
- Wash any clothing contaminated with tire sealant as soon as possible. The sealant may permanently stain or damage fabric if it is allowed to remain.
NOTE
- Do not remove a nail, screw, or other object that has penetrated the punctured tire before using the tire repair kit.
- Move the Mitsubishi Outlander so that the tire valve is positioned away from the point where the tire contacts the ground. If the valve is too close to the ground-contact area, the sealant may have difficulty flowing into the tire properly.
- Check the expiration date of the tire sealant regularly and replace the bottle before it expires. It is recommended that replacement sealant be obtained from an authorized Mitsubishi Motors dealer.
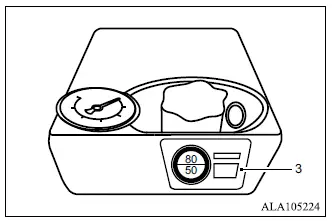
1. Remove speed restriction sticker (3) from the tire compressor.
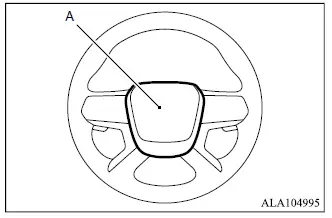
2. Attach speed restriction sticker (A) to the three-diamond mark on the steering wheel so that the temporary driving restriction remains clearly visible to the driver.
CAUTION
- Do not place the speed restriction sticker anywhere other than the specified position on the steering wheel pad. Installing it in an incorrect location could interfere with normal SRS airbag operation.
3. Remove hose 1 and power plug 2 from the tire compressor. Then remove the cap from the compressor bottle holder.
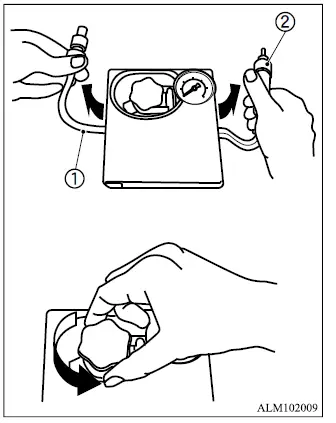
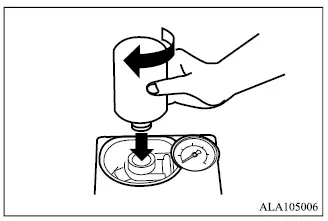
4. Remove the cap from the tire sealant bottle and screw the bottle clockwise onto the bottle holder. Leave the bottle seal intact while installing it.
As the sealant bottle is tightened onto the holder, the bottle seal is automatically pierced so the sealant can enter the compressor system.
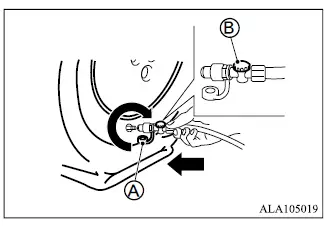
5. Remove the valve cap from the punctured tire.
6. Remove protective cap A from the compressor hose and screw the hose securely onto the tire valve. Confirm that pressure release valve B is fully tightened. Make sure the tire compressor switch is in the OFF ( ○ ) position, then connect the compressor power plug to the vehicle's power outlet.
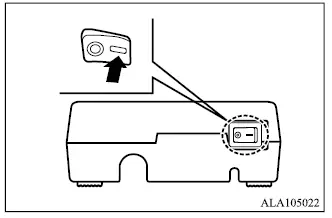
7. Place the ignition switch in the ON position.
Then move the compressor switch to the ON (-) position and inflate the tire, if possible, to the pressure specified on the Tire and Loading Information placard located on the driver's side center pillar. If the specified pressure cannot initially be reached, inflate the tire to at least 18 psi (130 kPa).
Switch the tire compressor off briefly when necessary to check the inflation pressure using the compressor pressure gauge.
If the tire is inflated above the specified pressure, release air using the pressure release valve until the correct pressure is reached. The recommended COLD tire pressures are listed on the Tire and Loading Information placard attached to the driver's side center pillar of the Mitsubishi Outlander.
WARNING
- Do not place your hands or fingers between the tire and wheel while the tire is being inflated.
The tire may move or change shape during inflation, creating a risk that your fingers or hand could become trapped between the tire and wheel.
CAUTION
- The supplied tire compressor is intended only for inflating the tires of the Mitsubishi Outlander.
- The compressor is designed to operate only from the vehicle's 12 V electrical power supply. Do not connect it to any other voltage or power source.
- The compressor is not waterproof. If it must be used in rainy conditions, protect it from direct exposure to water.
- Sand or dust drawn into the compressor can damage internal components and cause failure. Do not place the compressor directly on sandy, dusty, or dirty surfaces while it is operating.
- Do not disassemble, alter, or modify the compressor.
Also, do not subject the air pressure gauge to strong impacts or shocks, as this could damage the gauge and cause inaccurate readings or malfunction.
In most cases, the pressure will decrease within approximately 30 seconds as the sealant and air distribute through the tire.
If the tire pressure does not reach at least 18 psi (130 kPa) within 10 minutes, the tire may be too severely damaged to be repaired with the tire puncture repair kit.
In this situation, contact an authorized Mitsubishi Motors dealer.
8. When the tire pressure reaches the specified pressure, or at least the minimum of 18 psi (130 kPa), switch the tire compressor off.
Disconnect the power plug from the vehicle power outlet, then quickly remove the hose from the tire valve to minimize air loss. Reinstall the protective cap on the hose and the valve cap on the tire.
CAUTION
- Leave the tire sealant bottle attached to the bottle holder after use to help prevent the remaining sealant from spilling.
9. Immediately drive the Mitsubishi Outlander for approximately 10 minutes or 2 miles (3 km), keeping vehicle speed at 50 MPH (80 km/h) or less. This allows the sealant to distribute inside the tire.
10. After driving, confirm that the air compressor switch is in the OFF (○) position, then screw the hose securely onto the tire valve. Check the tire pressure using the compressor pressure gauge.
If the tire pressure drops under 18 psi (130 kPa): The tire cannot be safely repaired with this tire puncture repair kit. Do not continue relying on the temporary repair. Contact an authorized Mitsubishi Motors dealer.
If the tire pressure is 18 psi (130 kPa) or more but less than the specified pressure: Turn the compressor switch to the ON (-) position and inflate the tire to the pressure specified for the Mitsubishi Outlander. Then repeat the procedure beginning from step 8.
If the tire pressure drops again after this procedure, the puncture cannot be repaired reliably with the tire repair kit.
Contact an authorized Mitsubishi Motors dealer for inspection and repair.
When the tire pressure is the specified pressure: The temporary repair procedure has been completed successfully.
Have the tire professionally inspected and repaired or replaced by an authorized Mitsubishi Motors dealer as soon as possible.
CAUTION
- Do not reuse the tire sealant bottle or the compressor hose after they have been used.
Obtain a new tire sealant bottle and replacement hose from an authorized Mitsubishi Motors dealer before the repair kit is needed again.
Spare tire (if so equipped)
If the Mitsubishi Outlander is equipped with a spare tire and a flat tire occurs, follow the procedure below before beginning the tire change.
Stopping the vehicle
1. Carefully move the Mitsubishi Outlander off the roadway and as far away from moving traffic as practical.
2. Turn on the hazard warning flashers to alert other road users.
3. Park on a firm, level surface and apply the parking brake securely.
4. Move the selector lever to the P (Park) position.
5. Turn off the engine.
6. Raise the hood to make the stopped vehicle more visible to approaching traffic and to indicate to roadside assistance personnel that help may be required.
7. Have all passengers leave the vehicle and wait in a safe location away from traffic and clear of the Mitsubishi Outlander.
WARNING
- Make sure the parking brake is firmly applied and the transmission is securely shifted into P (Park) before attempting to change a tire.
- Never attempt to change a tire while the vehicle is on a slope, icy surface, or other slippery area. The Mitsubishi Outlander could move or the jack could become unstable, creating a serious hazard.
- Do not change a tire when passing traffic is too close to the vehicle. Move to a safer location if possible, or wait for professional roadside assistance.
Blocking wheels
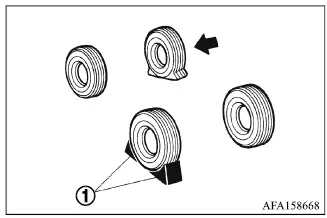
Place suitable wheel blocks 1 securely in front of and behind the wheel diagonally opposite the flat tire. This helps prevent the Mitsubishi Outlander from moving while it is raised with the jack.
WARNING
Always block the appropriate wheel before lifting the vehicle. If the Mitsubishi Outlander moves while supported by the jack, the vehicle could become unstable and cause serious personal injury.
Getting the spare tire and tools
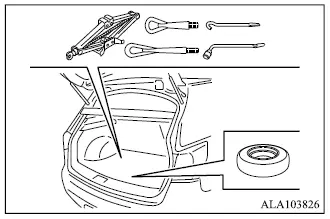
Remove the jack, required tools, and spare tire from their storage compartment before beginning the tire replacement procedure.
The spare tire, jack, and tools are stored beneath the cover in the luggage compartment.
To remove the spare tire
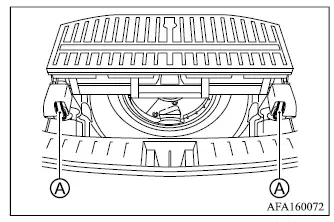
1. Before removing the spare tire, slide the second-row seats as necessary, fold the third-row seats, and then lift the third-row seat section by pulling strap A.
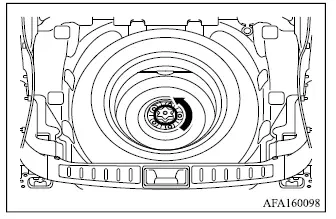
2. Loosen the retaining bolt by turning it counterclockwise.
3. After the bolt has been fully loosened, remove it.
4. On models equipped with a subwoofer, carefully move the subwoofer to the left side of the cargo area.
5. Remove the spare tire from its storage position.
6. After the spare tire has been removed, temporarily secure the subwoofer and tighten the retaining bolt firmly on models equipped with a subwoofer.
NOTE
Because the subwoofer is only temporarily secured after this procedure, have it properly checked and refitted by an authorized Mitsubishi Motors dealer as soon as practical.
Removing wheel cover
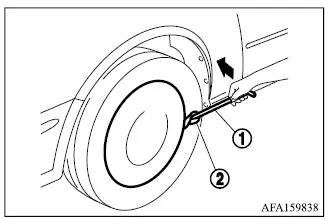
WARNING
Never attempt to remove the wheel cover with your bare hands. The cover may release suddenly or have sharp edges that could cause personal injury.
To remove the wheel cover, use jack rod 1 as shown in the illustration.
Place cloth 2 between the wheel and the jack rod to help prevent scratches or other damage to the wheel and wheel cover.
Jacking up the vehicle and removing the damaged tire
WARNING
- Read and follow all instructions in this section before attempting to raise the Mitsubishi Outlander or remove a wheel.
- DO NOT GET UNDER A VEHICLE THAT IS SUPPORTED BY A JACK.
- Never use a jack that was not supplied with your vehicle unless it is specifically suitable for the Mitsubishi Outlander and the lifting procedure being performed.
- The jack supplied with the vehicle is intended only for temporarily lifting the Mitsubishi Outlander during a tire change.
- Never position the jack anywhere other than the specified jack-up point. Using an incorrect lifting location may damage the vehicle or cause it to fall from the jack.
- Do not raise the vehicle higher than necessary to remove and install the wheel.
- Never place blocks, spacers, or other objects on top of or underneath the jack.
- Never start or operate the engine while the Mitsubishi Outlander is supported by the jack. Vehicle movement or vibration could cause the vehicle to shift or fall, resulting in an accident.
- Do not allow any passengers to remain inside the vehicle while a wheel is raised off the ground.
- Before using the jack, carefully read and follow the caution label attached to the jack body.
Carefully read the caution label attached to the jack body and the following instructions.
Jack-up point
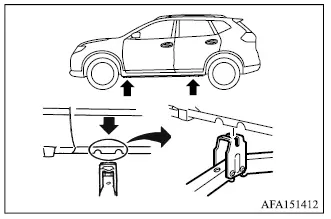
1. Position the jack directly beneath the specified jack-up point, as shown in the illustration, so that the top of the jack makes secure contact with the Mitsubishi Outlander at the designated lifting location.
Align the jack head carefully between the two designated notches at the front or rear jack-up point, as shown in the illustration.
Make sure the groove in the jack head is also positioned securely between the notches so the Mitsubishi Outlander is supported at the correct lifting point.
The jack should be used only on firm, level ground.
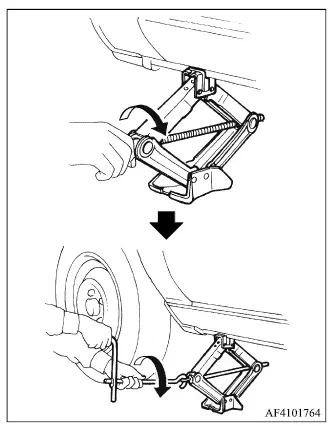
2. Using the wheel nut wrench, loosen each wheel nut by approximately one or two turns in the counterclockwise direction. Do not remove the wheel nuts completely until the tire has been raised clear of the ground.
3. To raise the Mitsubishi Outlander, hold the jack lever and jack rod securely with both hands as illustrated. Lift the vehicle carefully until the damaged tire is just clear of the ground. Remove the wheel nuts, then carefully remove the wheel.
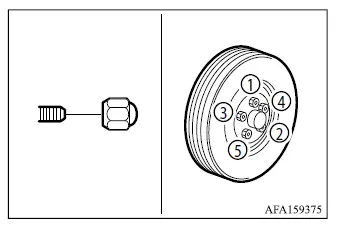
The spare tire is designed for emergency use.
1. Remove any mud, rust, dirt, or other debris from the contact surfaces between the wheel and hub before installing the spare tire.
2. Carefully position the spare tire on the hub and install the wheel nuts by hand. Tighten them finger-tight and confirm that each wheel nut seats evenly and squarely against the wheel surface.
3. Using the wheel nut wrench, tighten the wheel nuts gradually, evenly, and alternately in the illustrated sequence (1, 2, 3, 4, 5). Repeat the sequence more than twice until all nuts are firmly seated.
4. Lower the Mitsubishi Outlander slowly until the tire makes contact with the ground. Then use the wheel nut wrench to tighten the wheel nuts securely again in the illustrated sequence.
Lower the vehicle completely and remove the jack.
WARNING
- Incorrect wheel nuts or wheel nuts that are not properly tightened can allow the wheel to loosen or separate from the vehicle while driving. This could result in loss of control and a serious accident.
- Do not apply oil, grease, or other lubricants to the wheel studs or wheel nuts. Lubrication can affect tightening force and may allow the nuts to loosen.
- Retighten the wheel nuts after the Mitsubishi Outlander has been driven for 1,000 km, including after a wheel has been removed because of a flat tire or similar service.
- As soon as possible, use a torque wrench to tighten the wheel nuts to the specified torque.
Wheel nut tightening torque: 98 - 127 Nꞏm
The wheel nuts must remain tightened to the specified torque at all times. It is recommended that wheel nut torque be checked at each applicable lubrication or maintenance interval. - Adjust the tire pressure to the specified COLD pressure.
COLD pressure:
The tire is considered cold after the vehicle has been parked for 3 hours or more, or has been driven less than 1.6 km.
The recommended COLD tire pressures are shown on the Tire and Loading Information label attached to the driver's side centre pillar.
Stowing the damaged tire and the tools
1. Store the jack, tools, and damaged tire securely in their designated storage locations so they cannot move while the Mitsubishi Outlander is being driven.
2. Reinstall the flexible luggage boards, if equipped, and replace the storage-area cover.
3. Close the tailgate securely.
WARNING
- Always make sure the spare tire, jack, and all related tools are properly secured after use. Loose equipment can become dangerous projectiles during a collision, emergency maneuver, or sudden stop.
- The spare tire is intended only for emergency use and should be replaced by the repaired or replacement regular tire as soon as practical.
After the damaged tire has been repaired or replaced, return the spare tire to its original storage position. If the Mitsubishi Outlander is equipped with a subwoofer, reinstall and secure the subwoofer, then tighten the retaining bolt firmly.
