Mitsubishi Outlander: Seat Assembly
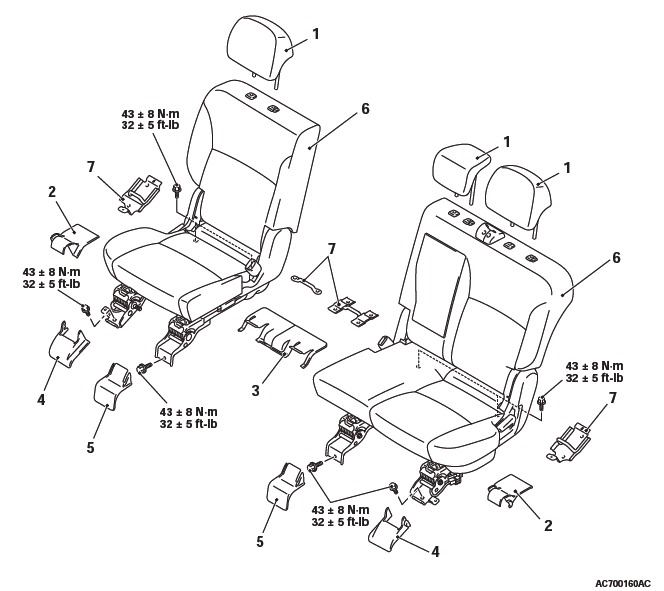
FRONT SEAT ASSEMBLY
REMOVAL AND INSTALLATION
CAUTION
To remove the front seat assembly of vehicle with side air bag, refer to GROUP 52B - Service Precautions and Curtain Air Bag Module.
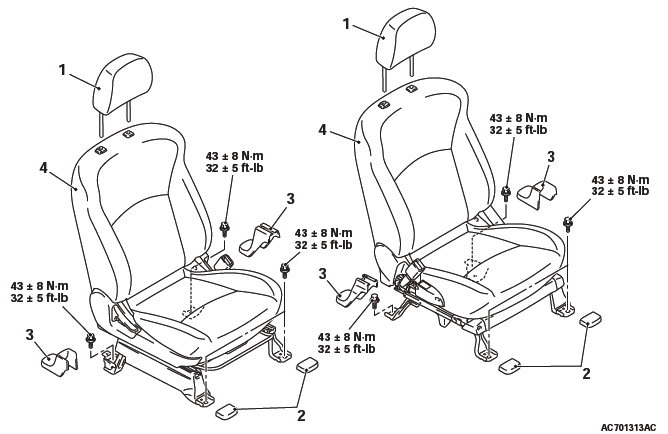
Removal steps
- Headrest
- Front seat anchor cover
- Rear seat anchor cover
- Wiring harness connectors
- Front seat assembly
REMOVAL SERVICE POINT
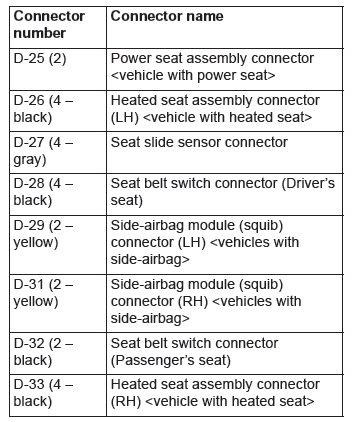
WIRING HARNESS CONNECTOR DISCONNECTION
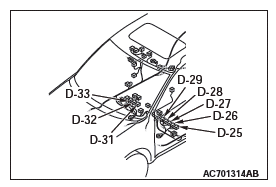
Disconnect the following wiring harness connectors:
INSTALLATION SERVICE POINT
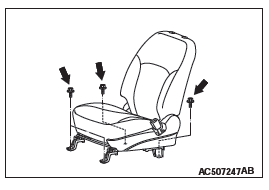
FRONT SEAT ASSEMBLY INSTALLATION
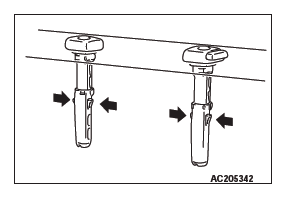
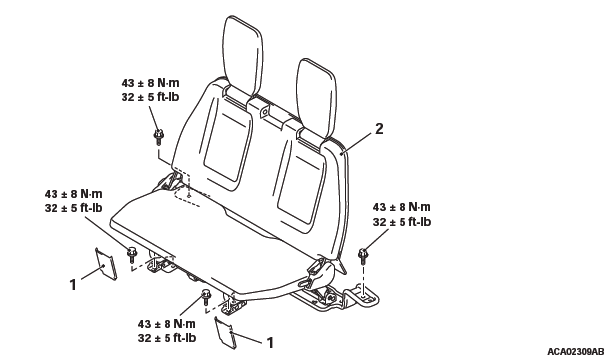
1. Confirm that both the seat slides are locked, and then temporarily tighten all the bolts shown in the figure so that no load is applied to the front seat cushion.
2. Tighten all the bolts to the specified torque.
INSPECTION
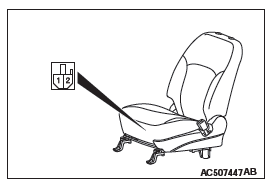
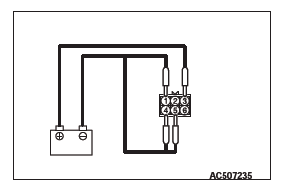
Connect the + terminal of the battery to the power seat connector terminal No. 2 and the − terminal to terminal No. 1, and check that the power seat works normally.
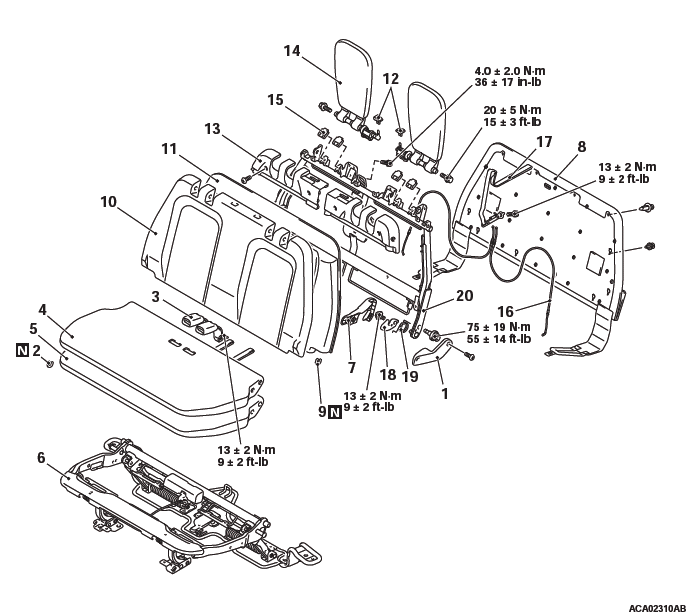
DISASSEMBLY AND ASSEMBLY
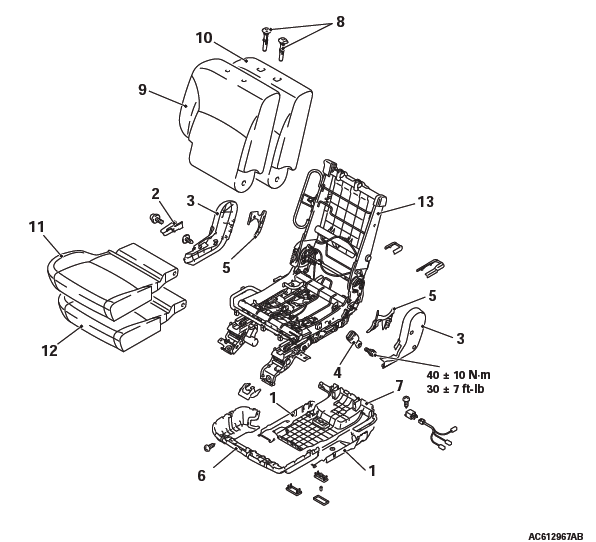
(DRIVER'S SEAT)
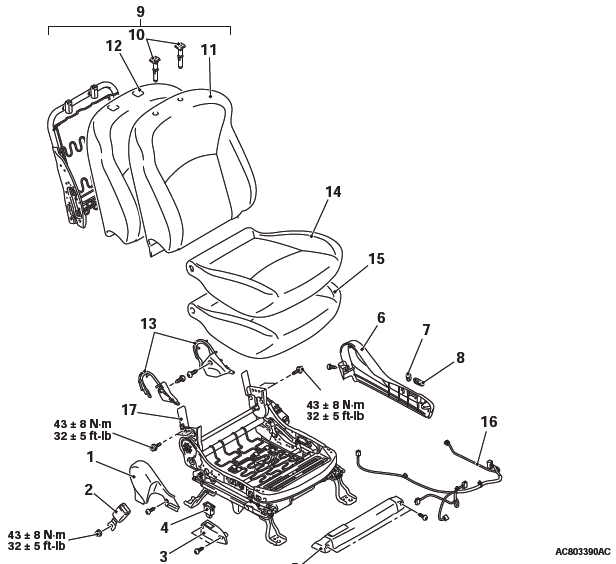
Disassembly steps
- Hinge cover outer
- Inner seat belt
- Heated seat switch cover <vehicle with heated seat>
- Heated seat switch <vehicle with heated seat>
- Under cover
- Side shield cover
- Reclining adjuster lever knob <vehicle with power seat>
- Reclining adjuster lever knob <vehicle with power seat>
- Seat back assembly
- Headrest guide
- Seat back cover
- Seat back pad
- Hinge cover inner
- Seat cushion cover
- Seat cushion pad
- Wiring harness clamp
- Seat cushion frame assembly
<PASSENGER'S SEAT>
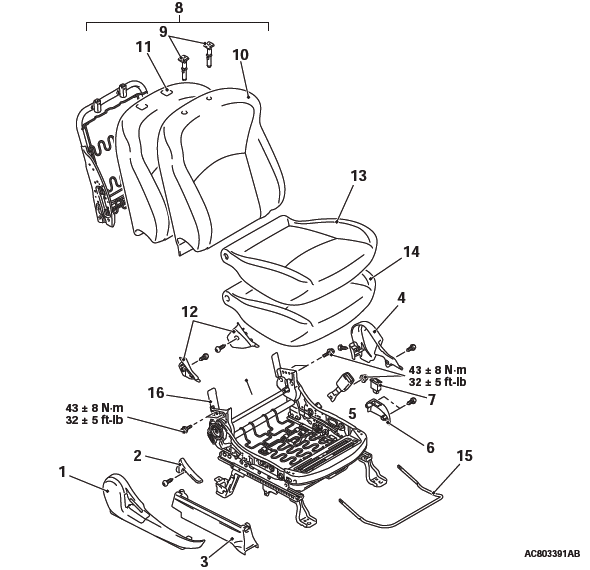
Disassembly steps
- Side shield cover
- Reclining lever
- Slide adjuster side cover
- Hinge cover outer
- Inner seat belt
- Heated seat switch cover <vehicle with heated seat>
- Heated seat switch <vehicle with heated seat>
- Seat back assembly
- Headrest guide
- Seat back cover
- Seat back pad
- Hinge cover inner
- Seat cushion cover
- Seat cushion pad
- Seat slide adjuster lever
- Seat cushion frame assembly
DISASSEMBLY SERVICE POINTS
HEADREST GUIDE REMOVAL
Peel of the front seatback cover and pad to access the head-restraint guides. Pull off the guides upwards while pushing the tabs (arrows) as shown.
SEAT CUSHION FRAME ASSEMBLY REMOVAL
For the vehicles with side air bag, do not remove the side air bag module from the frame.
INSPECTION
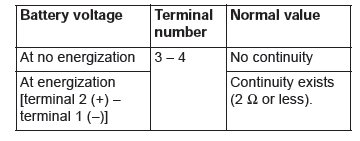
INSPECTION OF THE HEATED SEAT RELAY FOR CONTINUITY
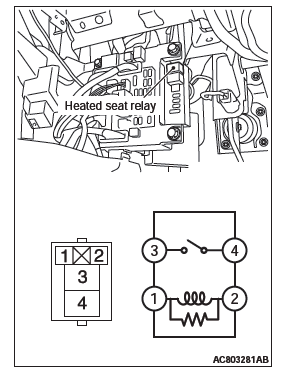
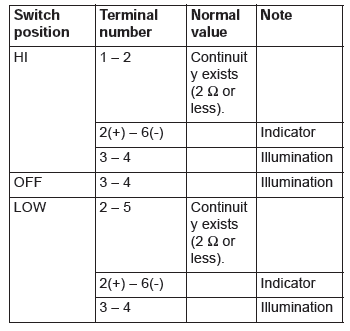
INSPECTION OF THE HEATED SEAT SWITCH FOR CONTINUITY
Inspect the heated seat switch for continuity.

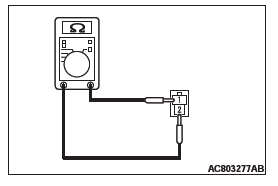
SEAT CUSHION HEATER INSPECTION
Measure the resistance between the terminals.
Standard value: At room temperature 20 ºC (68 ºF)
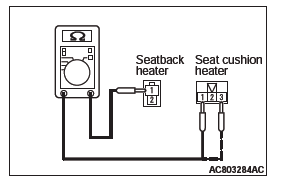
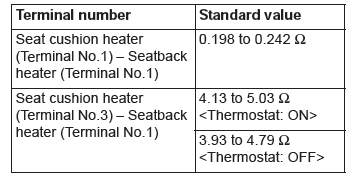
SEAT BACK HEATER INSPECTION
Measure the resistance between the terminals.
Standard value: At room temperature 20 ºC (68 ºF)

SECOND SEAT ASSEMBLY
SECOND SEAT ADJUSTMENT
1. Check that the automatic tumble mechanism works.
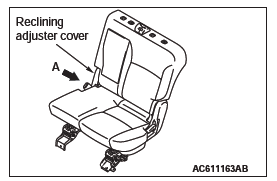
2. If the slide lock release is late, remove the reclining adjuster cover, and move the clamp position of the slide lock release cable for the automatic tumble mechanism on the side of the seat from the second recess to the first recess to adjust the slide lock release timing.
3. Check again that the automatic tumble mechanism works. If the slide lock timing is still late after the adjustment, replace the slide lock release cable for the automatic tumble mechanism.
4. If the slide lock timing is still late after the slide lock release cable for the automatic tumble mechanism is replaced, replace the seat.

5. If the automatic tumble mechanism is normal, lock the sliding and turn up the seat cushion pad. Then, check that the clearance between the slide lock claw and the second seat folding adjuster is approximately 3 mm(0.1in).
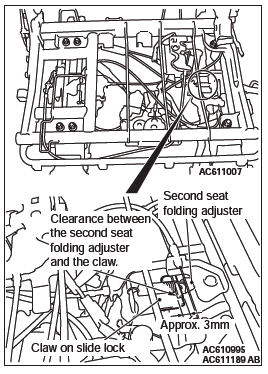
6. If the clearance between the second seat folding adjuster and the slide lock claw is 5 mm(0.2in) or more, loosen the bolts shown in the figure and fix them at the position where the clearance is approximately 3 mm(0.1in).

REMOVAL AND INSTALLATION
Removal steps
- Headrestraint
- Scuff plate rear
- Rear anchor cover outer
- Rear anchor cover inner
- Front anchor cover outer
- Front anchor cover inner
- Second seat assembly
- Rear seat striker
DISASSEMBLY AND ASSEMBLY
<SECOND SEAT (LH)>
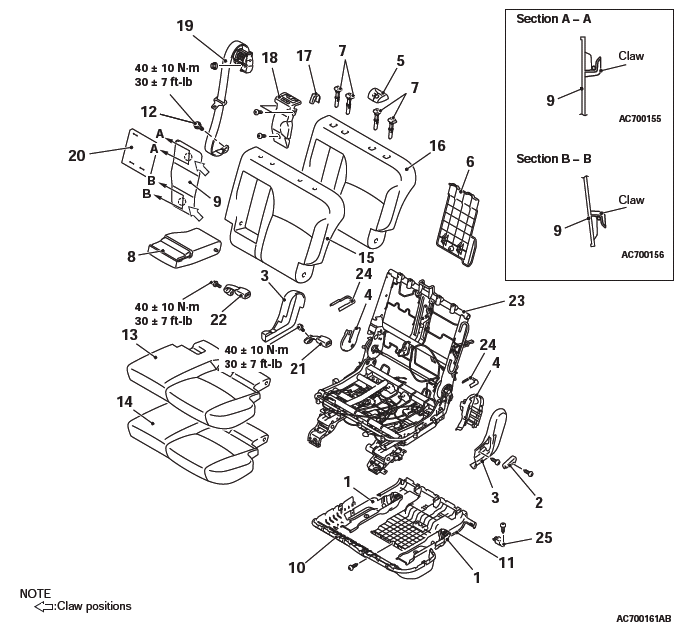
Disassembly steps
- Second seat latch cover
- Reclining adjuster lever
- Reclining adjuster outer cover
- Reclining adjuster inner cover
- Seat belt cover
- Seatback board
- Headrestraint guide
- Armrest
- Seatback armrest board
- Seat cushion under cover front
- Seat cushion under cover rear
- Seat belt bolt
- Seat cushion pad cover
- Seat cushion pad
- Seatback cover
- Seatback pad
- Second seat back side end cap
- Seat belt retractor cover
- Seat belt retractor
- Seat protector
- Center seat belt inner
- Side seat belt inner
- Seat frame assembly
- Second seat slide rail cover
- Relay
DISASSEMBLY SERVICE POINTS
HEADRESTRAINT GUIDE REMOVAL
Remove while pressing the claws on the both sides.
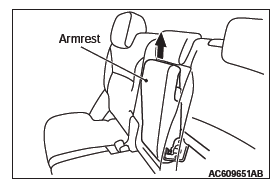
ARMREST REMOVAL
Tilt the armrest slightly, and remove it by lifting the left side.
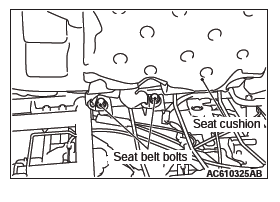
SEAT BELT BOLT REMOVAL
Turn up the cushion pad and remove the seat belt bolts.
<SECOND SEAT (RH)>
Disassembly steps
- Second seat latch cover
- Reclining adjuster lever
- Reclining adjuster cover
- Seat belt inner
- Reclining adjuster inner cover
- Seat cushion under cover front
- Seat cushion under cover rear
- Headrestraint guide
- Seatback cover
- Seatback pad
- Cushion pad cover
- Cushion pad
- Seat frame assembly
DISASSEMBLY SERVICE POINT
HEADRESTRAINT GUIDE REMOVAL
Remove while pressing the claws on the both sides.
<SEAT FRAME ASSEMBLY>
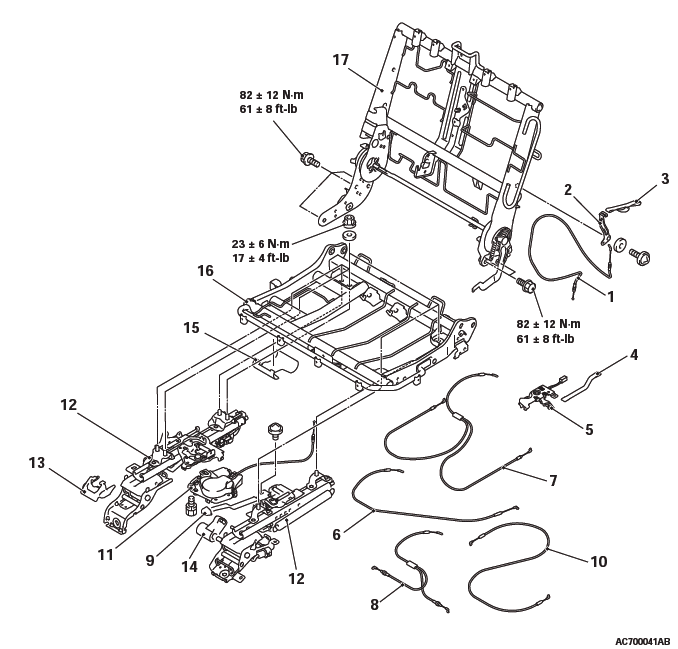
Disassembly
- Seatback lock release cable
- Second seat folding lever
- Second seat back strap
- Second seat cushion strap
- Second seat tumble lever<Vehicles with second seat tumble lever>
- Tumble lock release cable
- Seat rail rear end latch release cable
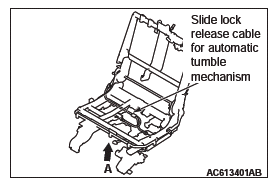
- Slide lock release cable for automatic tumble mechanism
- Second seat slide adjuster lever
- Seat slide cable
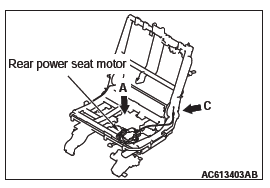
- Rear power seat motor
- Second seat folding adjuster
- Second seat slide rail cover
- Second seat stay damper
- Second seat rink cover
- Second seat cushion frame
- Second seat back frame
DISASSEMBLY SERVICE POINT
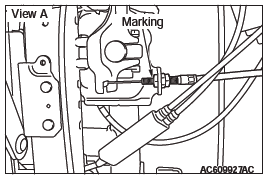
REMOVAL OF SLIDE LOCK RELEASE CABLE FOR AUTOMATIC TUMBLE MECHANISM
Put a mark in the position shown in view A to record the protrusion of the screw.
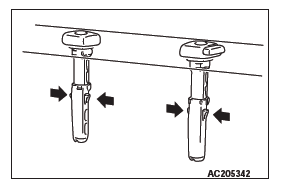
REASSEMBLY SERVICE POINTS
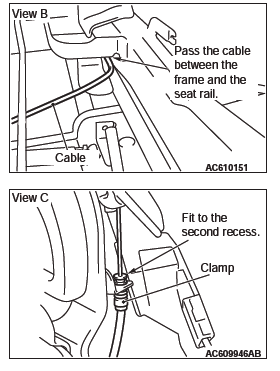
REAR POWER SEAT MOTOR INSTALLATION
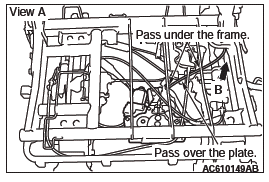
1. When installing the rear power seat motor, install the cable as shown in view A.
2. Pass the cable between the frame and the seat rail as shown in view B.
3. Fit the tip of the cable to the second recess of the clamp as shown in view C.
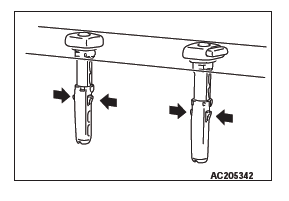
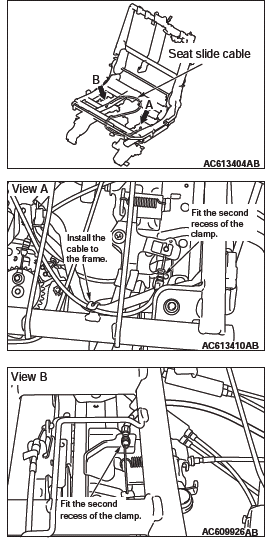
SEAT SLIDE CABLE INSTALLATION
Fit the second recess of the clamp in view A and view B to the bracket. When installing the cable, make sure that the cable is not bitten by the moving area.
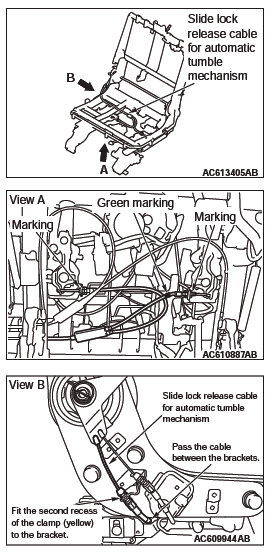
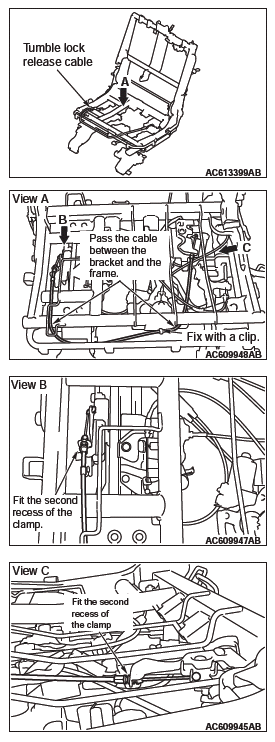
SLIDE LOCK RELEASE CABLE FOR AUTOMATIC TUMBLE MECHANISM INSTALLATION
1. When installing the cable in view A, protrude the screws to the position marked during the removal. Then, tumble the seatback and check that the slide locks on the right and left side are fully released. When installing the cable, install the cable with the green marking to the left rail.
2. Fit the second recess of the clamp (yellow) shown in view B to the bracket. Pass the cable between the brackets when installing it. Make sure that the cable is not bitten by the moving area.
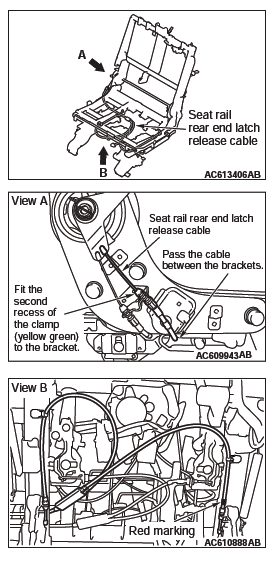
SEAT RAIL REAR END LATCH RELEASE CABLE INSTALLATION
Fit the second recess of the clamp in view A to the bracket.
When installing the cable, make sure that the cable is not bitten by the moving area. When installing the cable in view B, install the cable with the red marking to the left rail.
TUMBLE LOCK RELEASE CABLE INSTALLATION
Install the cable as shown in view A. Fit the second recess of the clamp in view A and view B to the bracket. When installing the cable, make sure that the cable is not bitten by the moving area.
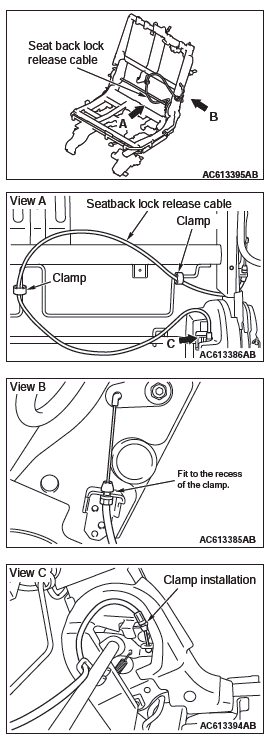
SEATBACK LOCK RELEASE CABLE INSTALLATION
Install the cable as shown in view A. Fit the second recess of the clamp in view B to the bracket. When installing the cable, make sure that the cable is not bitten by the moving area.
INSPECTION
AUTO-FOLDING SEAT INSPECTION
Connect the + terminal of the battery to the auto-folding seat connector terminal No.3 and the − terminal to terminals Nos. 1, 4, and 5 and check that the motor works.
THIRD SEAT ASSEMBLY
REMOVAL AND INSTALLATION
Removal steps
- Anchor cover
- Third seat assembly
DISASSEMBLY AND ASSEMBLY
Disassembly steps
- Third seat hinge cover outer
- Hog ring
- Third seat belt inner
- Third seat cushion cover
- Third seat cushion pad
- Seat cushion frame assembly
- Third seat hinge cover inner
- Third seatback board
- Hog ring
- Third seatback cover
- Third seatback pad
- Third seat folding knob
- Third seat headrestraint hinge cover
- Headrestraint assembly
- Third seat stopper
- Third seat wire
- Third seat band
- Third seat folding lever
- Third seat spring
- Seatback frame assembly
Seat Belt
FRONT SEAT BELT
REMOVAL AND INSTALLATION
CAUTION For the removal of the seat belt with pre-tensioner, refer to GROUP 52B − Service Precautions and Seat Belt with Pre-tensioner.
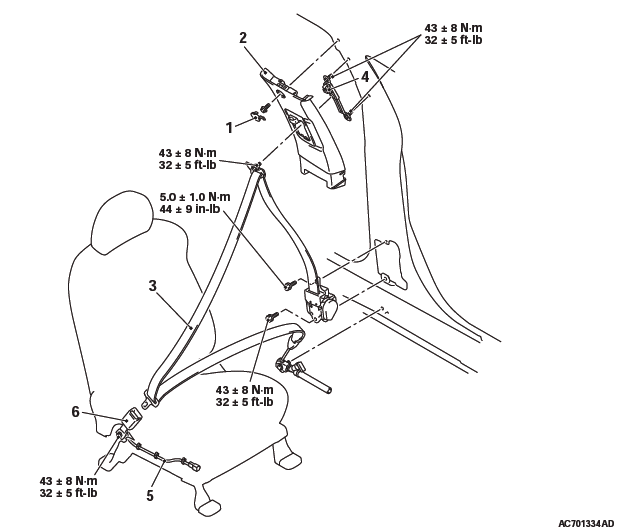
Outer seat belt removal steps
- Front scuff plate, scuff plate rear, center pillar trim lower
- Center pillar trim upper cap
- Center pillar trim upper
- Outer seat belt
- Adjuster seat belt anchor
Inner seat belt removal steps
- Seat belt switch connector
- Inner seat belt
SEAT BELT BUCKLE SWITCH CONTINUITY CHECK (DRIVER'S SIDE)
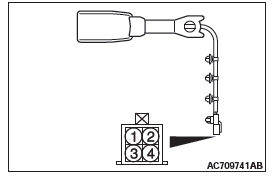
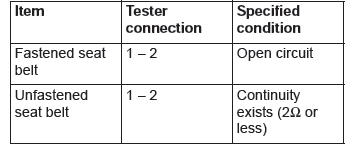
SEAT BELT BUCKLE SWITCH CHECK (PASSENGER'S SIDE)

Power supply voltage: 5V

REAR SEAT BELT
REMOVAL AND INSTALLATION
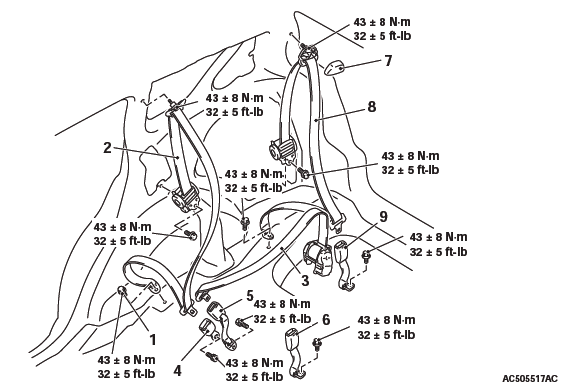
Second seat belt (outer) removal steps
- Seat belt side lower anchor bolt
- Scuff plate rear, quarter trim lower, quarter trim upper
- Lower liftgate trim
- Seat belt side
- Seat cushion assembly (LH)
- Seat belt center
Second seat belt RH and center (inner) removal steps
- Inner seat belt side (RH)
- Inner seat belt center
Second seat belt LH (inner) removal steps
- Seat cushion assembly (LH)
- Inner seat belt
Third seat belt removal steps <7 persons seat>
- Third seat belt sash guide cover
- Quarter trim lower, quarter trim upper
- Outer seat belt
- Inner seat belt
READ NEXT:
 Specifications, General Information, Service Precautions
Fastener Tightening Specifications
General Information
DANGER
The SRS-ECU adopts the rollover specification
that the curtain airbag and seat belt
pre-tensioner operate at the occurrence of
rollover.
SRS Air Bag Diagnosis
INTRODUCTION TO DIAGNOSIS
The SRS system is controlled by the SRS-ECU. The
SRS-ECU judges how severe a collision is by detecting
signals from the left and right front impact sensors
and side impact se
SEE MORE:
Fusible links
The fusible links will melt to prevent a fire if a large current attempts to
flow through certain electrical systems.
In case of a melted fuse link, we recommend you to have your vehicle inspected.
For the fusible links, please refer to “Fuse load capacity”.
WARNING:
● Fusible links
Transaxle Control
REMOVAL AND INSTALLATION
CAUTION
Before removing the clock spring connector, refer to GROUP 52B − SRS Air Bag
Service Precautions
and Air Bag Module and Clock Spring.
Pre-removal operation
Front floor console assembly removal
Post-installation operation
Front floor console assembly ins
