Mitsubishi Outlander: To use the external audio input function(vehicles with a rear-seat display)
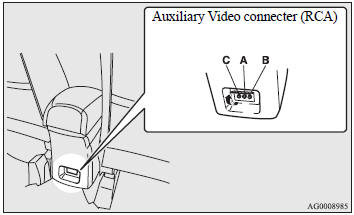
Auxiliary Video connecter (RCA).
A- Left audio input connecter (white).
B- Right audio input connecter (red).
C- Video input connecter (yellow).
You can listen to commercially available audio equipment, such as a portable audio system, from your vehicle’s speakers, by connecting the audio equipment to the audio input connecters (A or B), which are external input connecters (pin jacks).
NOTE:
● For information on using the video input connecter (C), refer to the separate owner’s manual for the rear-seat display.
To activate the external audio input mode
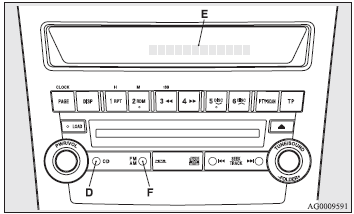
1. Use a commercially available audio cable to connect the audio equipment to the internal audio input connecter (A or B).
2. Press the CD button (D) for more than 2 seconds.
The display (E) will show “AUX REAR” and then the external audio input mode will be activated.
When the power of the rear-seat display is on, press the SOURCE button of the rear-seat display to activate VIDEO mode (for details, refer to the separate rear-seat display owner’s manual).
3. To deactivate the external audio input mode, press the AM/FM button (E) or the CD button (D) to switch to another mode.
CAUTION:
● Do not operate the connected audio equipment while driving.
This could distract you and an accident might occur.
NOTE:
● The connected audio equipment cannot be operated with the vehicle’s audio system.
● For information on how to connect and operate the audio equipment, refer to the owner’s manual for the equipment
READ NEXT:
 Steering wheel audio remote controlswitches
The remote control switch is located on the left side of the steering wheel.
It can be used when the ignition switch is in the “ON” or “ACC” positions.
1- Volume up button.
2- Volume down
Error codes
If an error code (1) appears in the display, take action in accordance with the
table below.
Handling of compact discs
● Use only the type of compact discs that have the mark shown in the illustration
below (playback of CD-R or CDRW discs may cause problems).
● The use of special shaped, damaged compa
SEE MORE:
Front Axle Diagnosis
TROUBLESHOOTING STRATEGY
Use these steps to plan your diagnostic strategy. If
you follow them carefully, you will be sure that you
have exhausted most of the possible ways to find a
front axle fault.
1. Gather information from the customer.
2. Verify that the condition described by the
customer e
Thermostat
REMOVAL AND INSTALLATION <2.4L ENGINE>
Pre-removal Operation
Engine Coolant Draining
Engine Upper Cover Removal
Air Cleaner Assembly Removal
Post-installation Operation
Air Cleaner Assembly Installation
Engine Upper Cover Installation
Engine Coolant Refilling
Removal steps
Hose
