Mitsubishi Outlander: Fender, Splash Shield, Fuel Filler Lid, Strut Tower Bar
Mitsubishi Outlander 2007-2013 Service Manual / Body, Exterior, Interior and Supplemental / Body / Fender, Splash Shield, Fuel Filler Lid, Strut Tower Bar
Fender
REMOVAL AND INSTALLATION
Pre-removal and post-installation operation
- Splash shield front removal and installation
- Front bumper side bracket removal and installation
- Headlight assembly removal and installation
- Side turn-signal lamp removal and installation
- Front deck garnish removal and installation
- Side air dam removal and installation
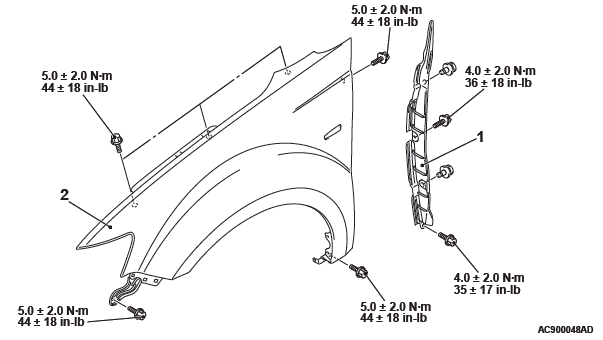
Removal steps
- Fender protector rear
- Fender
Splash Shield
REMOVAL AND INSTALLATION
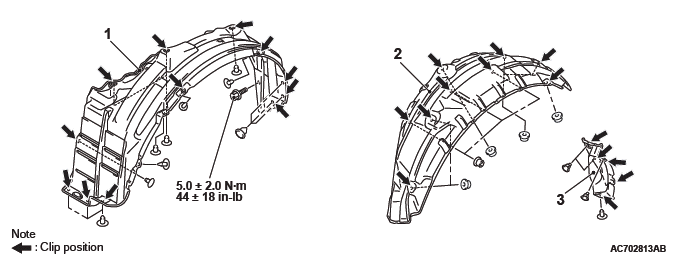
Removal
- Splash shield front
- Splash shield rear (body side)
- Splash shield rear (rear bumper side)
Fuel Filler Lid
REMOVAL AND INSTALLATION
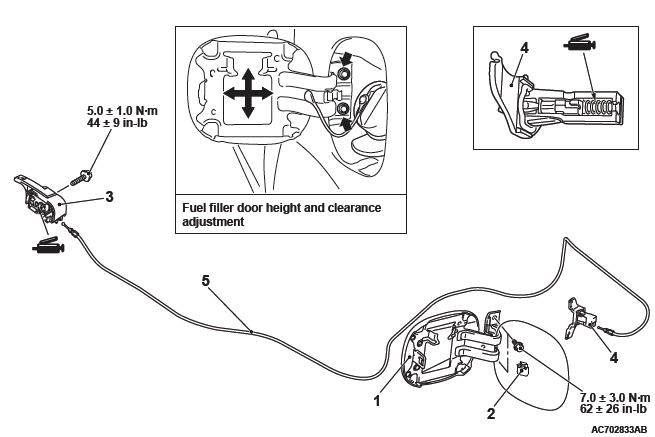
Removal steps
- Fuel filler door
- Fuel filler door damper spring
- Fuel filler door lock release handle
- Front scuff plate, rear scuff plate, center pillar trim lower and quarter trim lower
- Rear seat assembly
- Fuel filler door hook
- Fuel filler door lock release cable
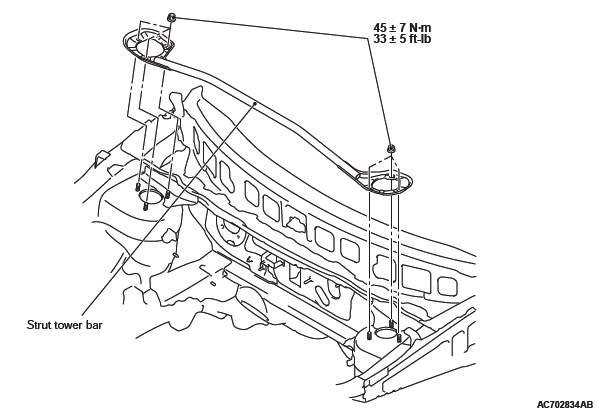
Strut Tower Bar
REMOVAL AND INSTALLATION
READ NEXT:
 Window Glass
SPECIFICATIONS
ADHESIVE
LUBRICANT
GENERAL
The windshield glass, quarter window glass and liftgate
window glass are attached by an urethane-base
adhesive to the window frame. This adhesive provides
General Information
CENTRAL DOOR LOCKING SYSTEM
The central door locking system operates the door
lock actuator to lock or unlock the doors and liftgate
using the door lock switch built into the front power
window (main
SEE MORE:
SRS Air Bag Diagnosis
INTRODUCTION TO DIAGNOSIS
The SRS system is controlled by the SRS-ECU. The
SRS-ECU judges how severe a collision is by detecting
signals from the left and right front impact sensors
and side impact sensors, front air bag analog
G-sensor and front air bag safing G-sensor and
side-airbag safing G-sens
Hood
HOOD DIAGNOSIS
INTRODUCTION TO HOOD DIAGNOSIS
Wind noise at the hood may be caused by improper
hood adjustment.
HOOD DIAGNOSTIC TROUBLESHOOTING STRATEGY
Use these steps to plan your diagnostic strategy. If
you follow them carefully, you will be sure that you
have exhausted most of the possible ways
© 2010-2026 Copyright www.mioutlander.com
