Mitsubishi Outlander: Window Glass
SPECIFICATIONS
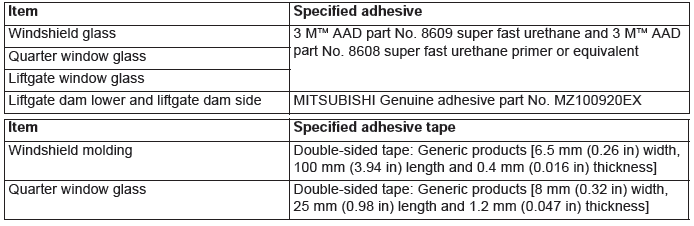
ADHESIVE
LUBRICANT

GENERAL
The windshield glass, quarter window glass and liftgate window glass are attached by an urethane-base adhesive to the window frame. This adhesive provides improved glass holding and sealing, and also gives body openings a greater structural strength.
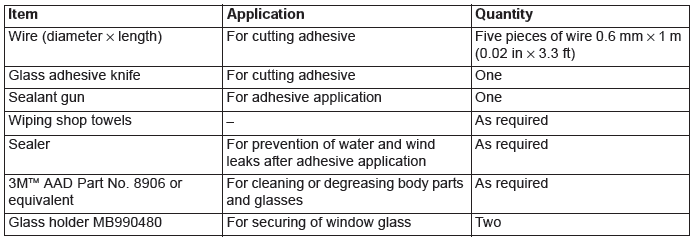
ITEMS
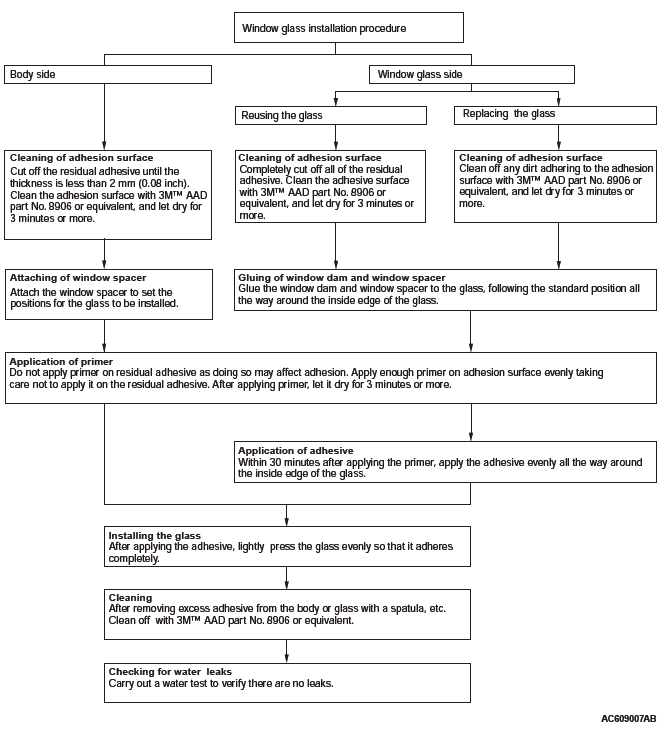
WINDOW GLASS INSTALLATION
CAUTION Do not apply primer on the adhesion surface, as adhesion may be reduced.
WINDOW GLASS DIAGNOSIS
INTRODUCTION TO WINDOW GLASS DIAGNOSIS
If water emerges from the following points, there is a problem in the seal or body flange.
- windshield glass
- Quarter window glass
- Liftgate window glass
WINDOW GLASS DIAGNOSTIC TROUBLESHOOTING STRATEGY
Use these steps to plan your diagnostic strategy. If you follow them carefully, you will be sure that you have exhausted most of the possible ways to find a window glass fault.
1. Gather information from the customer.
2. Verify that the condition described by the customer exists.
3. Find the malfunction by following the Symptom Chart.
4. Verify malfunction is eliminated.
WINDOW GLASS DIAGNOSTIC TROUBLE SYMPTOM CHART
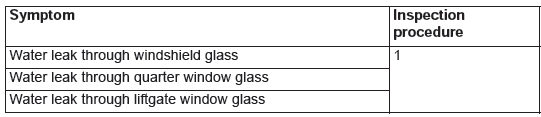
SYMPTOM PROCEDURES
INSPECTION PROCEDURE 1: Water Leak Through Windshield Glass/Water Leak Through Quarter Window Glass/Water Leak Though Liftgate Window Glass
DIAGNOSIS
STEP 1. Check if the seal is faulty.
Q: Is the seal faulty?
YES : Repair the seal, then go to Step 3.
NO : Go to Step 2.
STEP 2. Check if the body flange is deformed.
Q: Is the body flange deformed?
YES : Repair the body flange, then go to Step 3.
NO : Go to Step 3.
STEP 3. Retest the system.
Q: Is any water leaking?
YES : Return to Step 1.
NO : This diagnosis complete.
SPECIAL TOOL

WINDSHIELD
REMOVAL AND INSTALLATION
Pre-removal and post-installation operation
- Front deck garnish removal and installation
- Roof drip molding removal and installation
- Front pillar trim removal and installation
- Inside rear view mirror assembly removal and installation
- Lighting control sensor removal and installation <Vehicles with lighting control sensor>

Removal steps
- Windshield glass
- Windshield molding
- Glass stopper
- Windshield spacer
Required Special Tool:
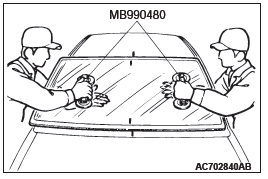
- MB990480: Glass Holder
REMOVAL SERVICE POINT
WINDSHIELD GLASS REMOVAL
1. To protect the body (paint surface), apply cloth tape to all body areas around the installed windshield glass.
2. Make mating marks on the windshield glass and body.
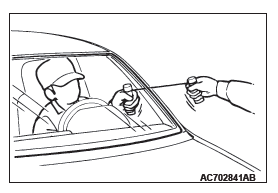
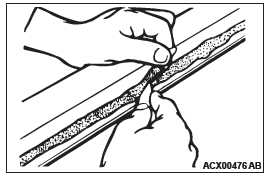
3. Using piano wire.
- Using a sharp-point drill, make a hole in the windshield adhesive.
- Pass the piano wire from the inside of the vehicle through the hole.
CAUTION Do not let the piano wire touch the edge of the windshield glass.
- Pull the piano wire alternately from the inside and outside along the windshield glass to cut the adhesive.
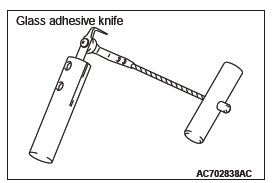
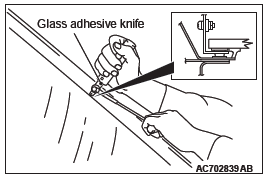
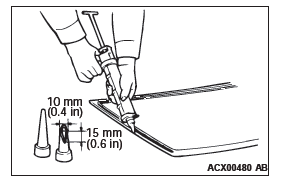
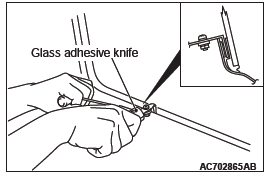
CAUTION Inserting the glass adhesive knife too deeply into windshield adhesive may damage windshield glass.
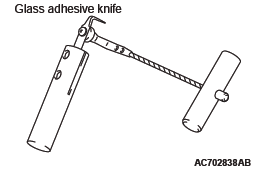
4. Using glass adhesive knife Keep glass adhesive knife at right angles with the windshield glass edge, and put the blade at windshield glass edge and surface. Then cut away adhesive along the windshield glass edge.
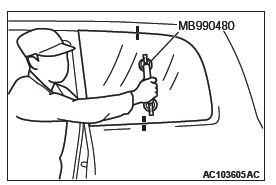
5. Use special tool MB990480 to remove the windshield glass.
CAUTION
- Be careful not to remove more adhesive than is necessary.
- Be careful also not to damage the paint on the body surface with the knife. If the paint is damaged, repair the damaged area with touch-up paint.
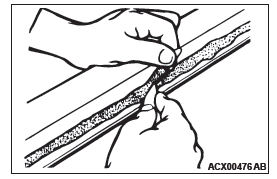
6. Use a knife to cut away the remaining adhesive so that the thickness is within 2 mm (0.08 inch) around the entire circumference of the body flange.
7. Finish the flange surfaces so that they are smooth.
CAUTION Allow the cleaned area to dry for at least three minutes. Do not touch any surface that has been cleaned.
8. When reusing the windshield glass, remove the adhesive still adhering to the windshield glass, and clean with 3M AAD Part No. 8906 or equivalent
9. Clean the body side in the same way.
INSTALLATION SERVICE POINTS
WINDSHIELD SPACER/GLASS STOPPER/ WINDSHIELD MOLDING INSTALLATION
CAUTION Leave the degreased parts for 3 or more minutes to dry well, before starting on the next step. Do not touch the degreased parts.
1. Use 3M AAD Part number 8906 or equivalent to degrease the inside and outside of the windshield glass and the body flanges.
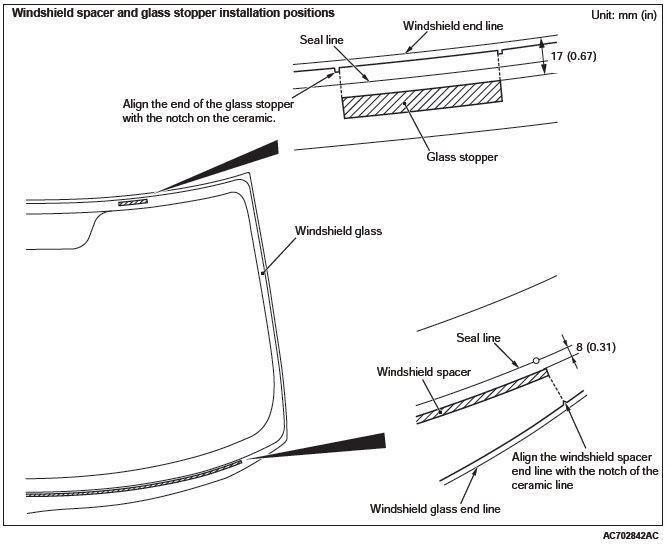
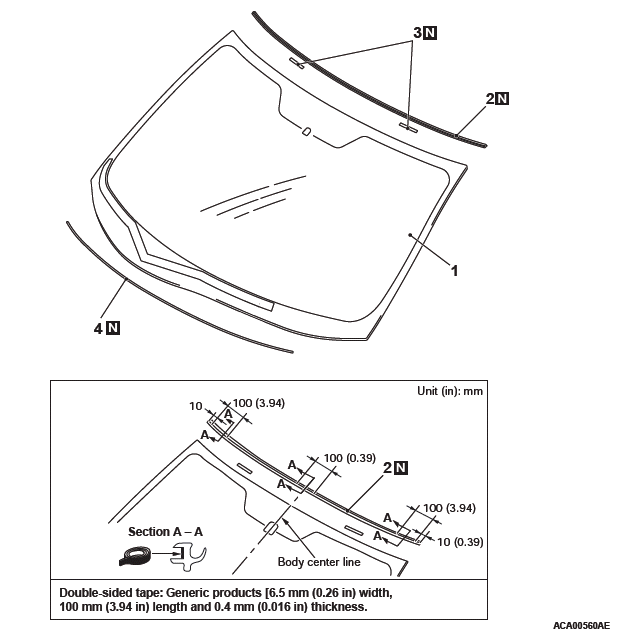
2. Install the windshield spacer and glass stoppers to the specified positions so that there are no adrift or warped surfaces inside the windshield glass.
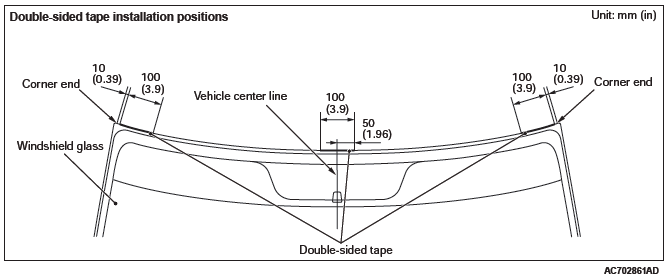
3. Install the double-sided tapes to the windshield glass.
4. Install the windshield molding to the windshield glass.
WINDSHIELD GLASS INSTALLATION
1. When replacing the windshield glass, temporarily set the windshield glass against the body, and place a mating mark on the windshield glass and body.
CAUTION
- The primer strengthens the adhesive, so be sure to apply it evenly around the entire circumference. However, a too thick application will weaken the adhesive.
- Do not touch the coated surface.
- Do not apply the primer on the remaining adhesive because of weakening the adhesive.
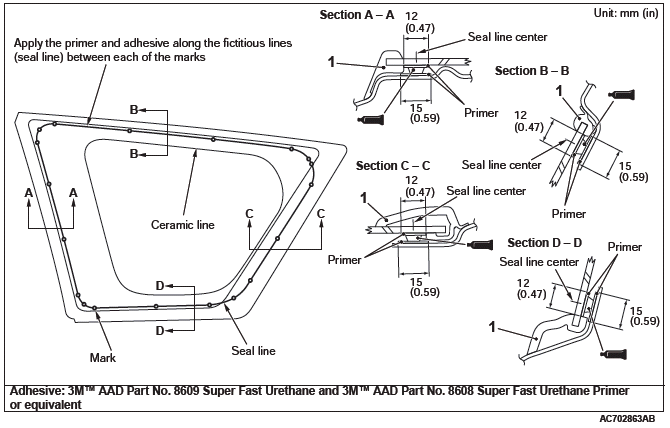
2. Soak a sponge in the primer, and apply evenly to the windshield glass and the body in the specified places.
3. Allow the windshield glass to dry for at least three minutes after applying primer.
4. Fill a sealant gun with adhesive. Then apply the adhesive evenly around the windshield glass within 30 minutes after applying the primer.
NOTE: Cut the tip of the sealant gun nozzle into a V shape to simplify adhesive application.
5. Align the mating marks on the windshield glass and the body, and lightly press the windshield glass evenly so that it adheres completely.
6. Use a spatula or similar tool to remove any excessive adhesive. Clean the surface with 3M AAD Part number 8906 or equivalent. Avoid moving the vehicle until the adhesive sets.
CAUTION
- Do not move the vehicle unless absolutely necessary.
- When testing for water leakage, do not apply strong water pressure.
7. Wait 30 minutes or more, and then test for water leakage.
QUARTER WINDOW GLASS
REMOVAL AND INSTALLATION
Pre-removal and post-installation operation
- Quarter trim upper removal and installation
Removal steps
- Quarter window glass assembly
- Clip
- Fastener
Required Special Tool:
- MB990480: Glass Holder
REMOVAL SERVICE POINT
QUARTER WINDOW GLASS ASSEMBLY REMOVAL
1. In order to protect the body (paint surface), apply the protective tape to all body areas around the installed quarter window glass assembly.
2. Stick the protective tape to avoid the quarter window glass assembly from dropping.

3. Use glass adhesive knife to cut away adhesive.
4. Working inside the vehicle, insert the tip of a windshield knife into the sealed part of the quarter window glass assembly.
CAUTION If you lever the windshield knife, the quarter window glass assembly may be damaged.
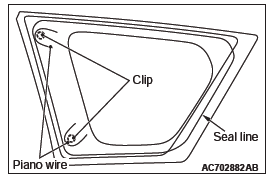
5. Holding the tip of the windshield knife and the body flange at right angles, align the blade of the windshield knife with the body flange, and pull the blade parallel to the body flange to separate the adhesive.
6. Use a piano wire to separate the clips.
7. Make mating marks on the quarter window glass assembly and body, and use the special tool MB990480 to remove the quarter window glass assembly.
CAUTION
- Be careful not to remove more adhesive than is necessary.
- Be careful also not to damage the paint on the body surface with the knife. If the paint is damaged, repair the damaged area with touch-up paint.
8. Use a knife to cut away the remaining adhesive so that the thickness is within 2 mm (0.08 inch) around the entire circumference of the body flange.
9. Finish the flange surfaces so that they are smooth.
CAUTION Allow the cleaned area to dry for at least three minutes. Do not touch any surface that has been cleaned.
10.When reusing the quarter window glass, remove the adhesive still adhering to the quarter window glass, and clean with 3M AAD Part number 8906 or equivalent.
11.Clean the body side in the same way.
INSTALLATION SERVICE POINTS
FASTENER/CLIP INSTALLATION
1. If the quarter window glass assembly is reused, follow the procedure below:
- Engage the clip with the body.
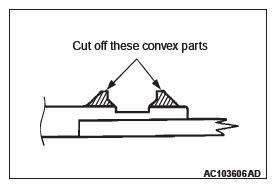
- Separate the convex portion of the quarter window glass assembly clip installation position.
NOTE: If the quarter window glass assembly is installed without separating the convex portion of the quarter window glass assembly clip installation position, improper installation may result.
CAUTION Before the next operation, leave the decreased parts for 3 minutes or more to dry. Do not touch the degreased parts.
2. Use 3M AAD Part number 8906 or equivalent to degrease the inside circumference of the quarter window glass assembly and the body flanges.
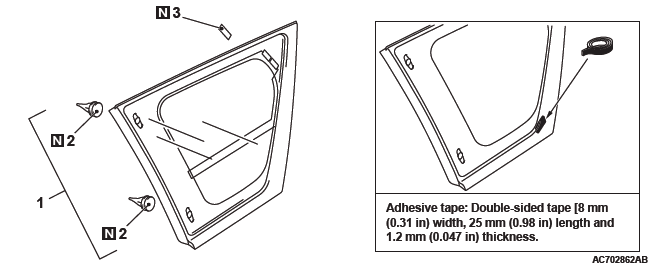
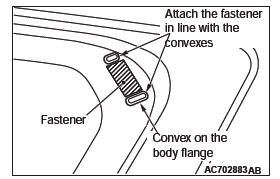
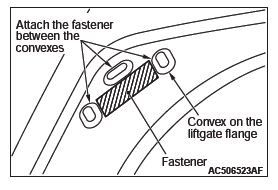
3. Install the fasteners to the specified positions on the body flange.
4. Install the fasteners to the quarter window glass assembly at the positions which correspond to the fasteners on the body flange.
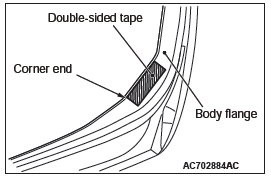
5. Apply the double-sided tape to the specified position on the body flange.
QUARTER WINDOW GLASS ASSEMBLY INSTALLATION
CAUTION Leave the degreased parts for 3 or more minutes to dry well, before starting on the next step. Do not touch the degreased parts.
1. Use 3M AAD Part number 8906 or equivalent to degrease the inside and outside of the quarter window glass and the body flanges.
2. Install the quarter window glass using the same procedures as for the windshield glass.
LIFTGATE WINDOW GLASS
REMOVAL AND INSTALLATION
Pre-removal and post-installation operation
- Rear wiper blade and arm assembly removal and installation
- Liftgate spoiler assembly removal and installation
- Liftgate trim removal and installation

Removal steps
- Harness connector
- Liftgate window glass
- Fastener
- Glass stopper
- Liftgate dam upper
- Liftgate dam side
- Liftgate dam lower
REMOVAL SERVICE POINT
LIFTGATE WINDOW GLASS REMOVAL
Remove the liftgate window glass by the same procedures as for the windshield glass.
NOTE: Use a piano wire to remove the liftgate window glass.
INSTALLATION SERVICE POINTS
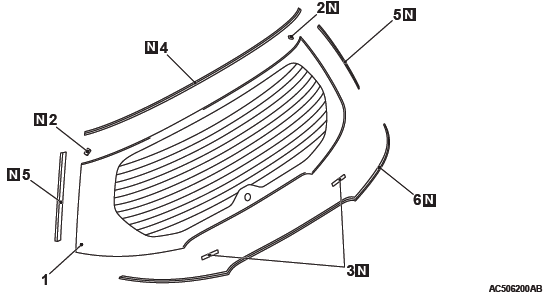
LIFTGATE DAM LOWER/LIFTGATE DAM SIDE/LIFTGATE DAM UPPER/GLASS STOPPER/ FASTENER INSTALLATION

1. As shown in the figure, divide the liftgate dam lower into three pieces.
- Liftgate dam lower center [725 mm (28.5 inches) ]
- Liftgate dam lower side (LH, RH) [471 mm (18.5 inches) ]
2. By referring to the illustration, cut the end of the liftgate dam lower (liftgate dam lower center, liftgate dam lower side) and liftgate dam side.
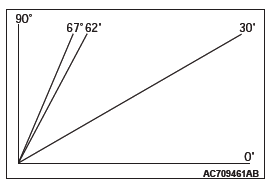

3. Cut both ends of the liftgate dam lower center to 67º.

4. Cut both ends of the liftgate dam lower side (LH) to 30º and 67º.

5. Cut both ends of the liftgate dam lower side (RH) to 67º and 30º.

6. Cut one side of the liftgate dam side (LH) end to 62º.

7. Cut one side of the liftgate dam side (RH) end to 62º.
CAUTION
- When adhering the liftgate dam lower center and the liftgate dam lower side, always use the adhesive of specified brand name (otherwise, a blushing occurs to the liftgate dam lower center and the liftgate dam lower side).
- When adhering, do not move the adhered objects for approximately 5 seconds.
- Do not apply excessive amount of adhesive to the application area (if excessive amount is applied, it takes longer for the adhesive to be hardened).
- Ensure that there is no level difference at the adhesion area.
- Ensure that the adhesive does not extrude on the adhesion area surface.
8. To both ends of the liftgate dam lower center, adhere the liftgate dam lower side (LH, RH) according to the procedure below.
NOTE: When the liftgate dam lower center and the liftgate dam lower side (LH, RH) are attached together, the liftgate dam lower is complete.
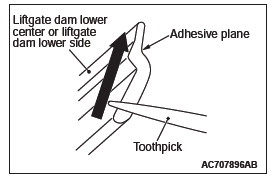
- To the 67º-end of the liftgate dam lower center and the 67º-end of the liftgate dam lower side, apply the adhesive.
NOTE: When applying the adhesive to the adhesion surfaces of the liftgate dam lower center and the liftgate dam lower side (LH, RH), the task becomes easier if a tooth pick is used.
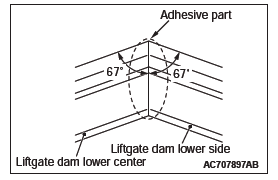
- Attach the 67º-end of the liftgate dam lower center with the 67º-end of the liftgate dam lower side.
CAUTION
- When adhering the liftgate dam lower and the liftgate dam side, always use the adhesive of specified brand name (otherwise, a blushing occurs to the liftgate dam lower and the liftgate dam side).
- When adhering, do not move the adhered objects for approximately 5 seconds.
- Do not apply excessive amount of adhesive to the application area (if excessive amount is applied, it takes longer for the adhesive to be hardened).
- Ensure that there is no level difference at the adhesion area.
- Ensure that the adhesive does not extrude on the adhesion area surface.
9. To both ends of the liftgate dam lower, adhere the liftgate dam side (LH, RH) according to the procedure below.
- Apply the adhesive only to the lip of the liftgate dam lower
30º-end.
NOTE: When applying the adhesive to the adhesion surfaces of the liftgate dam lower and the liftgate dam side (LH, RH), the task becomes easier if a tooth pick is used.
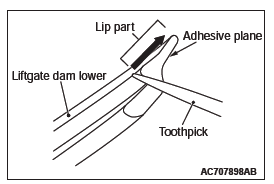
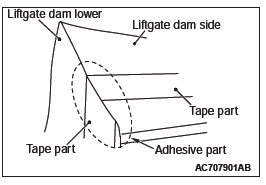
- Attach together the lip of liftgate dam lower 30º-end with the lip of liftgate dam side 62º-end (ensure that there is no level difference at the lip adhesion area).
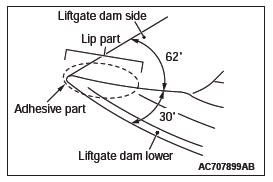
- After adhering the lip of the liftgate dam lower 30º-end with the lip of the liftgate dam side 62º-end, apply the adhesive to the remaining area.
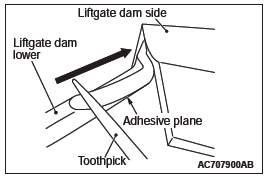
- Adhere the remaining area (ensure that there is no level difference at the tape part).
CAUTION Before the next operation, leave the degreased parts for 3 minutes or more to dry. Do not touch the degreased parts.
10.Use 3M AAD Part number 8906 or equivalent to degrease the inside circumference of the liftgate window glass and the liftgate flanges.
11.Install the liftgate dam lower, liftgate dam side, and liftgate dam upper according to the procedures below.
- Peel the backing paper of the liftgate dam lower.
- Adhere the liftgate dam lower to the liftgate window glass.
NOTE: The liftgate dam lower can be attached cleanly if the liftgate dam lower is attached to the liftgate window glass starting from the adhesion areas of the liftgate dam lower center and the liftgate dam lower side (LH, RH) located at the liftgate dam lower.
- Peel the backing paper of the liftgate dam side.
- Adhere the liftgate dam side to the liftgate window glass.
NOTE: The liftgate dam side can be attached cleanly if the liftgate dam side is attached to the liftgate window glass starting from the adhesion areas of the liftgate dam lower and the liftgate dam side (LH, RH) located at the liftgate dam lower.
- Peel the backing paper of the liftgate dam upper.
- Adhere the liftgate dam upper to the liftgate window glass.
- When the liftgate dam side's upper end section is protruding from the liftgate dam upper's upper end section, cut off the upper end section of the liftgate dam side so that the liftgate dam side's upper end section becomes leveled with the liftgate dam upper's upper end section.
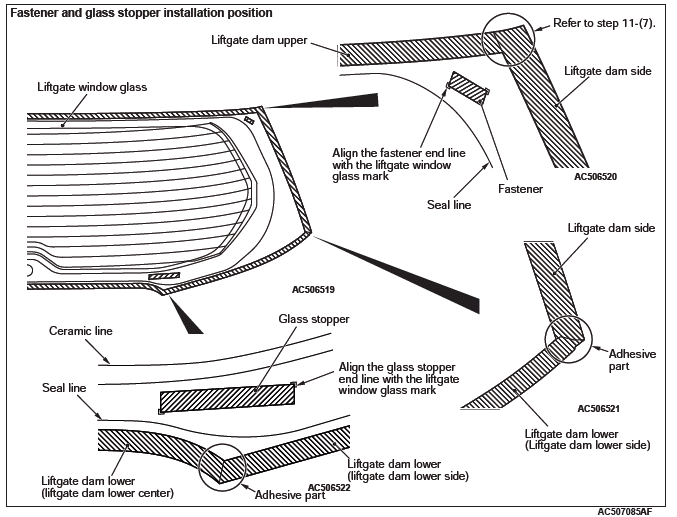
12.Install the glass stopper and fastener to the specified positions.
13.Correctly install the fasteners to the specified positions on the liftgate flange.
LIFTGATE WINDOW GLASS ASSEMBLY INSTALLATION
1. Apply the primer and adhesive.
2. Install the liftgate window glass by the same procedures as for the windshield glass.
READ NEXT:
 General Information
CENTRAL DOOR LOCKING SYSTEM
The central door locking system operates the door
lock actuator to lock or unlock the doors and liftgate
using the door lock switch built into the front power
window (main
Symptom Procedures (Central Door Locking System)
INSPECTION PROCEDURE A-1: Central Door Locking System does not Work at
All.
CAUTION
Before replacing the ECU, ensure that the power supply circuit, the ground
circuit and the communication
circuit a
SEE MORE:
Maintenance Service
1. FUEL SYSTEM (TANK, PIPE LINE AND
CONNECTION, AND FUEL TANK FILLER TUBE
CAP) (CHECK FOR LEAKS)
Check for damage or leakage in the fuel lines and connections.
2. FUEL HOSES (CHECK CONDITION)
1. Inspect the surface of fuel hoses for heat and mechanical
damage. Hard and brittle rubber, cracking, tear
On-vehicle Service
ENGINE COOLANT LEAK CHECK
WARNING
When pressure testing the cooling system, slowly
release cooling system pressure to avoid getting
burned by hot coolant.
CAUTION
Be sure to completely clean away any moisture from
the places checked.
When the tester is taken out, be careful not to spill any
co
