Mitsubishi Outlander: Balancer Shaft and Oil Pump Module
REMOVAL AND INSTALLATION
Pre-removal and Post-installation Operation
- Engine Oil Pan Removal and Installation
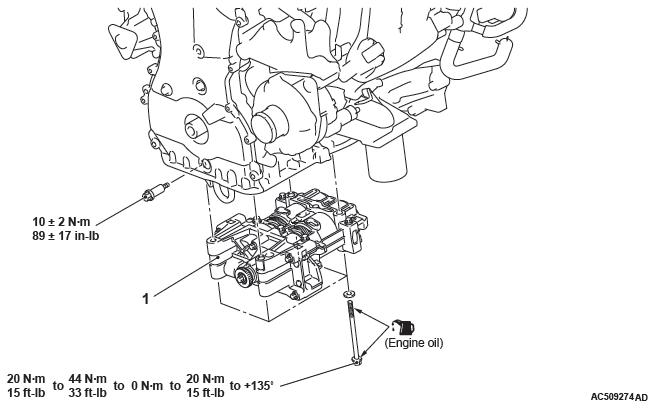
Removal steps
- Balancer shaft and oil pump module
Required Special Tool:
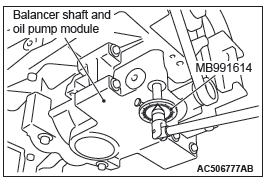
- MB991614: Angle Gauge
REMOVAL SERVICE POINT
BALANCER SHAFT AND OIL PUMP MODULE REMOVAL
CAUTION
- Never turn the crankshaft counterclockwise.
- Never turn the crankshaft after the cylinder No.1 or No.4 is set to the top dead center of compression.
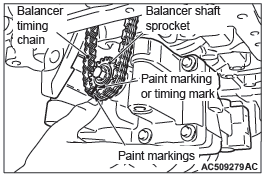
1. Turn the crankshaft clockwise to align the timing mark of the balancer shaft sprocket with the timing mark of the balancer shaft and oil pump module, and set the cylinder No.1 or No.4 to the top dead center of compression.
2. Put paint marks on the balancer shaft sprocket timing mark and balancer timing chain.

CAUTION
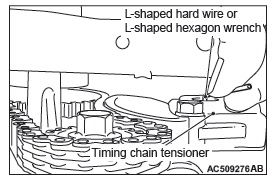
Securely install the plunger of the timing chain tensioner.
Otherwise, it may pop out.
3. Press the balancer timing chain against the timing chain tensioner, compress the plunger of the timing chain tensioner and insert L-shaped hard wire (piano wire, etc.) or L-shaped hexagon wrench (1.5 mm [0.05 inch] ) to the plunger fixing hole of the timing chain tensioner from under the timing chain case, and fix the plunger of the timing chain tensioner.
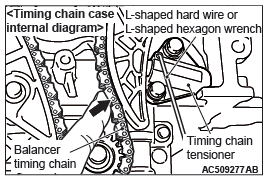
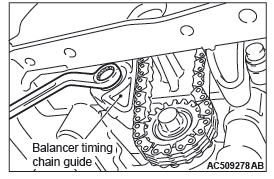
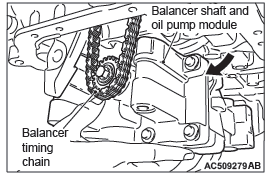
4. Use a wrench to remove the mounting bolt at the lower side of the balancer timing chain guide shown in the figure so that the balancer timing chain guide is unrestricted.
5. Support the balancer shaft and oil pump module with a hand, and remove the balancer shaft and oil pump module mounting bolt.
6. Remove the balancer shaft and oil pump module from the rudder frame with the balancer timing chain attached, and move it to the center of the engine.
7. Remove the balancer timing chain from the balancer shaft and oil pump module, and remove the balancer shaft and oil pump module.
CAUTION
When the tooth jump of the balancer timing chain from the crankshaft sprocket occurs, the timing between the balancer shaft and the oil pump module becomes off, resulting in the abnormal engine vibration. Be sure that the tooth jump will not occur.
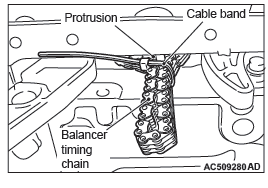
8. After the balancer shaft and oil pump module is removed, using a cable band, tie the balancer timing chain at the protrusion of the rudder frame to prevent the tooth jump of balancer timing chain from the crankshaft sprocket.
INSTALLATION SERVICE POINT
BALANCER SHAFT AND OIL PUMP MODULE INSTALLATION
1. When installing the new balancer shaft and oil pump module, apply oil to the oil pump in the balancer shaft and oil pump module and the balancer shaft bearing as follows.
- Clean the inside of the removed engine oil pan, and put the balancer shaft and oil pump module into the engine oil pan with its oil inlet port facing up.
- Pour new engine oil until two-thirds of the balancer shaft and oil pump module is soaked.
- Fill the engine oil (approximately 50 cm3 [3.05 cu.in.] ) into the balancer shaft and oil pump module from the oil inlet port.
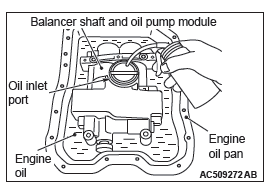
- Turn the balancer shaft sprocket of the balancer shaft and oil pump module clockwise four rotations or more to apply the engine oil to the entire area of the oil pump and the balancer shaft bearing.
2. Remove the cable band installed to prevent the tooth jump of the balancer timing chain from the crankshaft sprocket from the balancer timing chain.

3. Regarding the prevention of the tooth jump of the balancer timing chain, install the balancer shaft sprocket to the balancer timing chain with aligning the paint marking of the balancer shaft sprocket (the timing mark of the new balancer shaft and oil pump module) with that of the balancer timing chain.
4. With the paint marking of the balancer timing chain aligned with that of the balancer sprocket (the timing mark of the new balancer shaft and oil pump module), install the balancer shaft and oil pump module to the rudder frame.
Securely bring the balancer shaft and oil pump module into contact with the rudder frame mounting area.
5. Apply an adequate and minimum amount of engine oil to the threads and bearing surfaces of the balancer shaft and oil pump module bolts.
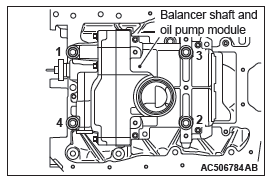
6. Tighten the balancer shaft and oil pump module bolts to the specified torque 20 N*m (15 ft-lb) in the order of number shown in the figure.
7. Tighten the balancer shaft and oil pump module bolts again to the specified torque 44 N*m (33 ft-lb) in the order of number shown in the figure.
8. Loosen the balancer shaft and oil pump module bolts fully in the reverse sequence to that shown.
9. Tighten the balancer shaft and oil pump module bolts to the specified torque 20 N*m (15 ft-lb) in the order of number shown in the figure.
10.After tightening to the specified torque, tighten the balancer shaft and oil pump module bolts to 135 degrees, using special tool MB991614, in the order of number shown in the figure.
11.Tighten the mounting bolt of the balancer timing chain guide lower with the standard torque.
Tightening torque: 10 +- 2 N*m (89 +- 17 in-lb)
12.Remove the plunger of the timing chain tensioner using the L-shaped hard wire (piano wire, etc.) or L-shaped hexagon wrench (1.5 mm [0.05 inch] ).
READ NEXT:
 Engine Assembly
REMOVAL AND INSTALLATION
CAUTION
When the engine assembly replacement is performed, use scan tool MB991958
to initialize the learning
value.
Pre-removal operation
Hood Removal
Fuel Line Pressure
Engine Overhaul - 2.4L Engine
General Specifications
Service Specifications
Rework Dimensions
Torque Specifications
NEW TIGHTENING METHOD BY USING
PLASTIC REGION TIGHTENING BOLT
Plastic region tightening bolts are used in s
Generator and Ignition System
REMOVAL AND INSTALLATION
Removal steps
Idler pulley
Idler pulley
Generator
Power steering pump bracket
Auto tensioner
Crankshaft pulley center bolt
Crankshaft pulley washer
Crankshaft pulley
SEE MORE:
Accessory socket
CAUTION:
● Be sure to use a “plug-in” type accessory operating at 12 V and at 120 W or
less.
When using more than one socket at the same time, make sure that the electrical
accessories are 12 V accessories and that the total power consumption does not exceed
120 W.
● Long us
General Information, Diagnosis
General Information
As for headlight assembly, a type with halogen
bulbs for the high-beam and low-beam and a type
with a discharge bulb for both high-beam and
low-beam are established.
The halogen bulb type headlight assembly
employs the four-light type integrated with the
headlight (low-b
