Mitsubishi Outlander: Generator and Ignition System
REMOVAL AND INSTALLATION
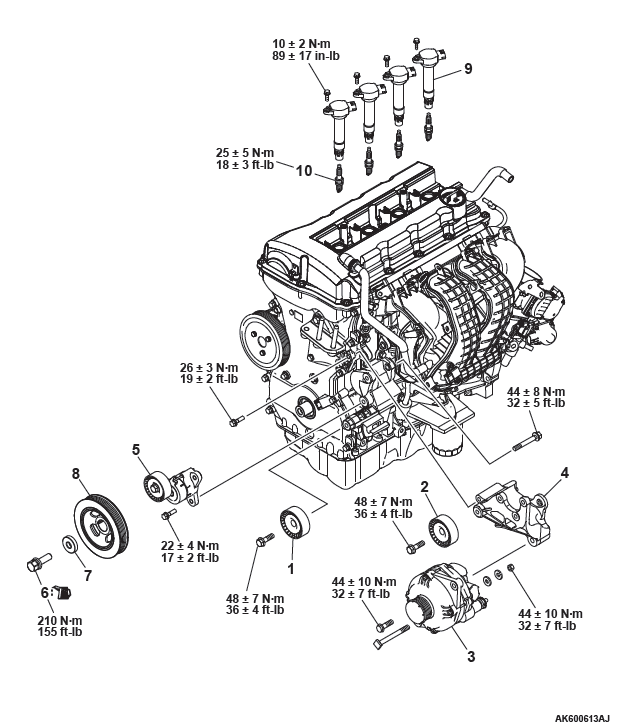
Removal steps
- Idler pulley
- Idler pulley
- Generator
- Power steering pump bracket
- Auto tensioner
- Crankshaft pulley center bolt
- Crankshaft pulley washer
- Crankshaft pulley
- Ignition coil
- Spark plug
Required Special Tool:
- MB991883: Flywheel Stopper
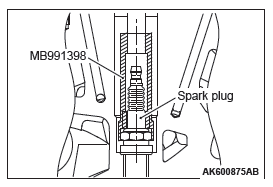
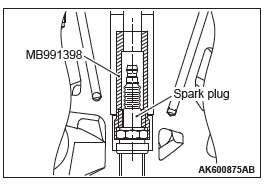
- MB991398: Spark plug wrench
REMOVAL SERVICE POINTS
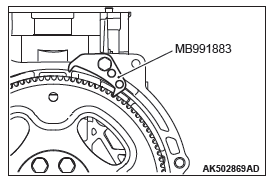
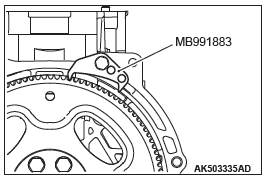
CRANKSHAFT PULLEY CENTER BOLT REMOVAL
1. Use special tool MB991883, to secure the drive plate.
2. Remove the crankshaft pulley center bolt.
SPARK PLUG REMOVAL
Using special tool MB991398, removal the spark plug.
INSTALLATION SERVICE POINTS
SPARK PLUG INSTALLATION
Use special tool MB991398, tighten the spark plug to specified tightening torque.
Tightening torque: 25 +- 5 N*m (18 +- 4 ft-lb)
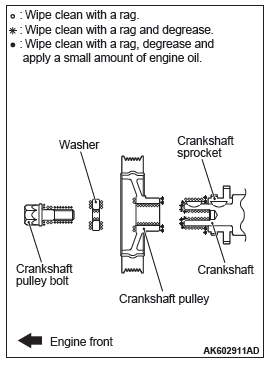
CRANKSHAFT PULLEY / CRANKSHAFT PULLEY WASHER / CRANKSHAFT PULLEY CENTER BOLT INSTALLATION
1. Use special tool MB991883, to secure the drive plate.
2. Wipe the dirt on the crankshaft pulley washer and on the thread hole of the crankshaft using a rag.
3. Wipe the dirt on the crankshaft pulley and the crankshaft sprocket using a rag, and then remove the grease from the portion shown in the illustration.
NOTE: Remove grease to prevent the coefficient of friction of the pressing portion from declining due to adhesion of oil.
4. Install the crankshaft pulley.
5. Apply an appropriate and minimum amount of engine oil to the threaded portion of the crankshaft and lower part of the flange.
6. With the chamfered side on the inside of the crankshaft pulley washer facing the bolt top, install the crankshaft pulley washer to the crankshaft pulley center bolt.
7. Tighten the crankshaft pulley center bolt to the specified tightening torque.
Tightening torque: 210 N*m (155 ft-lb)
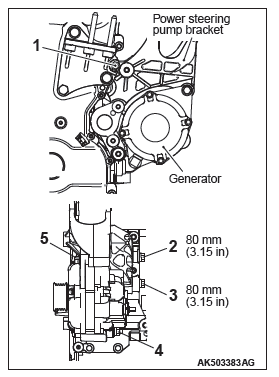
GENERATOR / POWER STEERING PUMP BRACKET INSTALLATION
1. Temporarily tighten power steering pump bracket bolts.
CAUTION
Always loosen the power steering pump bracket bolt, and temporarily the alternator. Then tighten each bolt.
2. Loosen the power steering pump bracket bolt and make the power steering pump bracket unfixed.
3. Temporarily tighten alternator bolts.
4. Tighten them to the specified tightening torque according to the order as illustrated.
Tightening torque
Power steering pump bracket:
M8: 26 +- 3 N*m (19 +- 2 ft-lb)
M10: 44 +- 8 N*m (33 +- 5 ft-lb)
Generator: 44 +- 10 N*m (32 +- 7 ft-lb)
Throttle Body and EGR System
REMOVAL AND INSTALLATION
Removal steps
- Vacuum pipe and hose
- Purge hose
- Chamber
- Purge hose
- Purge hose
- Water hose
- Throttle body stay
- Throttle body
- Throttle body gasket
- Exhaust gas recirculation valve
- Exhaust gas recirculation valve gasket
- EGR pipe
- EGR pipe gasket
- Exhaust gas recirculation valve support gasket
- EGR support stay A
- EGR support stay B
- Exhaust gas recirculation valve support
- EGR inlet pipe gasket
- EGR inlet pipe
- Solenoid valve
- O-ring
- Manifold absolute pressure (MAP) sensor
- O-ring
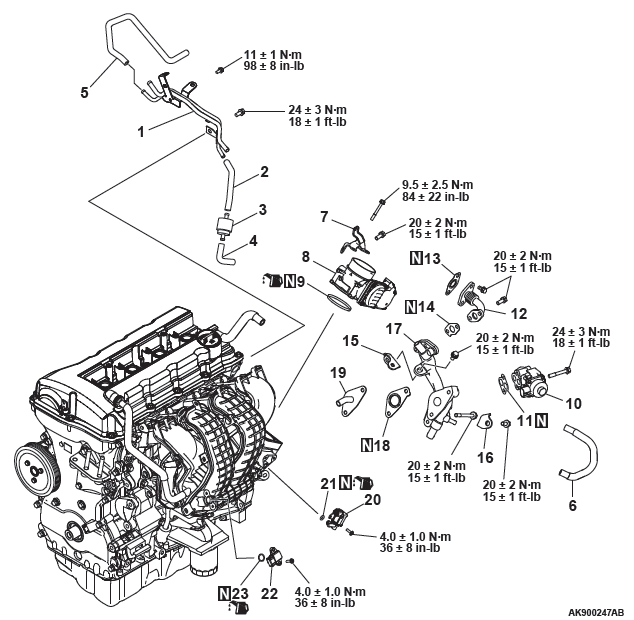
INSTALLATION SERVICE POINTS
MANIFOLD ABSOLUTE PRESSURE (MAP) SENSOR INSTALLATION
CAUTION
- Install the manifold absolute pressure (MAP) sensor, taking care not to give a shock to it.
- Do not use a manifold absolute pressure (MAP) sensor that has fallen down.
EGR INLET PIPE / EXHAUST GAS RECIRCULATION VALVE SUPPORT / EGR SUPPORT / EGR SUPPORT STAY A / EGR SUPPORT STAY B / EGR PIPE INSTALLATION
1. Temporarily tighten each part so that the protrusion of each gasket is positioned as illustrated.
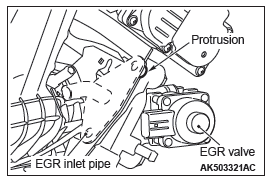
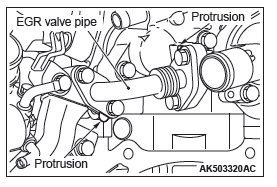
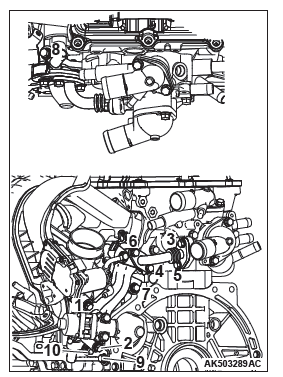
2. Tighten mounting bolts to the specified tightening torque in the order shown in the illustration.
Tightening torque: 20 +- 2 N*m (15 +- 1 ft-lb)
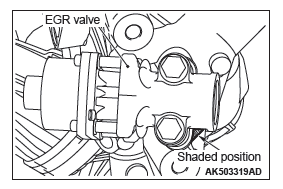
EXHAUST GAS RECIRCULATION VALVE GASKET INSTALLATION
Install the Exhaust gas recirculation valve gasket with the diagonally shaded area used as the illustrated position so as not to confuse the front with the back.
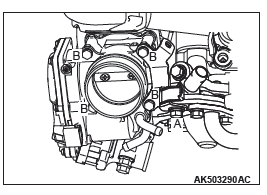
THROTTLE BODY GASKET / THROTTLE BODY INSTALLATION
1. Make sure that the throttle body gasket is placed before installing the throttle body.
2. Temporarily tighten throttle body and throttle body stay mounting bolts at A and B in the illustration.
3. Tighten the throttle body mounting bolt at illustrated position A to the specified torque.
Tightening torque: 20 +- 2 N*m (15 +- 1 ft-lb)
4. Tighten the throttle body mounting bolts at illustrated position B to the specified tightening torque.
Tightening torque: 9.5 +- 2.5 N*m (84 +- 22 in-lb)
READ NEXT:
 Intake Manifold and Fuel System
REMOVAL AND INSTALLATION
Removal steps
Oil dipstick rod
O-ring
Injector protector rear
Bracket
Bracket
Fuel rail assembly
Injection support
O-ring
Injector
O-ring
Fuel rail
Intake manifo
Exhaust Manifold
REMOVAL AND INSTALLATION
<4WD>
Removal steps
Exhaust manifold bracket C
Exhaust manifold bracket A
Crankshaft position sensor cover
Crankshaft position sensor
O-ring
Exhaust manifold upp
Oil Pan and Timing Chain Case
REMOVAL AND INSTALLATION
Removal steps
Breather hose
PCV hose
Positive Crankcase Ventilation
Valve
Positive Crankcase Ventilation
Valve gasket
Oil filler cap
O-ring
Oil drain plug
Oil drai
SEE MORE:
SRS Air Bag Diagnosis
INTRODUCTION TO DIAGNOSIS
The SRS system is controlled by the SRS-ECU. The
SRS-ECU judges how severe a collision is by detecting
signals from the left and right front impact sensors
and side impact sensors, front air bag analog
G-sensor and front air bag safing G-sensor and
side-airbag safing G-sens
DTC P0010, P0011, P0013, P0014, P0016, P0017, P0031, P0032, P0037, P0038
DTC P0010: Intake Engine Oil Control Valve Circuit
CIRCUIT OPERATION
The intake engine oil control valve power is supplied
from the MFI relay (terminal No. 2).
The ECM controls ground intake engine oil control
valve by turning the power transistor in the
ECM "ON" and "OFF".
TECHNICAL DESCR
