Mitsubishi Outlander: Engine Assembly
REMOVAL AND INSTALLATION
CAUTION
When the engine assembly replacement is performed, use scan tool MB991958 to initialize the learning value.
Pre-removal operation
- Hood Removal
- Fuel Line Pressure Reduction
- Engine Room Under Cover Front and Engine Room Side Cover Removal
- Engine Coolant Draining
- Engine Oil Draining
- Transmission Fluid Draining
- Engine Upper Cover Removal
- Air Cleaner Assembly Removal
- Battery and Battery Tray Removal
- Engine Control Module Removal
- Drive Shaft Removal
- Transfer Removal
- Strut Tower Bar Removal
- Exhaust Manifold Removal
- Throttle Body Removal
Post-installation operation
- Throttle Body Installation
- Exhaust Manifold Installation
- Strut Tower Bar Installation
- Transfer Installation
- Drive Shaft Installation
- Engine Control Module Installation
- Battery and Battery Tray Installation
- Air Cleaner Assembly Installation
- Transmission Fluid Draining
- Engine Oil Refilling
- Engine Coolant Refilling
- Drive Belt Tension Check
- Engine Room Under Cover Front and Engine Room Side Cover Installation
- Engine Upper Cover Installation
- Fuel Leak Check
- Hood Installation
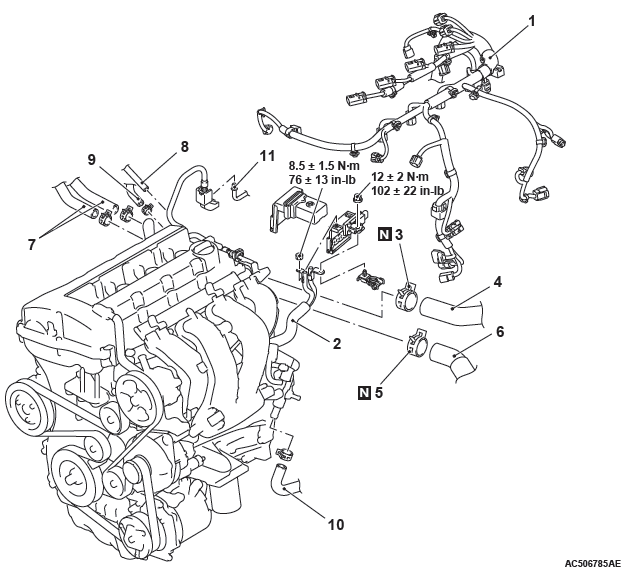
Removal steps
- Control wiring harness connection
- Battery cable connection
- Hose clip
- Radiator upper hose connection
- Hose clip
- Radiator lower hose connection
- Heater hose connection
- Emission vacuum hose connection
- Brake booster vacuum hose connection
- Cooling water line hose connection
- Fuel high-pressure hose connection
- Drive belt
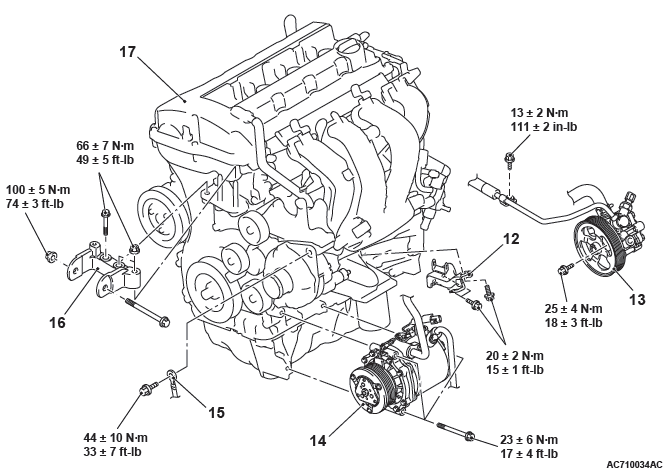
Removal steps
- Transaxle assembly
- Intake manifold stay
- Intake manifold stay
- Power steering oil pump assembly
- A/C compressor and clutch assembly
- Grounding cable connection
- Engine mounting bracket
- Engine assembly
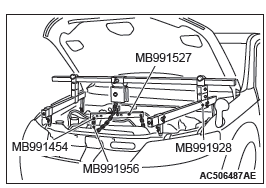
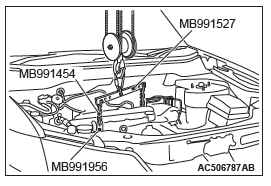
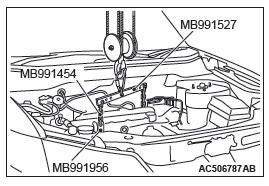
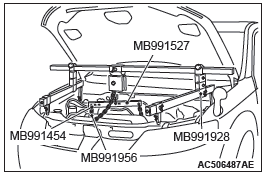
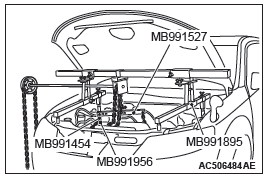
Required Special Tools:
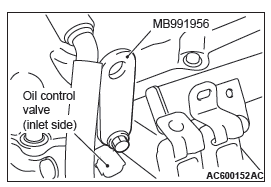
- MB991956: Engine Hanger Plate
- MB991527: Hanger
- MB991454: Engine Hanger Balancer
- MB991895: Engine Hanger
- MB991928: Engine Hanger
REMOVAL SERVICE POINTS
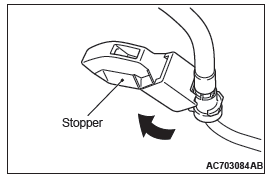
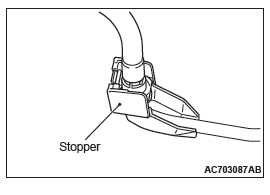
FUEL HIGH-PRESSURE HOSE REMOVAL
1. Remove the stopper of the fuel high-pressure hose.
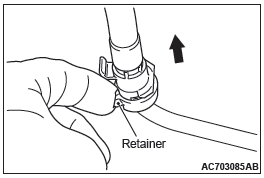
2. Raise the retainer of the fuel high-pressure hose and pull out the fuel high-pressure hose in the direction shown in the figure.
NOTE: If the retainer is released, install it securely after removing the fuel high-pressure hose.
POWER STEERING OIL PUMP ASSEMBLY REMOVAL
1. Remove the power steering oil pump assembly with hose on it.
2. Tie the removed power steering oil pump with a string at a position where it will not interfere with the removal and installation of engine assembly.
A/C COMPRESSOR AND CLUTCH ASSEMBLY REMOVAL
1. Remove the A/C compressor and clutch assembly together with the hose from the bracket.
2. Tie the removed A/C compressor and clutch assembly with a string at a position where it will not interfere with the removal and installation of engine assembly.
ENGINE MOUNTING BRACKET REMOVAL
CAUTION
When supporting the engine and transaxle assembly with a garage jack, be careful not to deform the engine oil pan.
1. Place a garage jack against the engine oil pan with a piece of wood in between to support the engine assembly.
2. Remove special tools engine hanger (MB991928 or MB991895) which was installed for supporting the engine assembly when the transaxle assembly was removed.
3. Operate a garage jack so that the engine weight is not applied to the engine mounting insulator, and remove the engine mounting bracket.

ENGINE ASSEMBLY REMOVAL
After checking that all cables, hoses and wiring harness connectors and so on are disconnected from the engine, lift the engine assembly slowly with the chain block to remove the engine assembly upward from the engine compartment.
INSTALLATION SERVICE POINTS
ENGINE ASSEMBLY INSTALLATION
1. Install special tool MB991956 to the cylinder head, and set special tool MB991527 and the chains of special tool MB991454 to the engine assembly to hold the engine assembly.
2. Install the engine assembly, being careful not to pinch the cables, hoses, or wiring harness connectors.
ENGINE MOUNTING BRACKET INSTALLATION
CAUTION
When supporting the engine and transaxle assembly with a garage jack, be careful not to deform the engine oil pan.
1. Place a garage jack against the engine oil pan with a piece of wood in between, and install the engine mounting bracket while adjusting the position of the engine.
2. Install special tool engine hanger (MB991928 or MB991895) which is used during installation of transaxle assembly to hold the engine assembly.
3. Remove the garage jack which supports the engine assembly.
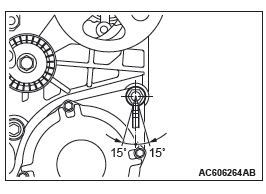
GROUNDING CABLE CONNECTION
1. Install the grounding cable in the direction shown in the illustration.
2. Tighten the generator mounting bolt to the specified torque.
Tightening torque: 44 +- 10 N*m (33 +- 7 ft-lb)
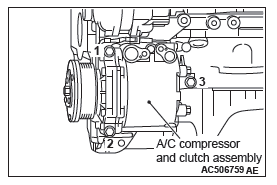
A/C COMPRESSOR AND CLUTCH ASSEMBLY INSTALLATION
Tighten A/C compressor and clutch assembly mounting bolts to the specified torque in the order of number shown in the illustration.
Tightening torque: 23 +- 6 N*m (17 +- 4 ft-lb)
FUEL HIGH-PRESSURE HOSE INSTALLATION
CAUTION
After connecting the fuel high-pressure hose, slightly pull it in the pull-out direction to check that it is installed firmly.
In addition, check that there is approximately 1 mm (0.04 inch) play. After the check, install the stopper securely.
READ NEXT:
 Engine Overhaul - 2.4L Engine
General Specifications
Service Specifications
Rework Dimensions
Torque Specifications
NEW TIGHTENING METHOD BY USING
PLASTIC REGION TIGHTENING BOLT
Plastic region tightening bolts are used in s
Generator and Ignition System
REMOVAL AND INSTALLATION
Removal steps
Idler pulley
Idler pulley
Generator
Power steering pump bracket
Auto tensioner
Crankshaft pulley center bolt
Crankshaft pulley washer
Crankshaft pulley
Intake Manifold and Fuel System
REMOVAL AND INSTALLATION
Removal steps
Oil dipstick rod
O-ring
Injector protector rear
Bracket
Bracket
Fuel rail assembly
Injection support
O-ring
Injector
O-ring
Fuel rail
Intake manifo
SEE MORE:
DTC B1000, B1003, B1018, B1021, B1031, B1032, B1034, B1035, B1079,
B2214, B223B
DTC B1000: Control Panel Communication Error
DTC SET CONDITION
DTC B1000 will be set when the communication
between A/C-ECU and A/C control panel cannot be
performed.
TECHNICAL DESCRIPTION (COMMENT)
Current trouble
The A/C-ECU, the A/C control panel, or connector(
s) or wiring between the two m
Towing
If your vehicle needs to be towed
If you need to tow your vehicle, we recommend that you contact a MITSUBISHI MOTORS
Authorised Service Point or tow truck company.
In the following cases, transport the vehicle using a tow truck.
● The engine runs but the vehicle does not move, or an abn
