Mitsubishi Outlander: Parking Brakes
General Information
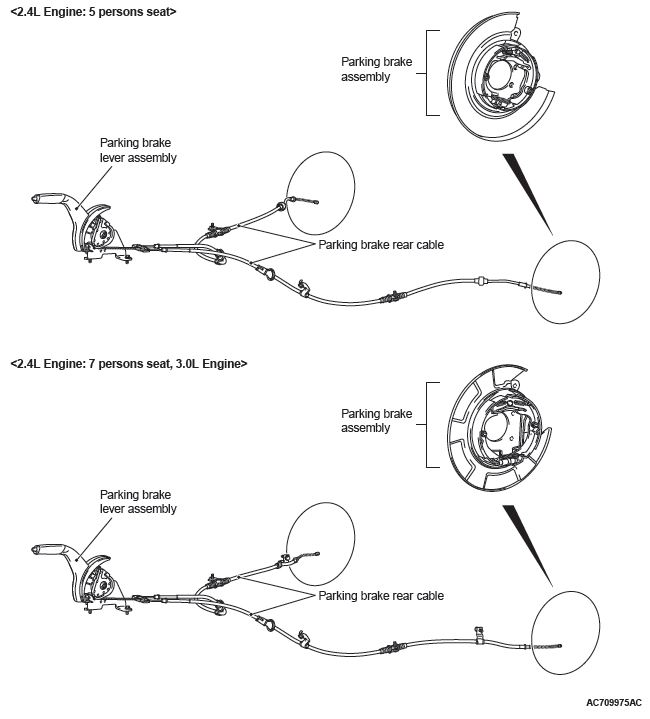
The mechanical rear-wheel acting type parking brake is adopted, and a parking brake lever is used for that operation.
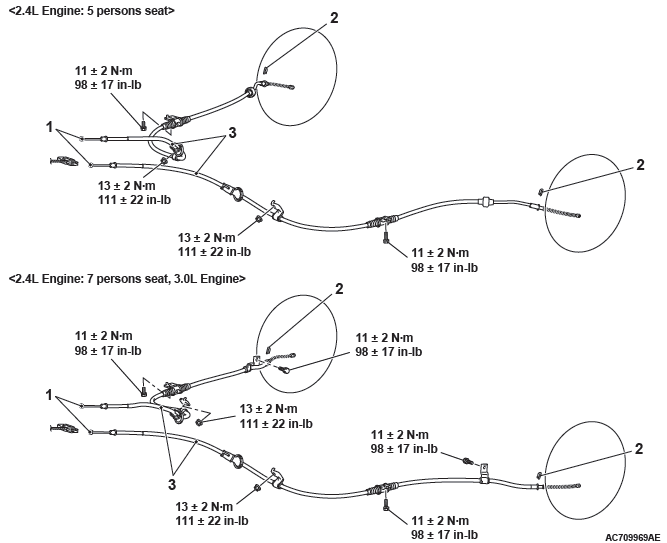
CONSTRUCTION DIAGRAM
<2.4L Engine: 5 persons seat>
<2.4L Engine: 7 persons seat, 3.0L Engine>
Service Specifications

Parking Brake Diagnosis
INTRODUCTION
If the parking brake is faulty, parking brake effort will become insufficient. The cause may be a malfunction of parking brake parts or the parking brake lever being out of adjustment.
TROUBLESHOOTING STRATEGY
Use these steps to plan your diagnostic strategy. If you follow them carefully, you will be sure that you have exhausted most of the possible ways to find a parking brakes fault.
1. Gather Information from the customer.
2. Verify that the condition described by the customer exists.
3. Find the malfunction by following the Symptom Chart.
4. Verify malfunction is eliminated.
SYMPTOM CHART
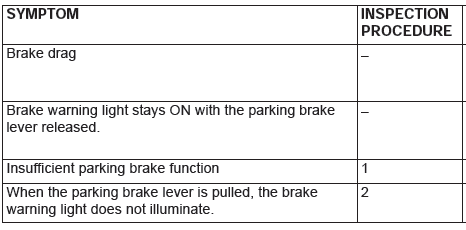
SYMPTOM PROCEDURES
INSPECTION PROCEDURE 1: Insufficient Parking Brake Function
DIAGNOSIS
STEP 1. Check the excessive parking brake lever stroke.
Q: Is the parking brake lever stroke adjusted properly?
YES : Go to Step 2.
NO : Adjust the parking brake lever stroke or check the parking brake cable routing. Then go to Step 5.
STEP 2. Check the parking brake cable for sticking.
Q: Is the parking brake cable stuck?
YES : Replace the cable. Then go to Step 5.
NO : Go to Step 3.
STEP 3. Check the brake lining and brake drum for wear.
Q: Is the brake lining thickness or brake drum inside diameter outside of specification?
YES : Replace the rear brake shoe assembly or rear brake disk.
Then go to Step 5.
NO : Go to Step 4.
STEP 4. Check for oil, water, etc., on the lining contact surfaces.
Q: Is oil, water, etc., on the lining contact surface?
YES : Replace the part and determine and repair source/cause of foreign material. Then go to Step 5.
NO : Carry out the parking brake lining seating procedure and then go to Step 5.
STEP 5. Retest the system.
Q: Is the malfunction eliminated?
YES : The procedure is complete.
NO : Recheck from Step 1.
INSPECTION PROCEDURE 2: When the Parking Brake Lever is Pulled, the Brake Warning Light does not Illuminate.
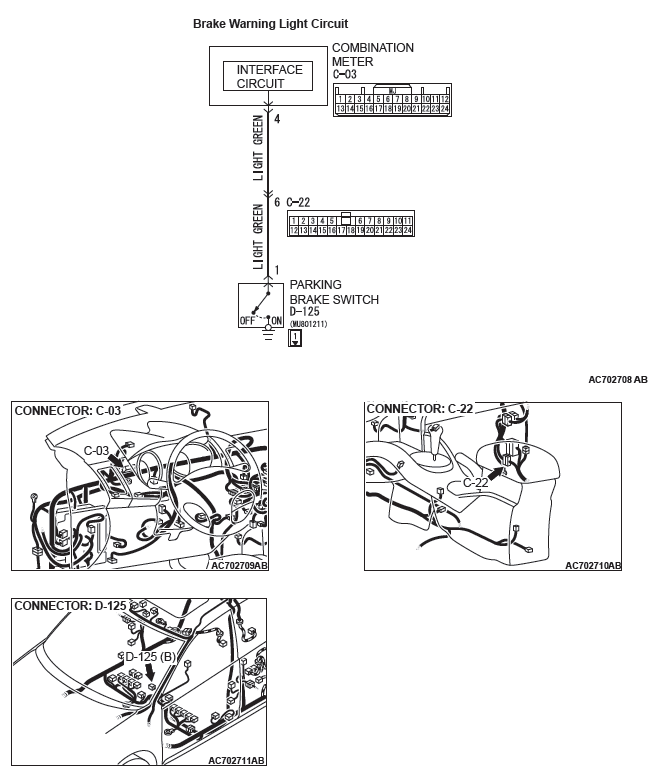
TECHNICAL DESCRIPTION (COMMENT)
The parking brake switch turns on and off by operating the parking brake lever, and the brake warning light illuminates and goes out, indicating the operating status of parking brake to a driver.
TROUBLESHOOTING HINTS (THE MOST LIKELY CAUSES FOR THIS CASE:)
- Damaged wiring harness or connector
- Parking brake switch defective
- Combination meter defective
DIAGNOSIS
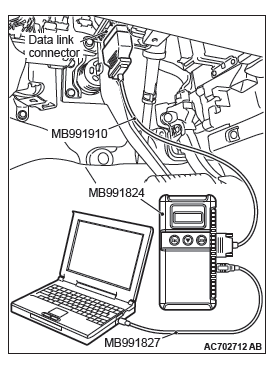
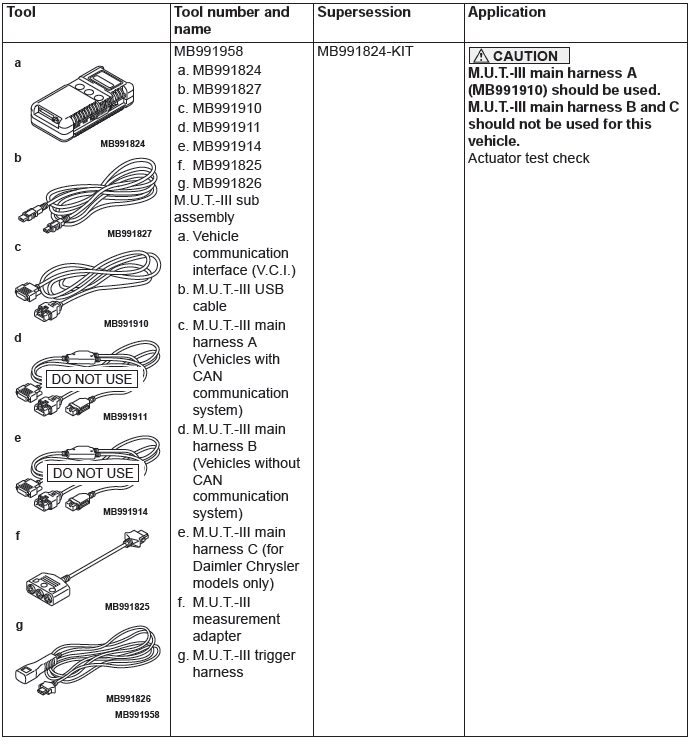
Required Special Tools:
- MB991958: Scan Tool (M.U.T.-III Sub Assembly)
- MB991824: Vehicle Communication Interface (V.C.I.)
- MB991827: M.U.T.-III USB Cable
- MB991910: M.U.T.-III Main Harness A
STEP 1. Using scan tool MB991958, check combination meter actuator test.
CAUTION To prevent damage to scan tool MB991958, always turn the ignition switch to the "LOCK" (OFF) position before connecting or disconnecting scan tool MB991958.
- Connect scan tool MB991958 to the data link connector.
- Turn the ignition switch to the "ON" position.
- Turn the parking brake switch and brake fluid level switch to "OFF" position.
- Set scan tool MB991958 to the actuator test mode.
- Item 13: Indicator4: ON
- The brake warning light illuminates.
- Item 13: Indicator4: OFF
- The brake warning light goes out.
- Item 13: Indicator4: ON
- Turn the ignition switch to the "LOCK" (OFF) position.
Q: Is the check result normal?
YES : Go to Step 2.
NO : Replace the combination meter (Refer to GROUP 54A, Combination meter assembly).
STEP 2. Check the parking brake switch.
Q: Is the parking brake switch normal?
YES : Go to Step 3.
NO : Replace the parking brake switch.
Then go to Step 6.
STEP 3. Connector check: D-125 parking brake switch connector, C-22 intermediate connector and C-03 combination meter connector
Q: Is the check result normal?
YES : Go to Step 4.
NO : Repair or replace the faulty connector (Refer to GROUP 00E, Harness Connector Inspection). Then go to Step 6.
STEP 4. Check the wiring harness for an open circuit between D-125 parking brake switch connector terminal No.1 and C-03 combination meter connector terminal No.4.
- Disconnect D-125 parking brake switch connector from C-03 combination meter connector, and measure at the wiring harness side connector.
- Measure the resistance between D-125 parking brake
switch connector terminal No.1 and C-03 combination
meter connector terminal No.4.
OK: Continuity exists (2 Ω or less)
Q: Is the check result normal?
YES : Go to Step 5.
NO : A open circuit may be present in the wiring harness between D-125 parking brake switch connector terminal No.1 and C-03 combination meter connector terminal No.4. Repair the wiring harness if necessary, and then go to Step 6.
STEP 5. Retest the system.
Q: Does the brake warning light illuminate when the parking brake lever is pull?
YES : It can be assumed that this malfunction is intermittent (Refer to GROUP 00, How to Use Troubleshooting/Inspection Service Points − How to Cope with Intermittent Malfunction).
NO : Replace the combination meter (Refer to GROUP 54A, Combination meter assembly).
STEP 6. Retest the system.
Q: Does the brake warning light illuminate when the parking brake lever is pulled?
YES : The procedure is complete.
NO : Return to Step 1.
Special Tool
On-vehicle Service
PARKING BRAKE LEVER STROKE CHECK AND ADJUSTMENT
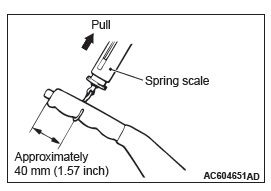
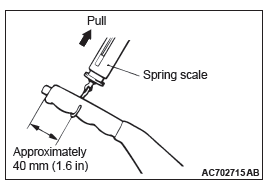
STROKE CHECK
Attach the spring scale to the center of the parking brake lever grip. Then, check that the stroke is within the standard value when the parking brake lever is pulled to the vertical direction of the lever with a force of approximately 200 N (45 pounds).
Standard value: 3 to 5 notches
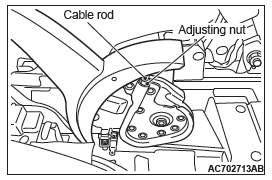
STROKE ADJUSTMENT
If the parking brake lever stroke is out of the standard range, adjust as described below:
1. Remove the rear floor console assembly.
2. Loosen the adjusting nut to the end of the cable rod in order to allow slack in the cables.
3. Remove the rear brake disc adjusting hole plug. Then insert a flat-tipped screwdriver to turn the adjuster to the arrow direction (to expand the shoe) until the parking brake shoe makes contact and the disc can no longer be turned. Back off the adjuster to the opposite direction by five notches.

CAUTION Be careful that the parking brake lever notch number should be within the standard range. If the notch number is too low, rear brake dragging can be caused.
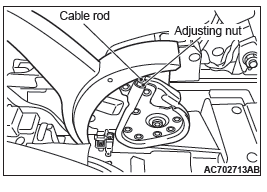
4. Adjust the parking brake lever stroke to the standard value by turning the adjusting nut. After adjustment, check that there is no free play between the adjusting nut and the parking brake lever.
5. After the parking brake lever stroke is adjusted, raise the rear of the vehicle. Release the parking brake, and turn the rear wheels to confirm that the rear brakes are not dragging.
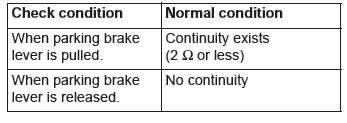
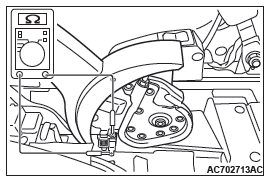
PARKING BRAKE SWITCH CHECK
CAUTION Do not apply grease or lubricant to the switch and the switch installation section to avoid malfunction of the switch. In addition, do not use gloves which have grease on them.
1. Remove the rear floor console assembly.
2. Check for continuity between the parking brake switch terminal and the switch mounting bolt.
PARKING BRAKE LINING SEATING PROCEDURE
CAUTION Perform lining seating in a place with good visibility, and pay special attention to safety.
Perform lining seating by the following procedure when replacing the parking brake shoe assemblies or the rear brake discs, or when brake performance is insufficient.
1. Adjust the parking brake lever stroke to the standard value.
2. Hook a spring scale onto the center of the parking brake lever grip and pull it with a force of 98 − 147 N (22 − 33 pounds) in a direction perpendicular to the handle.
3. Drive the vehicle at a constant speed of 35 − 50 km/h (22 − 31 mph) for 100 meters (328 feet).
4. Release the parking brake and let the brakes cool for five to ten minutes.
5. Repeat the procedure in steps 2. to 4. four to five times.
Parking Brake Lever
CAUTION Do not apply grease or lubricant to the switch and the switch installation section to avoid malfunction of the switch. In addition, do not use gloves which have grease on them.
Pre-removal operation
- Rear Floor Console Assembly Removal
Post-installation operation
- Parking Brake Lever Stroke Check
- Rear Floor Console Assembly Installation
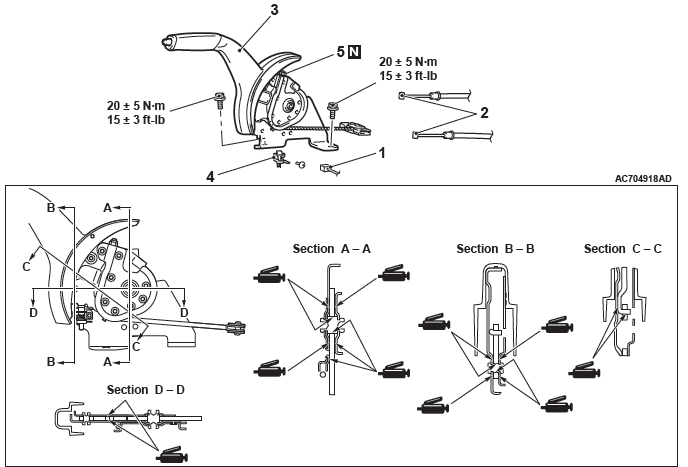
Removal steps
- Release the parking brake lever.
- Loosen the adjusting nut.
- Parking brake switch connector connection
- Parking brake rear cable assembly connection
- Parking brake lever assembly
- Parking brake switch
- Adjusting nut
INSTALLATION SERVICE POINT
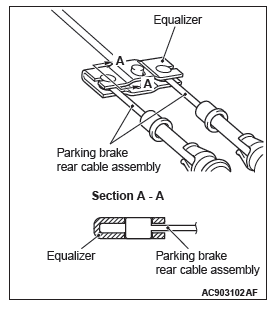
PARKING BRAKE REAR CABLE ASSEMBLY CONNECTION INSTALLATION
CAUTION Check that the equalizer and the parking brake rear cable assembly are connected correctly. If the parking brake is applied with the equalizer and the parking brake rear cable assembly connected improperly, the equalizer may be damaged.
Connect the parking brake rear cable assembly to the equalizer as shown in the figure.
Parking Brake Cable
REMOVAL AND INSTALLATION
Pre-removal operation
- Rear Floor Console Assembly Removal
- Second Seat Assembly Removal
- Shoe and Lining Assembly Removal
Post-installation operation
- Shoe and Lining Assembly Installation
- Second Seat Assembly Installation
- Parking Brake Lever Stroke Check and Adjustment
- Rear Floor Console Assembly Installation
- Parking brake lining seating procedure
<2.4L Engine: 5 persons seat>
<2.4L Engine: 7 persons seat, 3.0L Engine>
Removal steps
- Release the parking brake lever
- Loosen the adjusting nut
- Parking brake rear cable assembly connection
- Clip
- Parking brake rear cable assembly
INSTALLATION SERVICE POINT
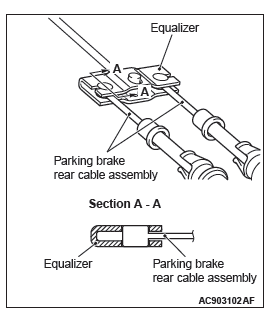
PARKING BRAKE REAR CABLE ASSEMBLY CONNECTION INSTALLATION
CAUTION Check that the equalizer and the parking brake rear cable assembly are connected correctly. If the parking brake is applied with the equalizer and the parking brake rear cable assembly connected improperly, the equalizer may be damaged.
Connect the parking brake rear cable assembly to the equalizer as shown in the figure.
Parking Brake Lining and Drum
REMOVAL AND INSTALLATION <2.4L ENGINE: 5 PERSONS SEAT>
Post-installation Operation
- Parking Brake Lever Stroke Check and Adjustment
- Parking Brake Lining Seating Procedure
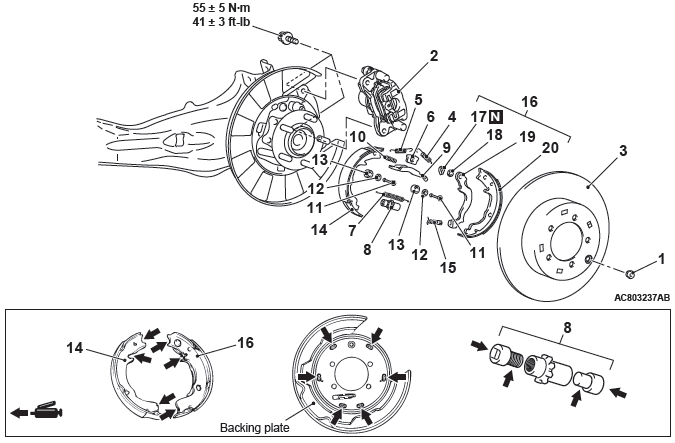
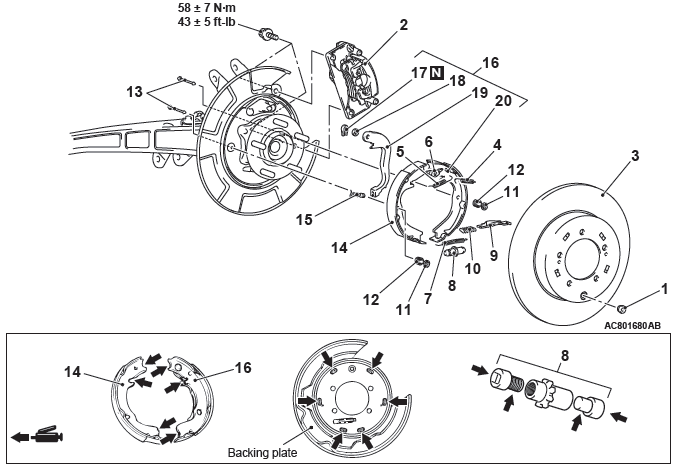
Removal steps
- Release the parking brake lever.
- Plug
- Rear brake caliper assembly
- Rear brake disk
- Shoe-to-anchor spring
- Shoe-to-anchor spring
- Shoe guide plate
- Adjusting wheel spring
- Adjuster assembly
- Strut
- Strut shoe-to-spring
- Shoe hold down pin
- Shoe hold down cup
- Shoe hold down spring
- Shoe and lining assembly
- Parking brake rear cable assembly connection
- Shoe and lever assembly
- Retainer
- Wave washer
- Parking lever
- Shoe and lining assembly
REMOVAL SERVICE POINTS
REAR BRAKE CALLIPER ASSEMBLY REMOVAL
1. Remove the rear brake caliper assembly with the brake hose.
2. Secure the removed rear brake caliper assembly with a wire or other similar material at a position where it will not interfere with the removal and installation operations.
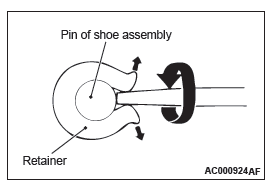
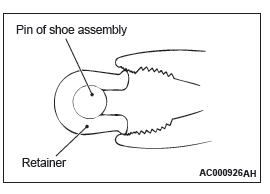
RETAINER REMOVAL
Use a flat-tipped screwdriver or a similar tool to open up the retainer joint. Then remove the retainer.
INSTALLATION SERVICE POINTS
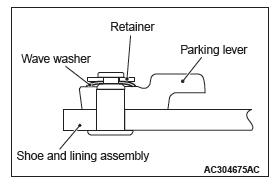
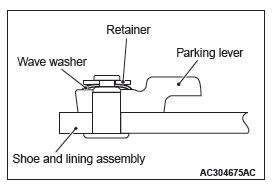
WAVE WASHER INSTALLATION
Install the wave washer in the direction shown in the illustration.
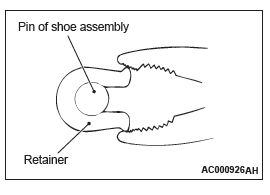
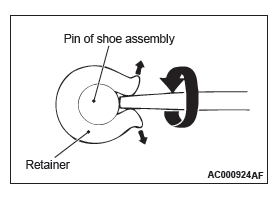
RETAINER INSTALLATION
Use pliers or a similar tool to close the retainer end onto the pin.
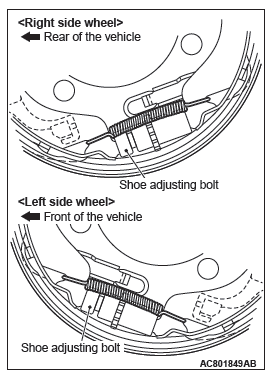
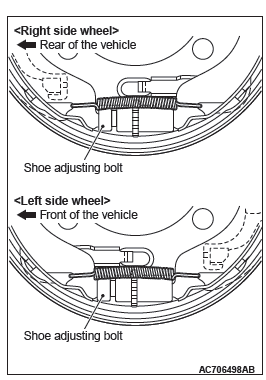
ADJUSTER ASSEMBLY INSTALLATION
Install the adjuster assemblies. The shoe adjusting bolt should be mounted to the rear of the vehicle for the right wheel, and to the front of the vehicle for the left wheel.
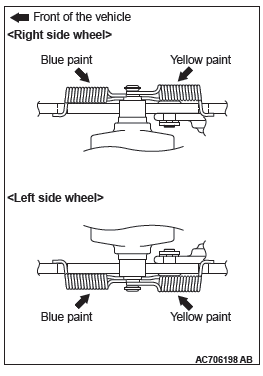
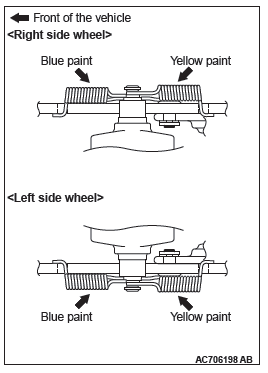
SHOE-TO-ANCHOR SPRING INSTALLATION
The shoe-to-anchor springs are not interchangeable because their spring loads are different. The one with blue paint mark should be installed to the front of the vehicle, and the other with yellow paint to the rear of the vehicle, respectively.
REMOVAL AND INSTALLATION <2.4L ENGINE: 7 PERSONS SEAT, 3.0L ENGINE>
Post-installation Operation
- Parking Brake Lever Stroke Check and Adjustment
- Parking Brake Lining Seating Procedure
Removal steps
- Release the parking brake lever.
- Plug
- Rear brake caliper assembly
- Rear brake disk
- Shoe-to-anchor spring
- Shoe-to-anchor spring
- Shoe guide plate
- Adjusting wheel spring
- Adjuster assembly
- Strut
- Strut shoe-to-spring
- Shoe hold down cup
- Shoe hold down spring
- Shoe hold down pin
- Shoe and lining assembly
- Parking brake rear cable assembly connection
- Shoe and lever assembly
- Retainer
- Wave washer
- Parking lever
- Shoe and lining assembly
REMOVAL SERVICE POINTS
REAR BRAKE CALLIPER ASSEMBLY REMOVAL
1. Remove the rear brake caliper assembly with the brake hose.
2. Secure the removed rear brake caliper assembly with a wire or other similar material at a position where it will not interfere with the removal and installation operations.
RETAINER REMOVAL
Use a flat-tipped screwdriver or a similar tool to open up the retainer joint. Then remove the retainer.
INSTALLATION SERVICE POINTS
WAVE WASHER INSTALLATION
Install the wave washer in the direction shown in the illustration.
RETAINER INSTALLATION
Use pliers or a similar tool to close the retainer end onto the pin.
ADJUSTER ASSEMBLY INSTALLATION
Install the adjuster assemblies. The shoe adjusting bolt should be mounted to the rear of the vehicle for the right wheel, and to the front of the vehicle for the left wheel.
SHOE-TO-ANCHOR SPRING INSTALLATION
The shoe-to-anchor springs are not interchangeable because their spring loads are different. The one with blue paint mark should be installed to the front of the vehicle, and the other with yellow paint to the rear of the vehicle, respectively.
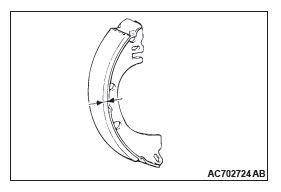
BRAKE LINING THICKNESS CHECK
1. Measure the lining thickness at the most worn area.
Standard value: 2.8 mm (0.11 inch)
Limit: 1.0 mm (0.04 inch)
2. If the thickness is less than the limit value, replace the right and left shoe and lining assemblies as a set.
BRAKE DRUM INSIDE DIAMETER CHECK
1. Measure the inside diameter of the brake drum at two positions or more.
Standard value:
168.0 mm (6.61 inch) <2.4L Engine: 5 persons seat>
190.0 mm (7.48 inch) <2.4L Engine: 7 persons seat, 3.0L Engine>
Limit:
169.0 mm (6.65 inch) <2.4L Engine: 5 persons seat>
191.0 mm (7.52 inch) <2.4L Engine: 7 persons seat, 3.0L Engine>
2. If the inside diameter is more than limit value or if there is excessive wear, replace the brake disk.
READ NEXT:
 Power Steering
General Information
The steering wheel has three spokes and is
equipped with SRS (Supplemental Restraint System).
The steering column has a shock absorbing
mechanism and a tilt steering mechanism
Power Steering Diagnosis
INTRODUCTION TO POWER STEERING DIAGNOSIS
Hydraulic power steering is used for all vehicles.
Faults in the power steering can include excessive
play of the steering wheel, difficult steering wheel
ope
On-vehicle Service
STEERING WHEEL FREE PLAY CHECK
1. With the engine running (hydraulic pressure applied),
position the front wheel in the straight ahead direction.
2. Measure the side to side steering wheel play until
SEE MORE:
Post-collision Diagnosis
To inspect and service the SRS after a collision (whether or not
the air bags have deployed), perform the following steps.
SRS-ECU MEMORY CHECK
Required Special Tool:
MB991958: Scan Tool (M.U.T.-III Sub Assembly)
MB991824:Vehicle Communication Interface (V.C.I.)
MB991827:M.U.T.-III USB Cable
Ventilators
1- Centre ventilators.
2- Side ventilators.
Air flow and direction adjustments
Centre ventilators
Move the knob (A) to adjust the air flow direction.
To close the ventilator, fully move the knob (A) to the inner side.
1- Close.
2- Open.
Side ventilators
Move the knob (A) to adjust the a
