Mitsubishi Outlander: Power Steering Diagnosis
INTRODUCTION TO POWER STEERING DIAGNOSIS
Hydraulic power steering is used for all vehicles.
Faults in the power steering can include excessive play of the steering wheel, difficult steering wheel operation, noise, vibration, and oil leaks, etc. Possible causes of these faults can include defects in the gear box, oil pump or steering linkage.
POWER STEERING DIAGNOSIS TROUBLESHOOTING STRATEGY
Use these steps to plan your diagnostic strategy. If you follow them carefully, you will be sure that you have exhausted most of the possible ways to find a power steering fault.
1. Gather information from the customer.
2. Verify that the condition described by the customer exists.
3. Find the malfunction by following the Symptom Chart.
4. Verify malfunction is eliminated.
SYMPTOM CHART
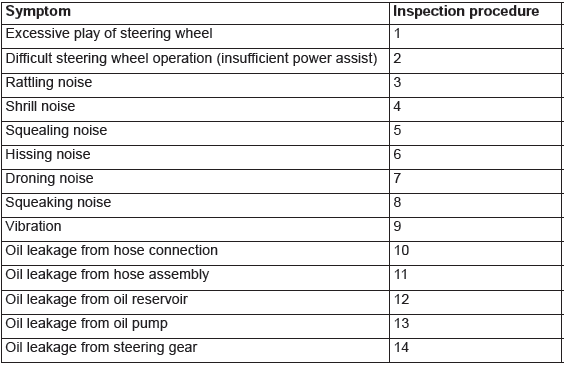
SYMPTOM PROCEDURES
INSPECTION PROCEDURE 1: Excessive Play of Steering Wheel
DIAGNOSIS
STEP 1. Check for looseness at the steering shaft coupling section and at the steering wheel linkage.
Q: Is there any looseness?
YES : Repair or replace the part. Then go to Step 3.
NO : Go to Step 2.
STEP 2. Check the steering wheel free play.
- With the engine running (hydraulic operation), set the front wheels straight ahead.
- Measure the play on the steering wheel circumference
before the wheels start to move when slightly moving the
steering wheel in both directions.
Limit: 30 mm (1.2 inch) or less
- If the free play exceeds the limit value, set the steering
wheel straight ahead with the engine stopped. Load
approximately 5 N (1.1 pound) towards the steering
circumference and check the play.
Standard value (steering wheel play with engine stopped): 16.5 mm (0.65 inch) or less
Q: Does the play exceed the standard value?
YES : Remove the steering gear box and check the total pinion torque. Then go to Step 3.
NO : Go to Step 3.
STEP 3. Check the steering wheel play.
Verify that the steering wheel play is not excessive.
Q: Is the steering wheel play excessive?
YES : Repeat to Step 1.
NO : The procedure is complete.
INSPECTION PROCEDURE 2: Difficult Steering Wheel Operation (Insufficient Power Assist)
DIAGNOSIS
STEP 1. Check the power steering oil pump drive belt tension.
Q: Is the power steering oil pump drive belt tension within the standard value?
YES : Go to Step 2.
NO : Adjust the tension (Refer to GROUP 11A − On-vehicle service − Drive belt tension check <2.4L>, GROUP 11C − On-vehicle service − Generator drive belt tension check <3.0L>). Then go to Step 10.
STEP 2. Check the drive belt for damage.
Q: Is the drive belt damaged?
YES : Replace the drive belt (Refer to GROUP 11A − Crankshaft pulley <2.4L>, GROUP 11C − Crankshaft pulley <3.0L>). Then go to Step 10.
NO : Go to Step 3.
STEP 3. Check the fluid level.
- Park the vehicle on a flat, level surface, and then start the engine.
- Turn the steering wheel several times to raise the temperature of the fluid to approximately 50 − 60ºC (122 − 140ºF).
- With the engine running, turn the wheel all the way to the left and right several times.
- Check the fluid in the oil reservoir for foaming or milkiness.
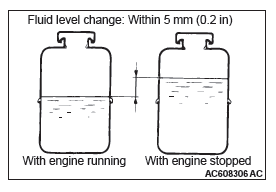
Check the difference of the fluid level when the engine is stopped, and while it is running. If the change of the fluid level is 5 mm (0.2 inch) or more, bleed the air from the system.
Q: Is the fluid foamy?
YES : Go to Step 4.
NO : Go to Step 10.
STEP 4. Check for entry of air.
Q: Has air entered?
YES : Bleed the air. Then go to Step 10.
NO : Go to Step 5.
STEP 5. Check each hose for crushing or twisting.
Q: Is any hose crushed or twisted?
YES : Replace the hose. Then go to Step 10.
NO : Go to Step 6.
STEP 6. Check for oil leaks.
Q: Are there oil leaks?
YES : Repair it. Then go to Step 10.
NO : Go to Step 7.
STEP 7. Check the wheel alignment (camber and caster).
Q: Is the alignment incorrect?
YES : Adjust it Then go to Step 10.
NO : Go to Step 8.
STEP 8. Check the gear box rack piston seal for damage.
Q: Is there damage?
YES : Replace it. Then go to Step 10.
NO : Go to Step 9.
STEP 9. Check for excessive tie rod end ball joint breakaway torque.
Q: Is there fault?
YES : Replace the part. Then go to Step 10.
NO : Go to Step 10.
STEP 10. Check the steering wheel operation.
Verify that the steering wheel operation is not difficult.
Q: Is the steering wheel operation difficult?
YES : Repeat from Step 1.
NO : The procedure is complete.
INSPECTION PROCEDURE 3: Rattling Noise
DIAGNOSIS
STEP 1. Check for proper oil pump and steering gear installation.
Q: Is the oil pump and the steering gear installation correct?
YES : Go to Step 2.
NO : Repair it. Then go to Step 4.
STEP 2. Check for interference of other parts with the steering column and the power steering hoses.
Q: Is there interference?
YES : Correct the interference. Then go to Step 4.
NO : Go to Step 3.
STEP 3. Check for noise from inside the oil pump or the steering gear.
Q: Is there noise?
YES : Replace the part. Then go to Step 4.
NO : Go to Step 4.
STEP 4. Check for rattling noise.
Confirm that no noise is generated.
Q: Is there noise?
YES : Repeat from Step 1.
NO : The procedure is complete.
INSPECTION PROCEDURE 4: Shrill Noise
DIAGNOSIS
STEP 1. Check for entry of air.
Q: Is the power steering fluid foamy?
YES : Bleed the air. Then go to Step 3.
NO : Go to Step 2.
STEP 2. Check for seizure in the oil pump.
Q: Is there seizure?
YES : Replace the part. Then go to Step 3.
NO : Go to Step 3.
STEP 3. Retest the system.
Confirm that no noise is generated.
Q: Is there noise?
YES : Repeat from Step 1.
NO : The procedure is complete.
INSPECTION PROCEDURE 5: Squealing Noise
DIAGNOSIS
STEP 1. Check the power steering oil pump drive belt tension.
Q: Is the drive belt tension incorrect?
YES : Adjust the belt tension (Refer to GROUP 11A − On-vehicle service − Drive belt tension check <2.4L>, GROUP 11C − On-vehicle service − Generator drive belt tension check <3.0L>). Then go to Step 3.
NO : Go to Step 2.
STEP 2. Check for seizure in the oil pump.
Q: Is there seizure?
YES : Replace the part. Then go to Step 3.
NO : Go to Step 3.
STEP 3. Retest the system.
Confirm that no noise is generated.
Q: Is there noise?
YES : Repeat from Step 1.
NO : The procedure is complete.
INSPECTION PROCEDURE 6: Hissing Noise
DIAGNOSIS
STEP 1. Check for entry of air.
Q: Is the power steering fluid foamy?
YES : Bleed the air. Then go to Step 4.
NO : Go to Step 2.
STEP 2. Check each hose for crushing or twisting.
Q: Is any hose crushed or twisted?
YES : Replace the hose. Then go to Step 4.
NO : Go to Step 3.
STEP 3. Check the steering gear for damage.
Q: Is there damage?
YES : Replace the part. Then go to Step 4.
NO : Go to Step 4.
STEP 4. Retest the system.
Confirm that no noise is generated.
Q: Is there noise?
YES : Repeat from Step 1.
NO : The procedure is complete.
INSPECTION PROCEDURE 7: Droning Noise
DIAGNOSIS
STEP 1. Check the oil pump or oil pump bracket installation.
Q: Is the oil pump or the oil pump bracket installation correct?
YES : Go to Step 2.
NO : Repair it. Then go to Step 3.
STEP 2. Check the oil pump for damage.
NOTE: If a slight "beat noise" is produced by the oil pump when the steering wheel is turned fully and held in that position, this is not a malfunction.
Q: Is there damage?
YES : Replace the oil pump.
Then go to Step 3.
NO : Go to Step 3.
STEP 3. Retest the system.
Confirm that no noise is generated.
Q: Is there noise?
YES : Repeat from Step 1.
NO : The procedure is complete.
INSPECTION PROCEDURE 8: Squeaking Noise
DIAGNOSIS
STEP 1. Check for interference of the wheel and the vehicle body.
If interfering, adjust the steering angle.
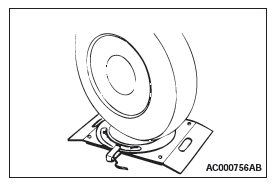
- Place the front wheel on a turning radius gauge and measure the steering angle.
Standard value:
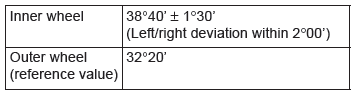
- If the steering angle is not within the standard value, adjust
the toe-in.
Standard value: 1 +- 2 mm (0.04 +- 0.08 inch)
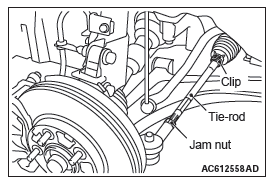
- Adjust the toe-in by undoing the clip and jam nut, and
turning the left and right tie rod turnbuckles by the same
amount (in opposite directions).
NOTE: The toe will move out as the left turnbuckle is turned toward the front of the vehicle and the right turnbuckle is turned toward the rear of the vehicle.
Q: Is the steering angle normal?
YES : Go to Step 2.
NO : Adjust the steering angle. Then go to Step 3.
STEP 2. Check the steering gear for damage.
Q: Is there damage?
YES : Replace the part. Then go to Step 3.
NO : Go to Step 3.
STEP 3. Retest the system.
Confirm that no noise is generated.
Q: Is there noise?
YES : Repeat from Step 1.
NO : The procedure is complete.
INSPECTION PROCEDURE 9: Vibration
NOTE: A slight vibration may be felt when the stationary steering effort is made due to the condition of the road surface. To check whether the vibration actually exists or not, test-drive the vehicle on a dry concrete or asphalt surface. A very slight amount of vibration is not a malfunction.
DIAGNOSIS
STEP 1. Check for entry of air.
Q: Is the power steering fluid foamy?
YES : Bleed the air. Then go to Step 3.
NO : Go to Step 2.
STEP 2. Check the steering gear for damage.
Q: Is there damage?
YES : Replace the part. Then go to Step 3.
NO : Go to Step 3.
STEP 3. Retest the system.
Confirm that no vibration is generated.
Q: Is there vibration?
YES : Repeat from Step 1.
NO : The procedure is complete.
INSPECTION PROCEDURE 10: Oil Leakage from Hose Connection
DIAGNOSIS
STEP 1. Check for loosening of the return tube flare nut.
Q: Is the flare nut loose?
YES : Tighten it to standard value. Then go to Step 3.
NO : Go to Step 2.
STEP 2. Check the hose connection and the clamp installation.
Q: Are they correct?
YES : Go to Step 3.
NO : Repair or replace the part. Then go to Step 3.
STEP 3. Retest the system.
Check that no oil is leaking.
Q: Is there oil leakage?
YES : Repeat from Step 1.
NO : The procedure is complete.
INSPECTION PROCEDURE 11: Oil Leakage from Hose Assembly
DIAGNOSIS
STEP 1. Check the hose for damage or clogging.
Q: Is the hose damaged or clogged?
YES : Replace it. Then go to Step 2.
NO : Go to Step 2.
STEP 2. Retest the system.
Check that no oil is leaking.
Q: Is there oil leakage?
YES : Repeat from Step 1.
NO : The procedure is complete.
INSPECTION PROCEDURE 12: Oil Leakage from Oil Reservoir
DIAGNOSIS
STEP 1. Check the oil reservoir for damage.
Q: Is there damage?
YES : Replace the oil reservoir.
Then go to Step 3.
NO : Go to Step 2.
STEP 2. Check for overflowing.
Q: Is there oil overflowing from the reservoir?
YES : Adjust fluid level. Then go to Step 3.
NO : Go to Step 3.
STEP 3. Retest the system.
Q: Is there oil leakage?
YES : Repeat from to Step 1.
NO : The procedure is complete.
INSPECTION PROCEDURE 13: Oil Leakage from Oil Pump
DIAGNOSIS
STEP 1. Check the oil pump body for damage.
Q: Is there damage?
YES : Replace the part. Then go to Step 3.
NO : Go to Step 2.
STEP 2. Check the O-ring or oil seal for damage.
Q: Is there damage?
YES : Replace the part. Then go to Step 3.
NO : Go to Step 3.
STEP 3. Retest the system.
Check that no oil is leaking.
Q: Is there oil leakage?
YES : Repeat from Step 1.
NO : The procedure is complete.
INSPECTION PROCEDURE 14: Oil Leakage from Steering Gear
DIAGNOSIS
STEP 1. Check the steering gear housing for damage.
Q: Is there damage?
YES : Replace the part. Then go to Step 2.
NO : Go to Step 2.
STEP 2. Retest the system.
Check that no oil is leaking.
Q: Is there oil leakage?
YES : Repeat from Step 1.
NO : The procedure is complete.
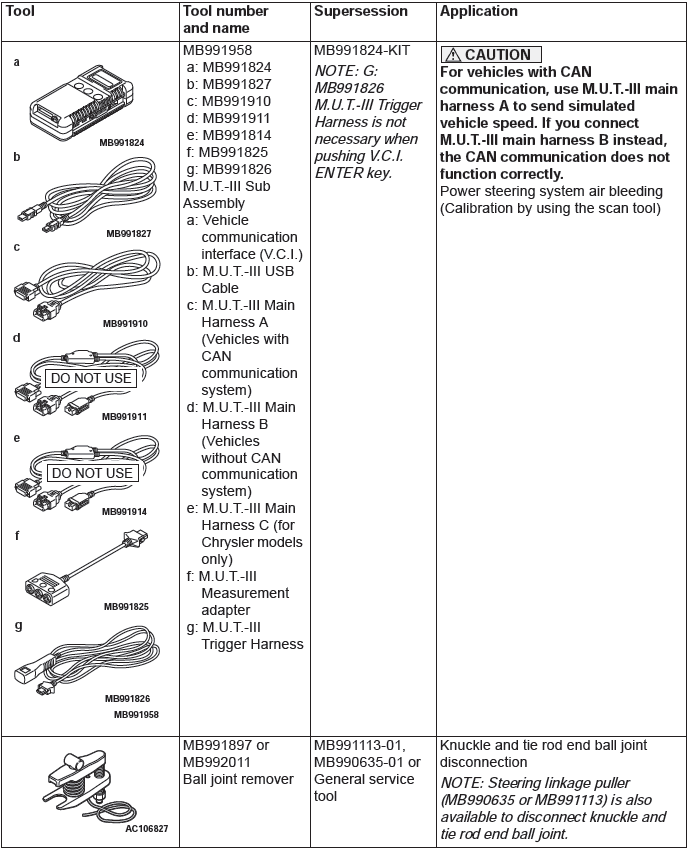
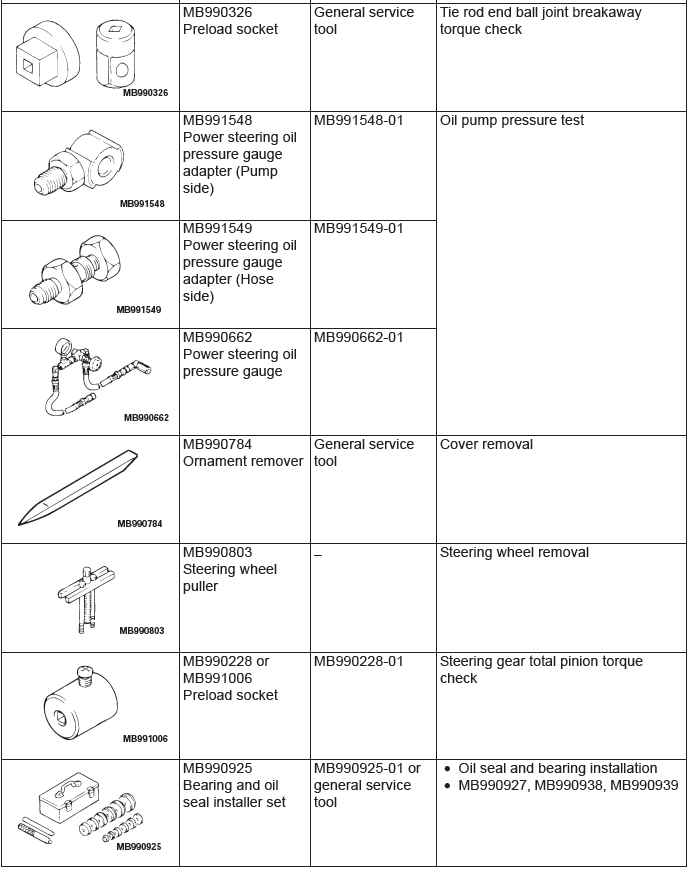
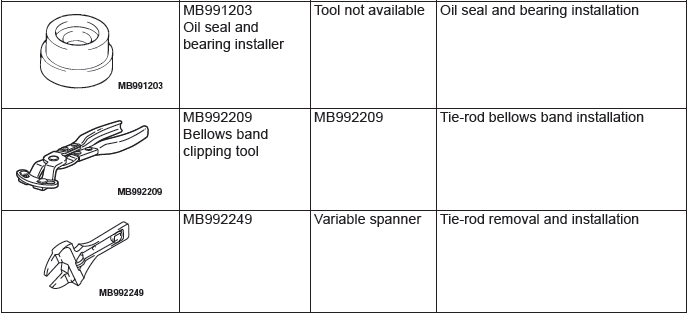
Special Tools
READ NEXT:
 On-vehicle Service
STEERING WHEEL FREE PLAY CHECK
1. With the engine running (hydraulic pressure applied),
position the front wheel in the straight ahead direction.
2. Measure the side to side steering wheel play until
Steering Wheel
REMOVAL AND INSTALLATION
WARNING
Before removing the steering wheel and driver's air bag module
assembly, refer to
GROUP 52B, Service Precautions and Driver's Air Bag Module and Clock Spring.
Wh
Steering Column Shaft
Assembly
REMOVAL AND INSTALLATION
CAUTION
Before removing the steering wheel/driver's air bag module assembly,
refer to GROUP 52B − Service
Precautions and Driver's Air Bag Module Clock Spring.
Af
SEE MORE:
Steering Column Shaft
Assembly
REMOVAL AND INSTALLATION
CAUTION
Before removing the steering wheel/driver's air bag module assembly,
refer to GROUP 52B − Service
Precautions and Driver's Air Bag Module Clock Spring.
After the installation, perform a calibration for the ASC-ECU to
learn the steering wheel sensor
ne
Steering wheel audio remote controlswitches
The remote control switch is located on the left side of the steering wheel.
It can be used when the ignition switch is in the “ON” or “ACC” positions.
1- Volume up button.
2- Volume down button.
3- Power switch / mode selector button.
4- Seek up / track up / fast-forward button.
5-
