Mitsubishi Outlander: On-vehicle Service
HEADLIGHT AIMING
PRE-AIMING INSTRUCTIONS (LOW-BEAM)
1. Inspect for rusted or faulty headlight assemblies.
2. These conditions must be corrected before a satisfactory adjustment can be made.
3. Inspect tire inflation, and adjust if necessary.
4. If the fuel tank is not full, place a weight in the trunk of the vehicle to simulate weight of a full tank [3 kg (6.6 pounds) per gallon].
5. There should be no other load in the vehicle other than driver or substituted weight of approximately 68 kg (150 pounds) placed in driver's position.
6. Turn the headlight leveling switch to the switch position "0".
<Vehicles with headlight manual leveling system>
7. Thoroughly clean headlight lenses.
8. Place the vehicle on a level floor, perpendicular to a flat screen 7.62 m (25.0 ft) away from the bulb center-marks on the headlight lens.
9. Rock vehicle sideways to allow vehicle to assume its normal position.
10.Bounce the front suspension through three (3) oscillations by applying the body weight to hood or bumper.
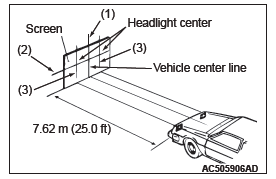
11.Set the distance between the screen and the bulb center marks of the headlight as shown in the illustration.
12.Four lines of adhesive tape (or equivalent markings) are required on screen or wall:
- Position a vertical tape or mark so that it is aligned with the vehicle center line.
- Measure the distance from the center-marks on the headlight lens to the floor. Transfer the measurement to the screen. Horizontal tape or mark on the screen is for reference of vertical adjustment.
- Measure the distance from the center line of the vehicle to the center of each headlight. Transfer the measurement to the screen. Vertical tape or mark on the screen with reference to the center line of each headlight bulb.

HEADLIGHT ADJUSTMENT (LOW-BEAM)
CAUTION
- Do not cover a headlight for more than three minutes to prevent the plastic headlight lens deformation.
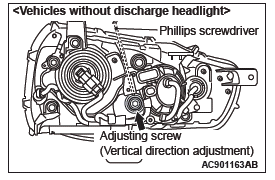
- Be sure to adjust the aiming adjustment screw in the tightening direction.
1. The low-beam headlight will project on the screen upper edge of the beam (cut-off).
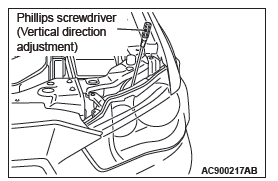
2. Turn the adjusting screw to achieve the specified low-beam cut-off location on the aiming screen.
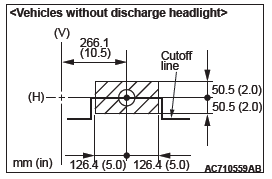
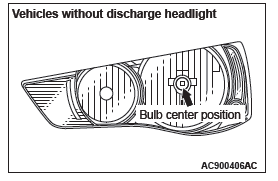
Standard value <Vehicles without discharge headlight>:
(Vertical direction) Horizontal line (H) +- 50.5 mm (+- 2.0 inches) (+- 0.38 degrees angle)
(Horizontal direction): +- 126.4 mm (+- 5.0 inches) (+- 0.95 degrees angle) from the axis, which is 266.1 mm (10.5 inches) (2 degrees angle) rightward from the vertical line (V)
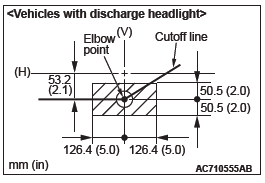
Standard value <Vehicles with discharge headlight>:
(Vertical direction) 53.2 mm (2.1 inches) (0.4 degrees) below horizontal line (H). +- 50.5 mm (+- 2.0 inches) (+- 0.38 degrees angle)
(Horizontal direction): Elbow point intersects the vertical line (V). +- 126.4 mm (+- 5.0 inches) (+- 0.95 degrees angle)
NOTE: High-beam pattern should be correct when the low-beams are adjusted properly.
LUMINOUS INTENSITY MEASUREMENT
1. Set the headlights to high-beam.
2. Using a photometer, and following its manufacturer's instruction manual, measure the headlight center intensity and check to be sure that the limit value is satisfied.
Limit: 40,000 cd or more {When a screen is set 18.3m (60 feet) ahead of the vehicle}
NOTE: When measuring the intensity, maintain an engine speed of 2,000 r/min, with the battery fully charged.
There may be special local regulations pertaining to headlight intensity. Be sure to make any adjustments necessary to satisfy such regulations.
If an illuminometer is used to make the measurements, convert its values to photometer values by using the following formula.
I =E × r2:
- I = intensity (cd)
- E = illumination (lux)
- r = distance (m) from headlights to illuminometer
REPLACE THE BULB
HEADLIGHT BULB (LOW-BEAM) REPLACEMENT <VEHICLES WITHOUT DISCHARGE HEADLIGHT>
CAUTION Do not touch the bulb surface with bare hands or dirty gloves. If the bulb surface (glass part) gets dirty, immediately clean it with alcohol or thinner. After drying completely, install the bulb.
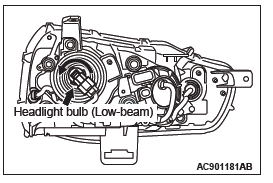
Disconnect the connector, and twist the headlight bulb (low-beam) to remove.
HEADLIGHT BULB (HIGH-BEAM) REPLACEMENT <VEHICLES WITHOUT DISCHARGE HEADLIGHT>
CAUTION Do not touch the bulb surface with bare hands or dirty gloves. If the bulb surface (glass part) gets dirty, immediately clean it with alcohol or thinner. After drying completely, install the bulb.
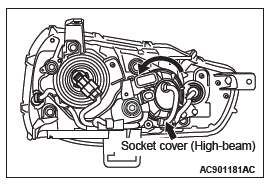
1. Twist the socket cover to remove.
2. Disconnect the connector, and twist the headlight bulb (high-beam) to remove.
DAYTIME RUNNING LIGHT BULB REPLACEMENT <VEHICLES WITH DISCHARGE HEADLIGHT>
CAUTION Do not touch the bulb surface with bare hands or dirty gloves. If the bulb surface (glass part) gets dirty, immediately clean it with alcohol or thinner. After drying completely, install the bulb.
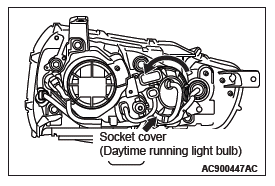
1. Twist the socket cover to remove.
2. Twist the daytime running light socket to remove it.
POSITION LIGHT BULB REPLACEMENT
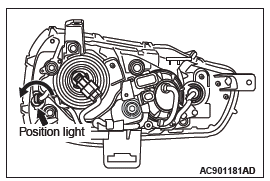
Disconnect the connector, and twist the position light socket to remove it.
FRONT TURN-SIGNAL LIGHT BULB REPLACEMENT
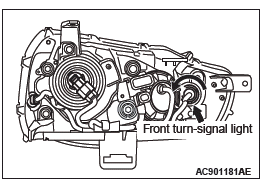
Disconnect the connector, and twist the front turn-signal light socket to remove it.
HEADLIGHT AUTOMATIC-SHUTDOWN FUNCTION CHECK
Confirm that the headlights turn OFF in one second if the ignition key is pulled out and the driver's door is opened when the ignition switch is ON and the lighting switch is ON (HEAD position).
If there is a malfunction, perform the troubleshooting.
HEADLIGHT AUTO LIGHT FUNCTION CHECK
Under the direct sunlight with the ignition switch ON and the lighting switch in the AUTO position, check that the headlight automatically illuminates when the lighting control sensor receiver is covered by hand. If there is any trouble, carry out the troubleshooting.
NOTE: When covering the lighting control sensor receiver, be careful not to touch the windshield surface (where the lighting control sensor receiver is mounted). (The lighting control sensor receiver has limited resistance to oil.)
CUSTOMIZATION FUNCTION
With the scan tool MB991958 operation, the following functions can be programmed. The programmed information is held even when the battery is disconnected.

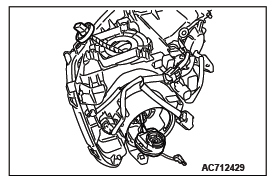
HEADLIGHT REMOVAL AND INSTALLATION
<VEHICLES WITHOUT DISCHARGE HEADLIGHT>
Pre-removal operation
- Front bumper assembly removal
Post-installation operation
- Front bumper assembly installation
- Check the beam direction of the headlight

Removal Steps
- Headlight assembly
- Headlight bulb (low-beam)
- Headlight bulb (high-beam)
- Front turn-signal light bulb
- Position light bulb
- Grommet
- Grommet
<VEHICLES WITH DISCHARGE HEADLIGHT>
Pre-removal operation
- Front bumper assembly removal
Post-installation operation
- Front bumper assembly installation
- Check the beam direction of the headlight
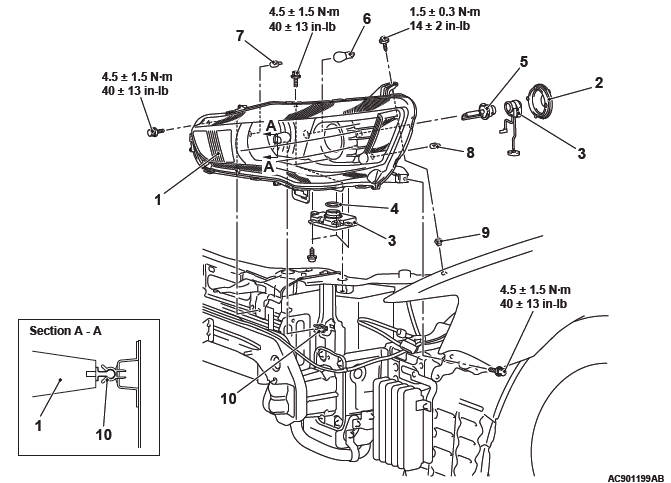
Removal Steps
- Headlight assembly
- Headlight bulb socket cover
- Headlight control unit
- Headlight gasket
- Headlight bulb
- Daytime running light bulb
- Front turn-signal light bulb
- Position light bulb
- Grommet
- Grommet
REMOVAL SERVICE POINTS
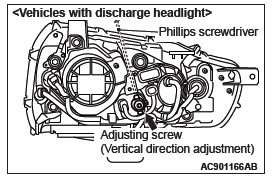
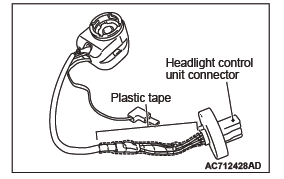
HEADLIGHT CONTROL UNIT (HARNESS) REMOVAL <VEHICLES WITH DISCHARGE HEADLIGHT>
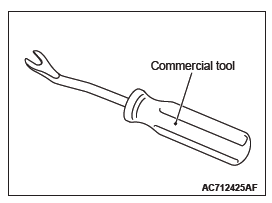
1. As shown in the figure, use the commercial tool to remove it.
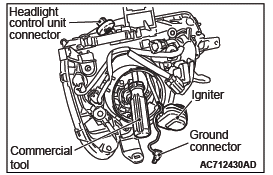
2. To insert the tool available in the market into the headlight assembly from the opening at the ignitor side, firstly remove the headlight control unit, the socket cover, the ignitor and the ground connector.
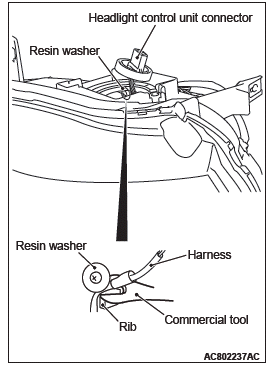
3. Using the commercial tool, make the resin washer sag to push up the harness above the resin washer.
4. Pull out the harness from the headlight assembly.
HEADLIGHT BULB REMOVAL <VEHICLES WITH DISCHARGE HEADLIGHT>
CAUTION Do not touch the bulb surface with bare hands or dirty gloves. If the bulb surface (glass part) gets dirty, immediately clean it with alcohol or thinner. After drying completely, install the bulb.
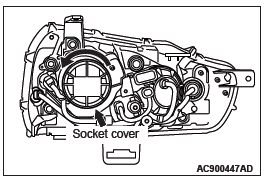
1. Twist the socket cover to remove.
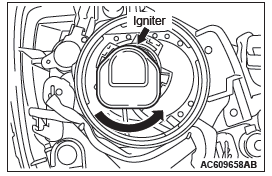
2. Disconnect the igniter.
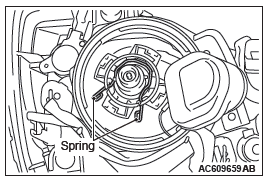
3. Release the bulb securing spring, and remove the bulb.
INSTALLATION SERVICE POINT
HEADLIGHT CONTROL UNIT INSTALLATION <VEHICLES WITH DISCHARGE HEADLIGHT>
1. As shown in the figure, doubly wrap the portion in the vinyl tape, from the headlight control unit connector root to the point where the harness separation is hidden.
2. Install the harness to the headlight assembly. At that time, fitting the harness into the resin washer is unnecessary.
HEADLIGHT LEVELING SWITCH REMOVAL AND INSTALLATION
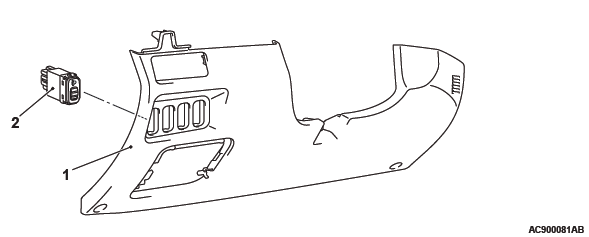
Removal Steps
- Side lower panel assembly
- Headlight leveling switch
LIGHTING CONTROL SENSOR REMOVAL AND INSTALLATION
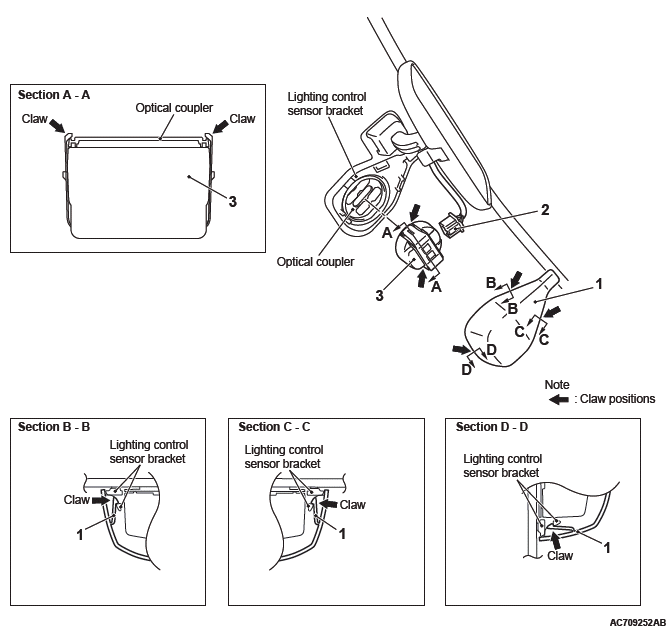
Removal Steps
- Lighting control sensor cover
- Connector
- Lighting control sensor
REMOVAL SERVICE POINT
LIGHTING CONTROL SENSOR REMOVAL
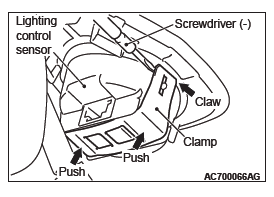
While pushing the clamp to the windshield side, pry up the clamp to disengage the right and left claws using the screwdriver (−), and then remove the lighting control sensor.
INSTALLATION SERVICE POINT
LIGHTING CONTROL SENSOR INSTALLATION
CAUTION After executing the lighting control sensor (rain sensor) adaptation, do not touch the lighting control sensor (or do not move it from the fixed position).
- Mount the lighting control sensor onto the optical coupler, and then connect the connector.
- When reusing the lighting control sensor or when the lighting control sensor is pushed to check the installation condition, install the connector and the lighting control sensor cover and wipe the windshield thoroughly. When the windshield is dry, execute the lighting control sensor (rain sensor) adaptation.
NOTE: Be careful not to touch the lighting control sensor receiver. (The lighting control sensor receiver has limited resistance to oil.)
INSPECTION
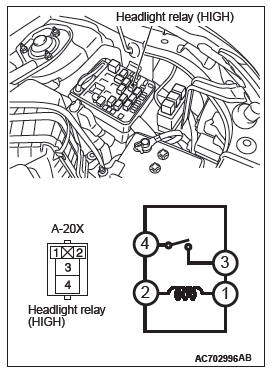
HEADLIGHT RELAY CHECK
HEADLIGHT RELAY (LOW) CHECK <VEHICLES WITH DISCHARGE HEADLIGHT>
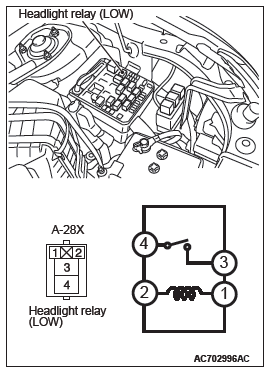
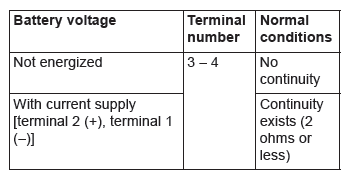
HEADLIGHT RELAY (HIGH) CHECK
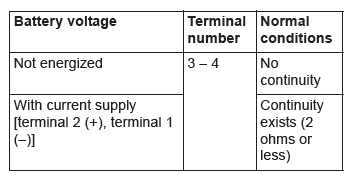
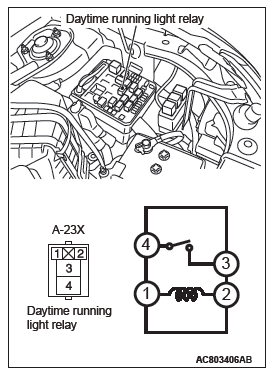
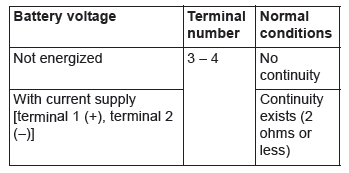
DAYTIME RUNNING LIGHT RELAY CHECK <VEHICLES WITH DISCHARGE HEADLIGHT>
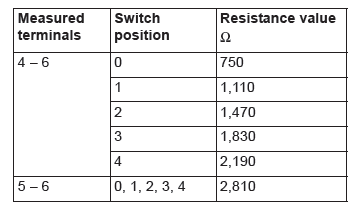
HEADLIGHT LEVELING SWITCH CHECK
LIGHTING CONTROL SENSOR (LIGHT SENSOR) CHECK
Using the scan tool MB991958, check the LIN data list as follows.
1. Under the direct sunlight, turn the ignition switch to the ON position and the lighting switch to the AUTO position.
2. When the lighting control sensor receiver is covered by hand, and if the item No. 7009 (RLS Low beam "ON" request) and the item No. 7011 (RLS Taillight "ON" request) turn from OFF to ON, it is judged normal.
NOTE:
- Before inspection using the scan tool MB991958, wipe off the windshield clearly. Then check that there is no abnormality on the windshield surface where the lighting control sensor is mounted.
- When covering the lighting control sensor receiver, be careful not to touch the windshield surface (where the lighting control sensor receiver is mounted). (The lighting control sensor receiver has limited resistance to oil.)
BRACKET REPAIR OF HEADLIGHT ASSEMBLY
CAUTION
- If damage is present to locations other than the repairable bracket, replace the assembly.
- Apply a tape to the area around the damaged bracket to prevent damage.
- During repair work, be careful not to damage the repair bracket installation bosses.
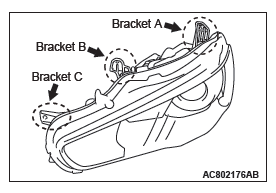
When brackets A, B and C shown in the figure are damaged, a low-cost repair can be performed by mounting a repair bracket.
OPERATIONS BEFORE REPAIRING BRACKET
Remove the headlight assembly.
REPAIR PROCEDURE OF BRACKET A
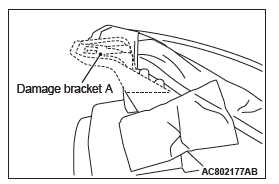
1. Cut the damaged bracket A so that it has the larger dimension than the dimension shown in the figure from the mounting boss seating face.
2. Smoothen the bracket cut surface using the sandpaper.
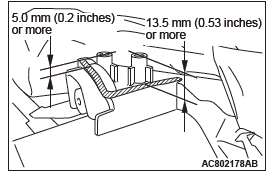
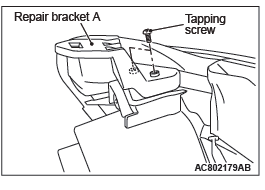
3. Fix the repair bracket A to the headlight assembly using the tapping screw.
REPAIR PROCEDURE OF BRACKET B
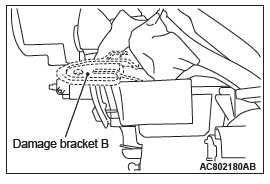
1. Cut off the damaged bracket B.
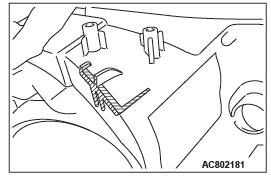
2. Remove the remaining bracket cut surface using the sandpaper.
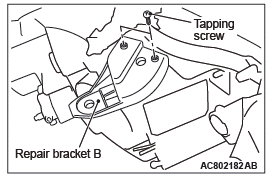
3. Fix the repair bracket B to the headlight assembly using the tapping screw.
REPAIR PROCEDURE OF BRACKET C

1. Cut the damaged bracket C so that it has the dimension shown in the figure.
2. Smoothen the bracket cut surface using the sandpaper.
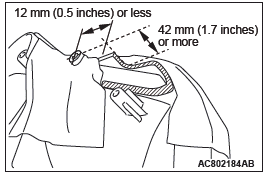
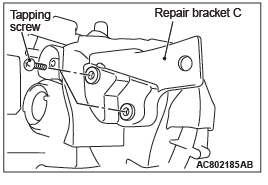
3. Fix the repair bracket C to the headlight assembly using the tapping screw.
OPERATIONS AFTER REPAIRING BRACKET
1. Mount the headlight assembly to the vehicle.
2. Check that the headlight assembly does not vibrate during driving.
3. Check whether each light built in the headlight assembly and the headlight leveling system are properly operated.
4. Perform the headlight aiming adjustment and light intensity measurement.
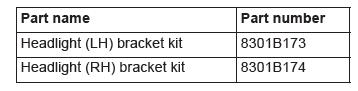
REPAIR BRACKET PART NUMBER
READ NEXT:
 Local Interconnect Network (LIN)
General Information
LIN refers to "Local Interconnect Network," which is a
serial multiplex communication protocol* administrated
by LIN consortium. A communication circuit
employing the LIN protocol
General Information, Service Precautions
General Information
CAN, an abbreviation for Controller Area Network, is
an ISO-certified international standard for a serial
multiplex communication protocol*. A communication
circuit employing the C
SEE MORE:
DTC B2412, B2413, B2415, B2416, C1608, C1900, C1901, C1910, C1920, C1930, C1940,
C1911, C1921, C1931, C1941, C1912, C1922, C1932, C1942, C1913, C1923, C1933,
C1943, C1914, C1924, C1934, C1944
DTC B2412 Antenna power voltage
CAUTION
If diagnostic trouble code No. B2412 is set,
diagnose the CAN bus lines.
When replacing the ECU, always check that
the communication circuit is normal.
Antenna Assembly Circuit
DIAGNOSTIC FUNCTION
If KOS-ECU detects an abnormality in power supply
of t
Symptom Procedures
Inspection Procedure 1: Power supply circuit check.
Combination Meter Power Supply Circuit
TECHNICAL DESCRIPTION (COMMENT)
If the odometer and trip meter are not displayed or all
the meter needles do not move, power supply to the
combination meter, or the combination meter itself
may have a proble
