Mitsubishi Outlander: Power Steering Hoses
REMOVAL AND INSTALLATION
Pre-removal operation
- Power Steering Fluid Draining
- Engine room Under Cover Front (A,B,C), Engine room Side Cover, Engine room Under Cover Rear Removal
- Propeller Shaft Assembly Removal
- Front Exhaust Pipe Removal
- Front Roll Stopper And Centermember Assembly Removal
Post-installation operation
- Front Roll Stopper And Centermember Assembly Installation
- Front Exhaust Pipe Installation
- Propeller Shaft Assembly Installation
- Engine room Under Cover Front (A,B,C), Engine room Side Cover, Engine room Under Cover Rear Installation
- Power Steering Fluid Refilling and Bleeding
<2.4L Engine>
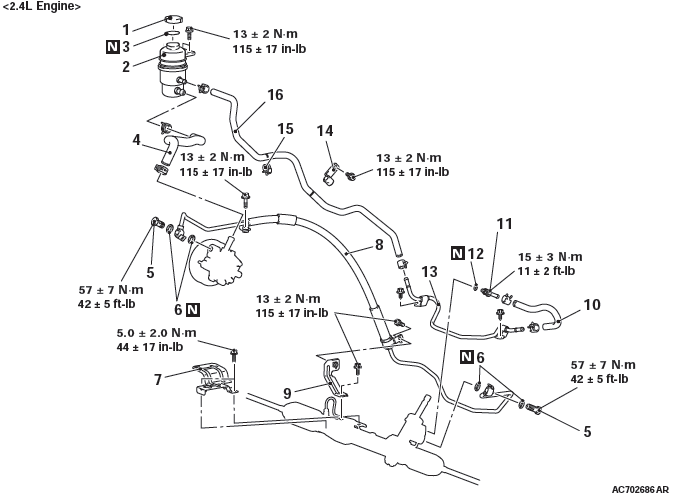
Removal steps
- Cap
- Oil reservoir
- O-ring
- Suction hose
- Eye bolt
- Gasket
- Heat protector
- Pressure hose assembly
- Pressure hose bracket
- Return hose
- Return tube assembly
- Gasket
- Return tube
- Clip
- Hose clamp
- Return hose
<3.0L Engine>
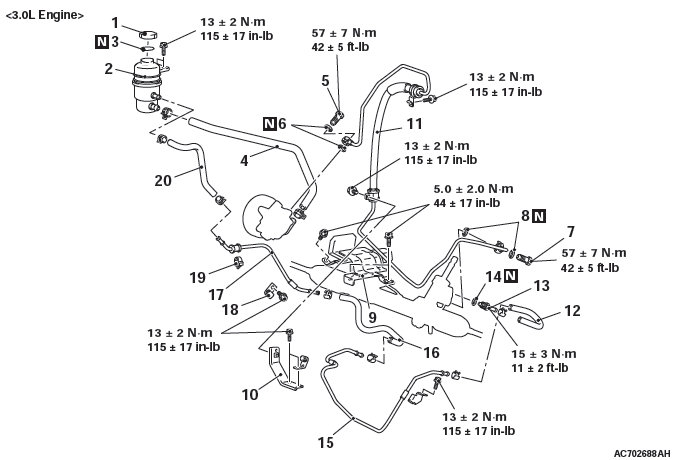
Removal steps
- Cap
- Oil reservoir
- O-ring
- Suction hose
- Eye bolt
- Gasket
- Eye bolt
- Gasket
- Heat protector
- Hose bracket
- Pressure hose assembly
- Return hose
- Return tube assembly
- Gasket
- Return tube
- Return hose
- Return tube
- Hose clamp
- Clip
- Return hose
REMOVAL SERVICE POINT
HEAT PROTECTOR/ PRESSURE HOSE ASSEMBLY/ RETURN TUBE ASSEMBLY/ RETURN TUBE REMOVAL
Remove the heat protector, and push the engine assembly and transaxle assembly toward the front of the vehicle to widen the clearance. Then, remove the pressure hose assembly and the return tube.
NOTE:
- When pushing the engine assembly and transaxle assembly, check that the propeller shaft assembly, front exhaust pipe, front roll stopper, and center member assembly are already removed.
INSTALLATION SERVICE POINTS
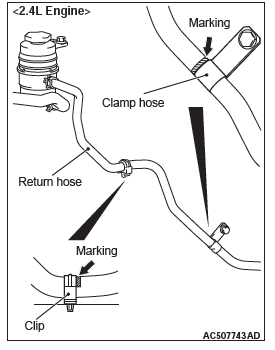
RETURN HOSE/ HOSE CLAMP/ CLIP INSTALLATION
1. Align the marking as shown in the figure and connect the return hose.
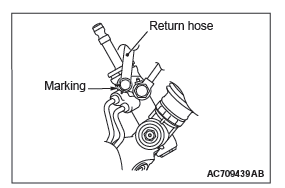
2. Align the return hose marking within the area shown in the figure and connect the return hose.
3. Using clip and hose clamp align the return hose marking within the area shown in the figure and connect the return hose.
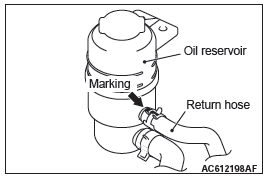
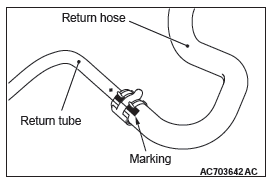
RETURN HOSE INSTALLATION
1. Align the marking as shown in the figure and connect the return hose.
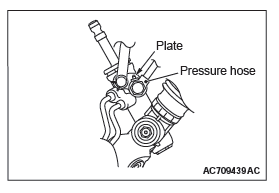
PRESSURE HOSE ASSEMBLY INSTALLATION
Align the pressure hose plate as shown in the figure and connect pressure hose assembly.
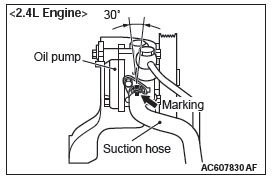
SUCTION HOSE INSTALLATION
1. Align the oil reservoir side suction hose marking within the area shown in the figure and connect the suction hose.
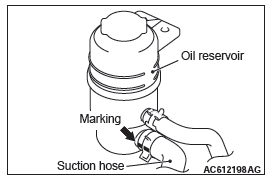
2. Align the oil pump side suction hose marking within the area shown in the figure and connect the suction hose.

READ NEXT:
 CVT
CVT
General Information
F1CJA, W1CJA model has been established.
TRANSAXLE
The transaxle consists of the torque converter and
gear train. The three-element, one-stage, two-phase
type torque converter wit
Diagnostic Function
WARNING INDICATOR
When any malfunction occurs in the items related to the CVT
system, which are described below, the symbol (A) continues
being displayed in the information screen in the multi informa
SEE MORE:
Multi-information display
The following information is included on the multi-information display: warnings,
odometer/tripmeter, service reminders, engine coolant temperature, fuel remaining,
outside temperature, 4WD operation status, average and momentary fuel consumption,
driving range, average speed and meter illumin
Basic Brake
General Information
Brake systems with higher reliability and durability
have achieved distinguished braking performance.
FEATURES
IMPROVEMENT OF BRAKING PERFORMANCE
In addition to the 10-inch single brake booster,
the small and long stroke-type master cylinder is
used to achieve the downsizing
