Mitsubishi Outlander: Front Disc Brake Assembly
REMOVAL AND INSTALLATION
Pre-removal operation
- Brake Fluid Draining
Post-installation operation
- Brake Fluid Refilling and Air Bleeding
- Brake Disk Runout Inspection/Correction

Removal steps
- Brake hose (brake caliper side) connection
- Gasket
- Brake caliper assembly
- Front brake disk
- Clip
- Brake pipe connection
- Brake hose
INSTALLATION SERVICE POINTS
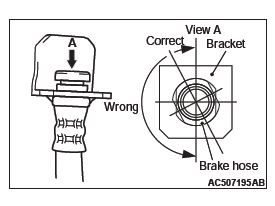
BRAKE HOSE INSTALLATION
1. Pass the brake hose through the hole in the body-side bracket.
2. Install the brake hose to the brake caliper.
3. Install the brake hose at the two fixing points.
4. Twist the brake hose toward the lesser torsion between the brake hose and body-side bracket as shown in the figure, and fix it to the body-side bracket with a clip.
INSPECTION
BRAKE DISC CHECK
- Disc wear
- Disc run-out
DISASSEMBLY AND ASSEMBLY
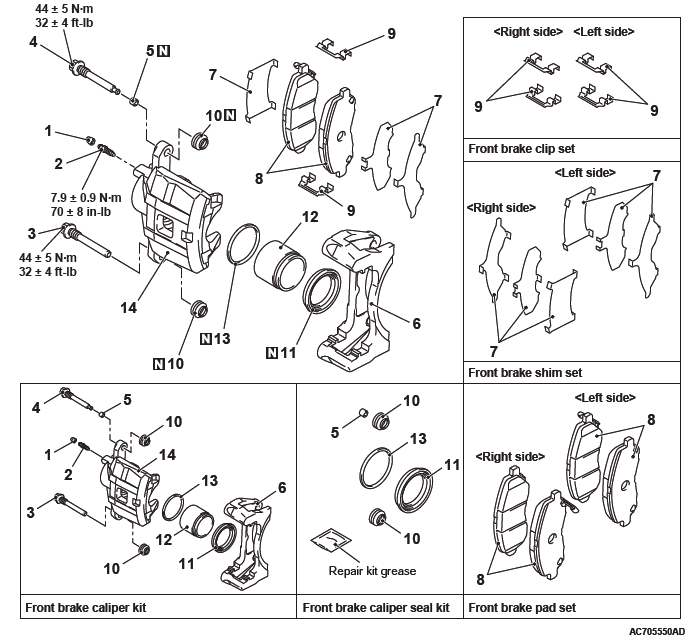
Disassembly steps
- Bleeder cap
- Bleeder
- Guide pin
- Lock pin
- Bushing
- Caliper support (including brake pad assembly, clip, and shim)
- Shim
- Brake pad assembly
- Clip
- Pin boot
- Piston boot
- Piston
- Piston seal
- Caliper body
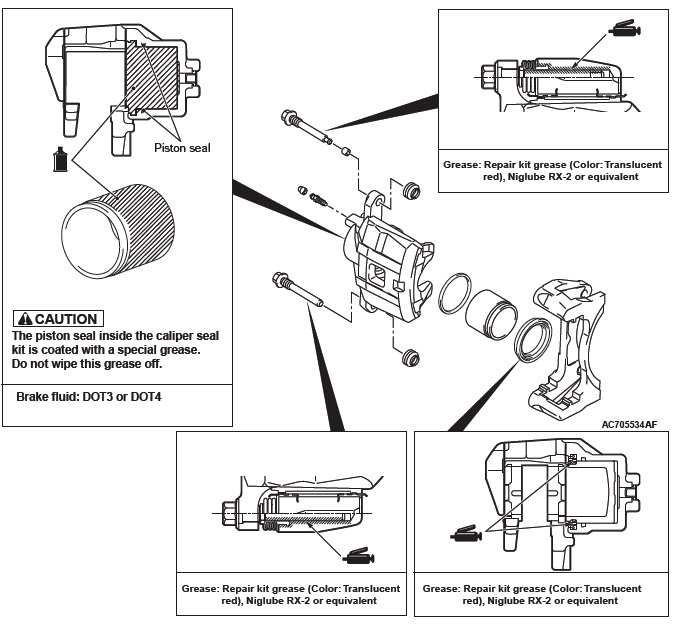
LUBRICATION POINTS
DISASSEMBLY SERVICE POINTS
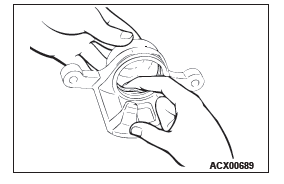
PISTON BOOT/PISTON REMOVAL
CAUTION Blow air gradually to remove the pistons. The pistons will rush out if a force of air is applied suddenly.
Cover the caliper body outer side with a cloth or similar materials.
Blow compressed air through the brake hose installation area to remove the piston and piston boot.
PISTON SEAL REMOVAL
CAUTION Do not use a flat-tipped screwdriver to remove the piston seal. This may damage the inner side of the cylinder.

1. Remove the piston seal with your finger tip.
2. Clean the piston surface and cylinder inner face with alcohol or specified brake fluid.
Brake fluid: DOT3 or DOT4
INSPECTION
- Check the cylinder for wear, damage or rust.
- Check the piston surface for wear, damage or rust.
- Check the caliper body for wear.
- Check the pad for damage or adhesion of grease, check the backing metal for damage.
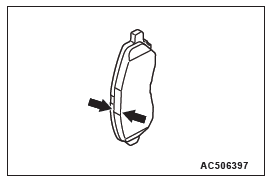
BRAKE PAD WEAR CHECK
WARNING
- Always replace both brake pads on each wheel as a set (both front wheels or both rear wheels). Failure to do so will result in uneven braking, which may cause unreliable brake operation.
- If there is significant difference in the thickness of the pads on the left and right sides, check the moving parts.
Measure thickness at the thinnest, most worn area of the pad.
Replace the pad assembly if pad thickness is less than the limit value.
Standard value: 10.0 mm (0.39 inch)
Limit: 2.0 mm (0.08 inch)
READ NEXT:
 Rear Disc Brake Assembly
REMOVAL AND INSTALLATION <2.4L ENGINE: 5 PERSONS SEAT>
Pre-removal operation
Brake Fluid Draining
Post-installation operation
Brake Fluid Refilling and Air Bleeding
Brake Disk Runout Inspe
Anti-lock Braking System (ABS)
General Information
The 4ABS ensures directional skid and control during
hard braking.
This ABS uses a 4-sensor system that controls all
four wheels independently of each other.
EBD *1control can o
Diagnosis Function
ABS-ECU has the following functions for easier system
checks. The following items can be diagnosed
using scan tool.
Diagnostic trouble code set
Service data output
Actuator test
Freeze frame d
SEE MORE:
DTC B2412, B2413, B2415, B2416, C1608, C1900, C1901, C1910, C1920, C1930, C1940,
C1911, C1921, C1931, C1941, C1912, C1922, C1932, C1942, C1913, C1923, C1933,
C1943, C1914, C1924, C1934, C1944
DTC B2412 Antenna power voltage
CAUTION
If diagnostic trouble code No. B2412 is set,
diagnose the CAN bus lines.
When replacing the ECU, always check that
the communication circuit is normal.
Antenna Assembly Circuit
DIAGNOSTIC FUNCTION
If KOS-ECU detects an abnormality in power supply
of t
Third seat (7 persons)
To fold out the underfloor-stowable third seat
The third seat is stowed under the floor. Use the seat when extra people ride
in your vehicle. When not in use, stow the seat under the floor and use as a luggage
area.
WARNING:
● Make sure that you arrange the third seat before starting to
