Mitsubishi Outlander: On-vehicle Service
DRIVE BELT TENSION CHECK
1. Remove the radiator condenser tank mounting bolt, and move the radiator condenser tank to a place where it does not interfere with the drive belt tension check.
CAUTION
Check the drive belt tension after turning the crankshaft clockwise one turn or more.
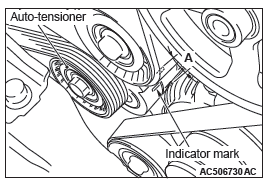
2. Make sure that the indicator mark on the auto-tensioner is within the area marked with A in the illustration.
3. If the mark is out of the area A, replace the drive belt.
NOTE: The drive belt tension adjustment is not necessary as the auto-tensioner is adopted.
4. Install the radiator condenser tank to the original position.
AUTO-TENSIONER CHECK
OPERATION CHECK
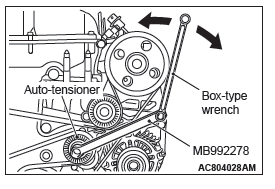
Required Special Tool: MB992278: Belt tension release wrench
1. Stop the engine from the idle state.
2. Remove the radiator condenser tank mounting bolt, and move the radiator condenser tank to a place where it does not interfere with the auto-tensioner check.
3. Check that the drive belt are not protruding from the pulley width of drive belt auto-tensioner.
4. Remove the drive belt.
WARNING
Always work from above when releasing the tension of the auto-tensioner. When you try to gain access from underneath the vehicle, you will experience difficulty, thus causing the tool to be dropped off.
CAUTION
To work at the optimum angle, you must choose a most suitable box-type wrench is applied to the special tool.
WARNING
Be sure to set the box-type wrench and the special tool MB992278 to the hexagonal parts securely to prevent the tool from falling off because the tension of the auto-tensioner is high.
5. Install special tool MB992278 and a box-type wrench at the optimum angle.
6. Check that no binding is present by turning the auto-tensioner in the left and right directions.
7. If there are any problems in the procedure 3 or 6, replace the auto-tensioner.
8. Install the drive belt.
9. Install the radiator condenser tank to the original position.
FUNCTION CHECK
The auto-tensioner can be checked whether it is in good condition by checking its tension.
<When the vibration frequency is measured: Recommendation>
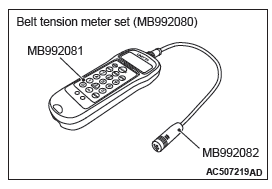
Required Special Tools:
- MB992080: Belt Tension Meter Set
- MB992081: Belt Tension Meter
- MB992082: Microphone Assembly
1. Check the tension of the drive belt.
2. Check the tension of the drive belt in the following procedures.
- Connect special tool MB992082 to special tool MB992081 of special tool MB992080.
- Press the "POWER" button to turn on the power supply.
- Press number key "1". Check to ensure that "No.01"
appears on the upper left of the display and that the
following numeric values are displayed for individual
items (M, W, and S):
M 000.9 g/m
W 010.0 mm/R
S 0100 mm
If numeric values have not been entered (new tool), set them according to the belt specifications as shown below.
Once you set them, you do not have to set them again.
The settings remain undeleted even after battery replacement.
NOTE: This operation is to temporarily set the preset data such as the belt specifications, because if the measurement is taken without input of the belt specifications, conversion to tension value (N) cannot be made, resulting in judgement of error.
<Setting procedure>
- Press down the "MASS" button till the belt mass select display appears.
- Press the "UP" or "DOWN" button to select "01 1.5GT
0.9" and press the "MEASURE" button to decide it.
Check to ensure that "M 000.9 g/m" is displayed.
- Press the "WIDTH" button to change to the belt width input display.
- Press number keys 0, 1, 0, and 0 sequentially, and press the "SELECT" button to apply them. Check to ensure that "W 010.0 mm/R" appears on the display.
- Press the "SPAN" button to change to the span length input display.
- Press number keys 0, 1, 0, and 0 sequentially, and press the "SELECT" button to apply them. Check to ensure that "S 0100 mm" appears on the display.
- Press "Hz" button twice to change the display to the frequency display (Hz.)
CAUTION
- When measuring, make sure that the engine is cold.
- Measure after turning the crankshaft clockwise one turn or more.
- Do not allow any contaminants such as water or oil to get onto the microphone.
- If strong gusts of wind blow against the microphone or if there are any loud sources of noise nearby, the values measured by the microphone may not correspond to actual values.
- If the microphone is touching the belt while the measurement is being made, the values measured by the microphone may not correspond to actual values.
- Do not take the measurement while the vehicle's engine is running.
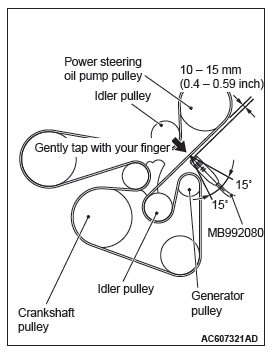
- Hold special tool MB992080 to the middle of the belt between the pulleys (at the place indicated by arrow) where it does not contact the belt [approximately 10 − 15 mm (0.4 − 0.59 inch) away from the rear surface of the belt] so that it is perpendicular to the belt (within an angle of +- 15 degree angle.)
- Press the "MEASURE" button.
- Gently tap the middle of the belt between the pulleys (the place indicated by the arrow) with your finger as shown in the illustration, and check that the vibration frequency of the belt is within the standard value.
Standard value: 102 − 129 Hz
NOTE: To take the measurement repeatedly, tap the belt again.
- Press and hold the "POWER" button to turn off the power supply.
3. If not within the standard value, replace the auto-tensioner.
<When using a tension gauge>
1. Check the tension of the drive belt.
CAUTION
- When measuring, make sure that the engine is cold.
- Measure after turning the crankshaft clockwise one turn or more.
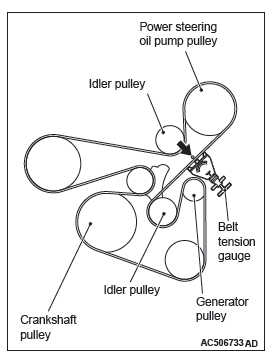
2. Use a belt tension gauge in the middle of the belt between the pulleys shown in the figure (at the place indicated by the arrow) to check that the belt tension is within the standard value.
Standard value: 248 − 400 N (56 − 90 lb)
3. If not within the standard value, replace the auto-tensioner.
VALVE CLEARANCE CHECK AND ADJUSTMENT
Refer to GROUP00, General − Maintenance service − Intake And Exhaust Valve Clearance (Inspect And Adjust)
IGNITION TIMING CHECK
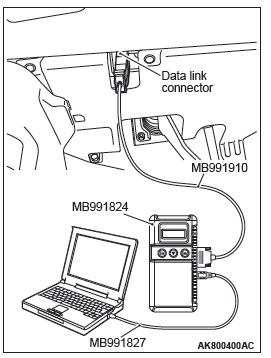
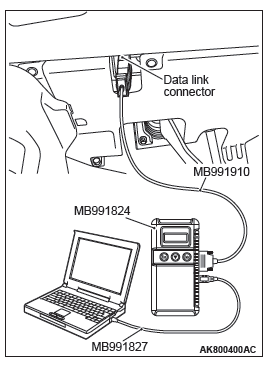
Required Special Tool: MB991958: Scan Tool (M.U.T.-III Sub Assembly)
- MB991824: V.C.I.
- MB991827: M.U.T.-III USB Cable
- MB991910: M.U.T.-III Main Harness A
1. Before inspection, set the vehicle in the following condition:
- Engine coolant temperature: 80 − 95ºC (176 − 203ºF)
- Lights and all accessories: OFF
- Transaxle: P range
NOTE: On vehicles for Canada, the headlight, taillight, etc. remain lit even when the lighting switch is in "OFF" position but this is no problem for checks.
CAUTION
To prevent damage to scan tool MB991958, always turn the ignition switch to the "LOCK" (OFF) position before connecting or disconnecting scan tool MB991958.
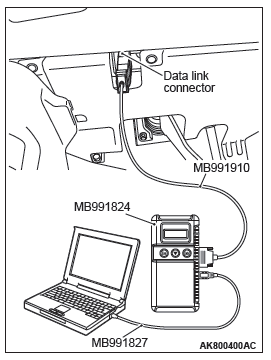
2. Connect scan tool MB991958 to the data link connector.
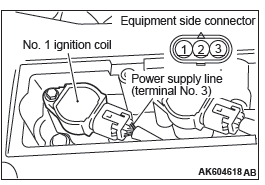
3. Set the timing light to the power supply line (terminal No. 3) of the ignition coil No. 1.
4. Start the engine and run it at idle.
5. Check that the idle speed is approximately 650 r/min.
6. Select scan tool MB991958 actuator test "item number 11".
7. Check that basic ignition timing is within the standard value.
Standard value: 5º BTDC +- 3º
8. If the basic ignition timing is not within the standard value, refer to GROUP 13A, Multiport Fuel Injection (MFI) <2.4L Engine> − Multiport Fuel Injection (MFI) Diagnosis − Symptom Chart.
CAUTION
If the actuator test is not canceled, the forced drive will continue for 27 minutes. Driving in this state could lead to engine failure.
9. Cancel the setting mode of the scan tool MB991958.
10.Check that the actual ignition timing is at the standard value.
Standard value: Approximately 10º BTDC
NOTE: The ignition timing fluctuates about +- 7º, even under normal operating condition.
NOTE: It is automatically further advanced by about 5º from 10º Before Top Dead Center at higher altitudes.
NOTE: Wait till approximately 1 minute passes after the engine started, and check the ignition timing when the engine stabilized.
11.Remove the timing light.
CAUTION
To prevent damage to scan tool MB991958, always turn the ignition switch to the "LOCK" (OFF) position before connecting or disconnecting scan tool MB991958.
12.Disconnect scan tool MB991958 from the data link connector.
CURB IDLE SPEED CHECK
Required Special Tool: MB991958: Scan Tool (M.U.T.-III Sub Assembly)
- MB991824: V.C.I.
- MB991827: M.U.T.-III USB Cable
- MB991910: M.U.T.-III Main Harness A
1. Before inspection, set the vehicle in the following condition:
- Engine coolant temperature: 80 − 95ºC (176 − 203ºF)
- Lights and all accessories: OFF
- Transaxle: P range
NOTE: On vehicles for Canada, the headlight, taillight, etc.
remain lit even when the lighting switch is in "OFF" position but this is no problem for checks.
CAUTION
To prevent damage to scan tool MB991958, always turn the ignition switch to the "LOCK" (OFF) position before connecting or disconnecting scan tool MB991958.
2. Connect scan tool MB991958 to the data link connector.
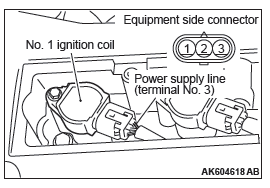
3. Set the timing light to the power supply line (terminal No. 3) of the ignition coil No. 1.
4. Start the engine.
5. Run the engine at idle for 2 minutes.
6. Check the actual ignition timing is at the standard value.
Standard value: Approximately 10º BTDC
NOTE: The ignition timing fluctuates about +-7º, even under normal operating condition.
NOTE: It is automatically further advanced by about 5º from 10º Before Top Dead Center at higher altitudes.
7. Check the idle speed. Select item number 2 and take a reading of the idle speed.
Curb idle speed: 650 +- 100 r/min
NOTE: The idle speed is controlled automatically by the idle air control system.
8. If the idle speed is outside the standard value, refer to GROUP 13A, Multiport Fuel Injection (MFI) <2.4L Engine> − Multiport Fuel Injection (MFI) Diagnosis − Symptom Chart.
9. Remove the timing light.
CAUTION
To prevent damage to scan tool MB991958, always turn the ignition switch to the "LOCK" (OFF) position before connecting or disconnecting scan tool MB991958.
10.Disconnect scan tool MB991958 from the data link connector.
IDLE MIXTURE CHECK
Required Special Tool: MB991958: Scan Tool (M.U.T.-III Sub Assembly)
- MB991824: V.C.I.
- MB991827: M.U.T.-III USB Cable
- MB991910: M.U.T.-III Main Harness A
1. Before inspection, set the vehicle in the following condition:
- Engine coolant temperature: 80 − 95ºC (176 − 203ºF)
- Lights and all accessories: OFF
- Transaxie: P range
NOTE: On vehicles for Canada, the headlight, taillight, etc.
remain lit even when the lighting switch is in "OFF" position but this is no problem for checks.
CAUTION
To prevent damage to scan tool MB991958, always turn the ignition switch to the "LOCK" (OFF) position before connecting or disconnecting scan tool MB991958.
2. Connect scan tool MB991958 to the data link connector.
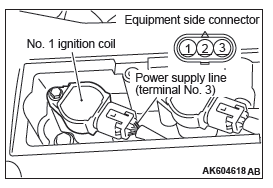
3. Set the timing light to the power supply line (terminal No. 3) of the ignition coil No. 1.
4. Start the engine and let it run at idle.
5. Check that the actual ignition timing is at the standard value.
Standard value: Approximately 10º BTDC
NOTE: The ignition timing fluctuates about +-7º, even under normal operating condition.
NOTE: It is automatically further advanced by about 5º from 10º Before Top Dead Center at higher altitudes.
NOTE: Wait till approximately 1 minute passes after the engine started, and check the ignition timing when the engine stabilized.
6. Run the engine and increase the engine speed to 2,000 − 3,000 r/min for 2 minutes.
7. Set the CO, HC tester.
8. Check the CO contents and the HC contents at idle.
Standard value:
CO contents: 0.5% or less
HC contents: 100 ppm or less
9. If there is a deviation from the standard value, inspect the MFI system (Refer to GROUP 13A − Multiport Fuel Injection (MFI) <2.4L Engine> − Multiport Fuel Injection (MFI) Diagnosis − Symptom Chart)
10.Remove the CO, HC tester and timing light.
CAUTION
To prevent damage to scan tool MB991958, always turn the ignition switch to the "LOCK" (OFF) position before connecting or disconnecting scan tool MB991958.
11.Disconnect scan tool MB991958 from the data link connector.
COMPRESSION PRESSURE CHECK
Required Special Tool: MB991958: Scan Tool (M.U.T.-III Sub Assembly)
- MB991824: V.C.I.
- MB991827: M.U.T.-III USB Cable
- MB991910: M.U.T.-III Main Harness A
1. Before inspection, check that the engine oil, starter and battery are normal. Also, set the vehicle in the following condition:
- Engine coolant temperature: 80 − 95ºC (176 − 203ºF)
- Lights and all accessories: OFF
- Transaxle: P range
NOTE: On vehicles for Canada, the headlight, taillight, etc. remain lit even when the lighting switch is in "OFF" position but this is no problem for checks.
2. Remove all of the ignition coils and spark plugs.
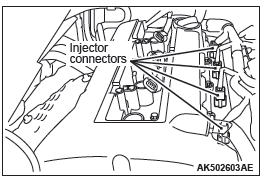
3. Disconnect the all of the injector connectors.
WARNING
Keep your distance from the spark plug hole when cranking. Oil, fuel, etc., may spray out from the spark plug hole and may cause serious injury.
4. Cover the spark plug hole with a shop towel etc., after the engine has been cranked, check that no foreign material is adhering to the shop towel.
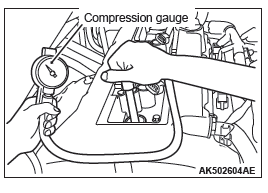
5. Set compression gauge to one of the spark plug holes.
6. Crank the engine with the throttle valve fully open and measure the compression pressure.
Standard value (at engine speed of 200 r/min): 1,440
kPa (209 psi)
Limit (at engine speed of 200 r/min): Minimum 1,000
kPa (145 psi)
7. Measure the compression pressure for all the cylinders, and check that the pressure differences of the cylinders are below the limit.
Limit: Maximum 98 kPa (14 psi)
8. If there is a cylinder with compression or a compression difference that is outside the limit, pour a small amount of engine oil through the spark plug hole, and repeat the operations in steps from 5 to 7.
- If the compression increases after oil is added, the cause of the malfunction is a worn or damaged piston ring and/or cylinder inner surface.
- If the compression does not rise after oil is added, the cause is a burnt or defective valve seat, or pressure is leaking from the gasket.
9. Connect the all of the injector connector.
10.Install the spark plugs and ignition coils.
11.Use the scan tool MB991958 to erase the diagnosis codes.
NOTE: This will erase the diagnosis code resulting from the injector connectors being disconnected.
12.Select "Mode $0A" from "Special Function" of Scan tool MB991958. Check whether the permanent-DTC (PDTC) is stored or not. If stored, clear the PDTC. (Refer to GROUP 13A − Multiport Fuel Injection (MFI) <2.4 L Engine> − Multiport Fuel Injection (MFI) Diagnosis − Diagnostic Function)
MANIFOLD VACUUM CHECK
Required Special Tool: MB991958: Scan Tool (M.U.T.-III Sub Assembly)
- MB991824: V.C.I.
- MB991827: M.U.T.-III USB Cable
- MB991910: M.U.T.-III Main Harness A
1. Before inspection, set the vehicle in the following condition:
- Engine coolant temperature: 80 − 95ºC (176 − 203ºF)
- Lights and all accessories: OFF
- Transaxle: P range
NOTE: On vehicles for Canada, the headlight, taillight, etc. remain lit even when the lighting switch is in "OFF" position but this is no problem for checks.
CAUTION
To prevent damage to scan tool MB991958, always turn the ignition switch to the "LOCK" (OFF) position before connecting or disconnecting scan tool MB991958.
2. Connect scan tool MB991958 to the data link connector.
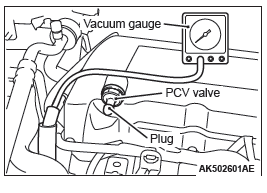
3. Disconnect the ventilation hose from the positive crankcase ventilation (PCV) valve, and then connect a vacuum gauge to the ventilation hose. Plug the PCV valve.
4. Start the engine and check that idle speed is approximately 650 r/min.
5. Check the intake manifold vacuum.
Limit: Minimum 60 kPa (18 in Hg)
6. Turn off the ignition switch.
7. Remove the vacuum gauge and then connect the ventilation hose to the PCV valve.
CAUTION
To prevent damage to scan tool MB991958, always turn the ignition switch to the "LOCK" (OFF) position before connecting or disconnecting scan tool MB991958.
8. Disconnect scan tool MB991958 from the data link connector.
READ NEXT:
 Crankshaft Pulley
REMOVAL AND INSTALLATION
Pre-removal operation
Engine Room Under Cover Front B and Engine Room
Side Cover (RH) Removal.
Post-installation operation
Drive Belt Tension Check.
Engine Room Under C
Camshaft
REMOVAL AND INSTALLATION
Pre-removal Operation
Engine Room Under Cover Front A, B and Engine Room
Side Cover (RH) Removal.
Air Cleaner Assembly Removal.
Strut Tower Bar Removal.
Post-installatio
Valve Stem Seal
REMOVAL AND INSTALLATION
CAUTION
*Remove and assemble the marked parts in each cylinder unit.
Pre-removal operation
Engine Room Under Cover Front B and Engine Room Side
Cover (RH) Removal
Engine
SEE MORE:
Doors
CAUTION:
● Make sure the doors are closed: driving with doors not completely closed is
dangerous.
● Never leave children in the vehicle unattended.
● Be careful not to lock the doors while the keys is inside the vehicle.
NOTE:
● When the driver’s door is open, neithe
Engine Control
GENERAL INFORMATION
For the accelerator system, the electronic throttle
valve control system, disposing of the accelerator
cable, is adopted.
This system determines the amount of pressure
applied to the accelerator pedal using the built-in
accelerator pedal position sensor of the accelerator
pedal
