Mitsubishi Outlander: On-vehicle Service
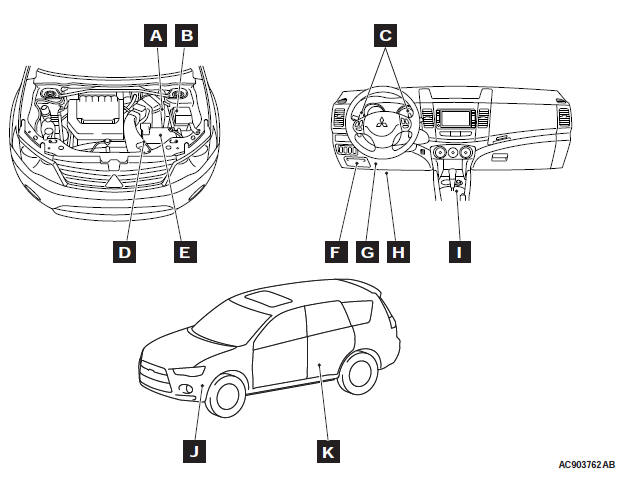
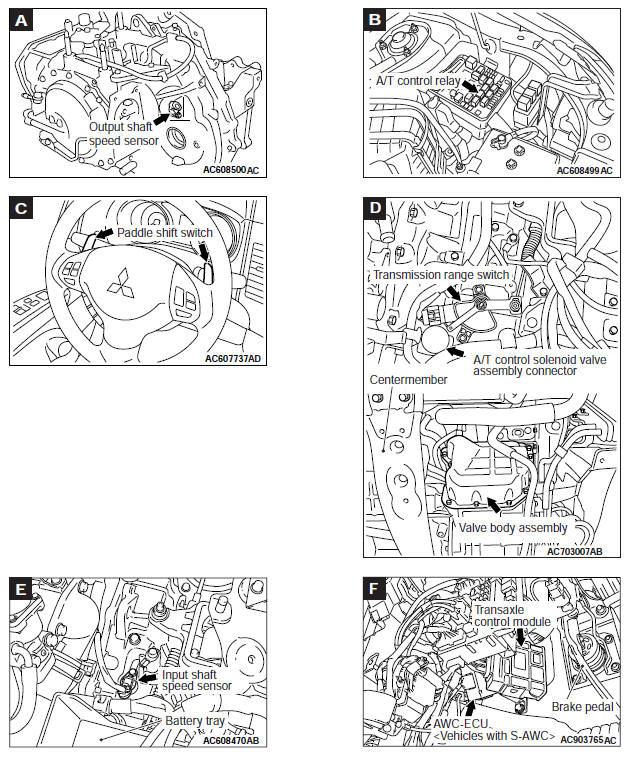
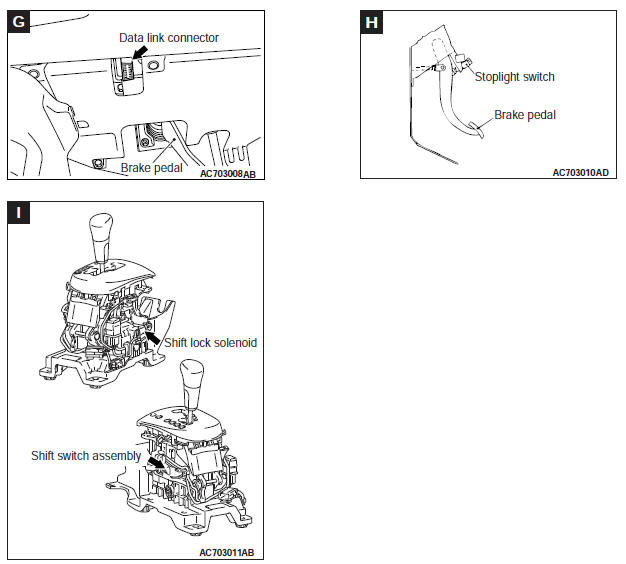
A/T CONTROL COMPONENT LAYOUT


ESSENTIAL SERVICE
TRANSMISSION FLUID CHECK
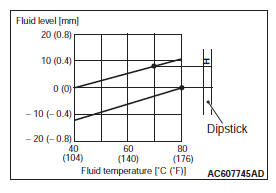
1. Drive the vehicle until the transmission fluid temperature rises to the normal operating temperature [70 − 80ºC (158 − 176ºF) ].
NOTE: The transmission fluid temperature is measured with scan tool MB991958 (M.U.T.-III sub assembly).
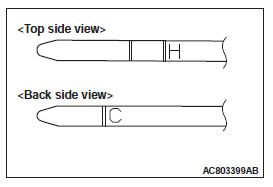
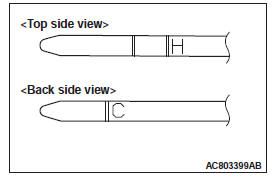
NOTE: If it takes some amount of time until the transmission fluid reaches its normal operating temperature [70 − 80ºC (158 − 176ºF) ], check the transmission fluid level by referring to the left diagram.
2. Park the vehicle on a level surface.
3. Move the selector lever through all positions to fill the torque converter and the hydraulic circuits with fluid, and then move the selector lever to the "N" position.
4. After wiping off any dirt around the dipstick, remove the dipstick and check the condition of the transmission fluid.
NOTE: If the transmission fluid smells as if it is burnt, it means that the transmission fluid has been contaminated by fine particles from the bushings and friction materials. Transaxle overhaul and cooler line flushing may be necessary.
5. Check transmission fluid level is at the "H" mark on the dipstick. If the transmission fluid level is less than this, add DIA QUEEN ATF- J3 until the level reaches the "H" mark.
NOTE: If the transmission fluid level is too low, the oil pump will draw in air along with the transmission fluid, which will cause to form bubbles. If the transmission fluid level is too high, rotating components inside the transaxle will churn the fluid and air into a foamy liquid. Both conditions (level too low or too high) will cause the hydraulic pressure to drop, which will result in late shifting and slipping of the clutches and brakes.
NOTE: In either case, air bubbles can interfere with normal valve, clutch, and brake operation. Also, foaming can cause transmission fluid to escape from the transaxle vent where it may be mistaken for a leak.
6. Securely insert the dipstick.
NOTE: The transmission fluid should always be replaced under the following conditions:
- When troubleshooting the transaxle.
- When overhauling the transaxle.
- When the transmission fluid is noticeably dirty or burnt (driving under severe conditions).
TRANSMISSION FLUID CHANGE
If you have a transmission fluid changer, use this changer to replace the transmission fluid. If you do not have a transmission fluid changer, replace the transmission fluid by the following procedure.
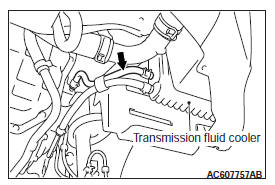
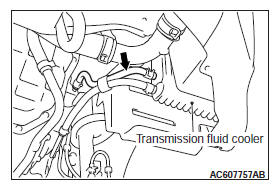
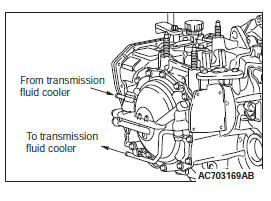
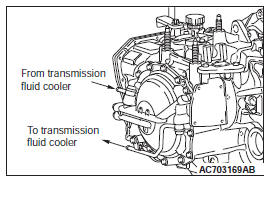
1. Disconnect the hose shown in the illustration which connects the transaxle and the oil cooler (inside the radiator). Place a container under the hose to collect the discharge.
CAUTION The engine should be stopped within one minute after it is started. If all the transmission fluid has drained out before then, the engine should be stopped at that point.
2. Start the engine and let the transmission fluid drain out.
(Running conditions: "N" range with engine idling)
Approximately 3.5 dm3 (3.7 quarts) of transmission fluid should be removed.
3. Remove the drain plug from the bottom of the transaxle case to drain the transmission fluid.
Approximately 2.0 dm3 (2.1 quarts) of transmission fluid should be removed.
4. Install the drain plug with a new gasket, and tighten it to the specified torque.
Tightening torque: 7.4 +- 2.4 N*m (65 +- 21 in-lb)
CAUTION Stop pouring if the full volume of transmission fluid cannot be added.
5. Add new transmission fluid (DIA QUEEN ATF- J3) through the oil filter tube.
Approximately 5.5 dm3 (5.8 quarts) of transmission fluid should be added.
6. Repeat the procedure in Step 2. (to pump out the rest of the contaminated transmission fluid)
7. Add new transmission fluid (DIA QUEEN ATF- J3) through the oil filter tube.
Approximately 3.5 dm3 (3.7 quarts) of transmission fluid should be added.
NOTE: Check for contamination or a burnt odor. If the transmission fluid is still contaminated or burnt, repeat Steps 6 and 7 before proceeding to Step 8.
8. Reconnect the hose which was disconnected in step 1 above, and firmly insert the dipstick.
9. Start the engine and run it at idle for one to two minutes.
10.Move the selector lever through all positions, and then move it to the "N" position.
11.Check that the transmission fluid level is at the "C" mark on the dipstick. If the level is less than this, add transmission fluid.
12.Drive the vehicle until the transmission fluid temperature rises to the normal operating temperature [70 − 80ºC (158 − 176ºF) ], and then check the transmission fluid level again.
The transmission fluid level must be at the "H" mark.
NOTE: The transmission fluid temperature is measured with scan tool MB991958 (M.U.T.-III sub assembly).
NOTE: The "C" level is for reference only; the "H" level should be regarded as the standard level.
NOTE: If it takes some amount of time until the transmission fluid reaches its normal operating temperature [70 − 80ºC (158 − 176ºF) ], check the transmission fluid level by referring to the left diagram.
13.When the transmission fluid is less than the specified level, add transmission fluid.
When the transmission fluid is greater than the specified level, drain the excess fluid through the drain plug to adjust the transmission fluid to the specified level.
14.Firmly insert the dipstick into the oil filler tube.

FLUSHING COOLERS AND TUBES
Required Special Tool: MB995062: Flushing Tool
WARNING
- Wear protective eyewear that meets the requirements of ANSI Z87.1 − 1968 and OSHA. Wear standard industrial rubber gloves.
- Keep a
class B fire extinguisher in the area where the
flushing tool will be used. Keep the area well ventilated.
Do not let flushing solvent come in contact with eyes or skin. If it does, flush with water for 15 to 20 seconds. Remove contaminated clothing and wash affected skin with soap and water. Seek medical attention.
When a transaxle failure has contaminated the transmission fluid, the oil cooler(s) must be flushed. The cooler by-pass valve in the transaxle must also be replaced. The torque converter must also be replaced with an exchange unit. This will ensure that metal particles or sludged transmission fluid are not later transferred back into the reconditioned (or replaced) transaxle.
There are two different procedures for flushing coolers and lines. The recommended procedure is to use special tool MB995062 Flushing Tool. The other procedure is to use a hand suction gun and mineral spirits.
1. Remove the cover plate filler plug on special tool MB995062. Fill the reservoir 1/2 to 3/4 full with fresh flushing solution. Flushing solvents are petroleum based solutions generally used to clean transaxle components. Do not use solvents containing acids, water, gasoline, or any other corrosive liquids.
2. Reinstall the filler plug on special tool MB995062.
3. Verify that the pump power switch is turned "OFF". Connect the red alligator clip to the positive battery terminal. Connect the black alligator clip to a good ground.
4. Disconnect the cooler lines at the transaxle.
NOTE: When flushing the transaxle cooler and lines, always reverse flush.
5. Connect the pressure line to the OUTLET line (from cooler).
6. Connect the return line to the INLET line (to cooler).
7. Turn the pump "ON" for two to three minutes to flush the cooler(s) and lines. Monitor the pressure readings. Clear the return lines. Pressure readings should stabilize below 138 kPa (20 psi) for vehicles equipped with a single cooler and 208 kPa (30 psi) for vehicles equipped with dual coolers. If flow is intermittent or exceeds these pressures, replace the cooler(s).
8. Turn the pump "OFF".
9. Disconnect the suction line from the reservoir at the cover plate. Disconnect the return line at the cover plate and place it in a drain pan.
10.Turn the pump "ON" for 30 seconds to purge flushing solution from the cooler(s) and lines. Turn the pump "OFF".
11.Place the suction line into a one quart container of DIA QUEEN ATF- J3 transmission fluid.
12.Turn the pump "ON" until all transmission fluid is removed from the one quart container and lines. This purges any residual cleaning solvent from the transaxle cooler(s) and lines. Turn the pump "OFF".
13.Disconnect the alligator clips from the battery. Reconnect the flusher lines to the cover plate, and remove the flushing adapters from the cooler lines. Reconnect the cooler lines.
OIL COOLER FLOW CHECK
After the new or repaired transaxle has been installed, fill to the proper level with DIA QUEEN ATF- J3. The flow should be checked using the following procedure:
CAUTION With the fluid set at the proper level, transmission fluid collection should not exceed one quart or internal damage to the transaxle may occur.
1. Disconnect the OUTLET line (from cooler) at the transaxle and place a collecting container under the disconnected line.
2. Run the engine at curb idle speed with the shift selector in neutral.
3. If transmission fluid flow is intermittent or it takes more than 20 seconds to collect one quart of transmission fluid, replace the cooler.
4. If flow is within acceptable limits, reconnect the cooler line.
Then fill the transaxle to the proper level, using DIA QUEEN ATF- J3
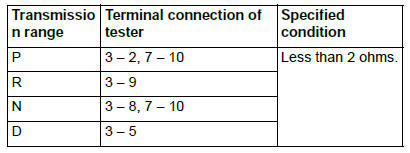
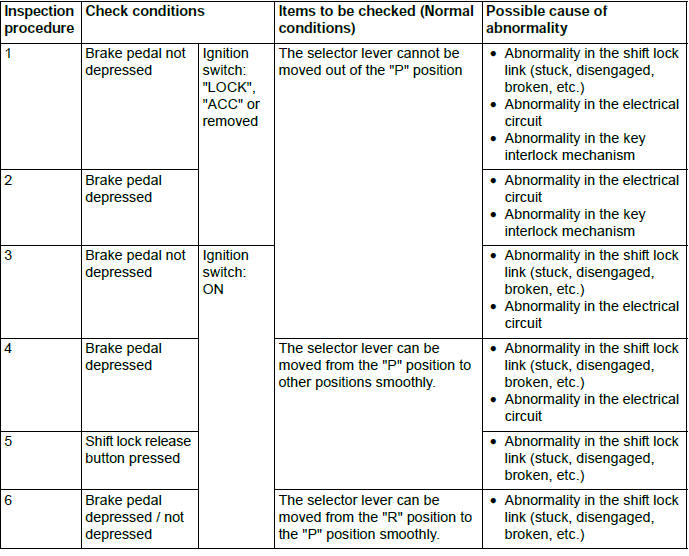
TRANSMISSION RANGE SWITCH CHECK
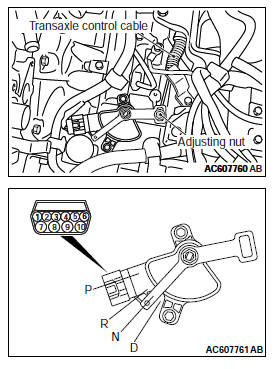
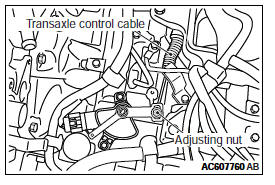
TRANSMISSION RANGE SWITCH AND CONTROL CABLE ADJUSTMENT
1. Set the selector lever to the "N" position.
2. Loosen the control cable to the manual control lever adjusting nut to free the cable and lever.
3. Set the manual control lever to the neutral position.
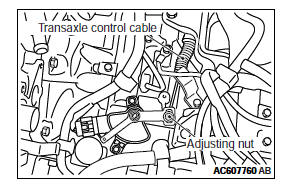
4. Align the hole at the end of the manual control lever and the hole in the Transmission range switch body flange (section A − A).
NOTE: Insert a φ5 bar into the aligned holes in the Transmission range switch body flange and on the tip of the manual control lever to position the Transmission range switch body.
5. Tighten the transaxle control cable using the adjusting nut with the specified torque.
Tightening torque: 9.5 +- 3.5 N*m (84 +- 30 in-lb)
6. Check that the selector lever is in the N position.
7. Check that each position of the manual control lever matches each position of the selector lever using M.U.T.-III MB991958 (M.U.T.-III sub assembly).
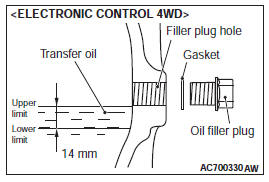
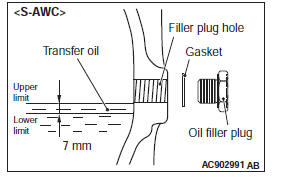
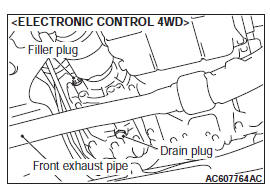
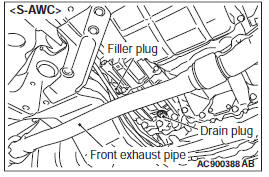
TRANSFER OIL LEVEL CHECK
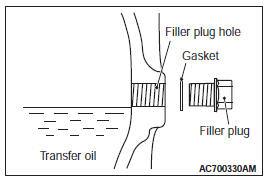
1. Remove the filler plug and gasket.
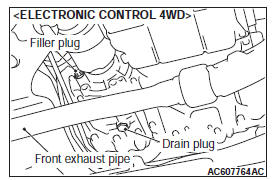

2. Check that the oil level is in between the upper limit (bottom of the filler plug hole) and the lower limit as shown.
3. Check that the oil is not excessively foul and has moderate viscosity.
4. If the oil level is not in between the upper limit and the lower limit, refill the specified gear oil to the bottom of the oil filler plug hole.
Brand name: Hypoid gear oil API classification GL-5 SAE80
5. Install the filler plug and new gasket, then tighten them to the specified torque.
Tightening torque : 32 +- 2 N*m (24 +- 1 ft-lb)
TRANSFER OIL REPLACEMENT
1. Remove the drain plug and gasket, to drain the transfer oil.
2. Install the drain plug and new gasket, and tighten to the specified torque.
Tightening torque: 32 +- 2 N*m (24 +- 1 ft-lb)
3. Remove the filler plug and gasket, and fill the transfer oil up to the lower edge of the filler plug hole.
Brand name: Hypoid gear oil API classification GL-5
SAE80
Filling amount: 0.49 dm3 (0.52 quarts)
4. Install the filler plug and a new gasket, and tighten them to the specified torque.
Tightening torque: 32 +- 2 N*m (24 +- 1 ft-lb)
ELECTRONIC CONTROL COUPLING (FRONT) OPERATION CHECK <VEHICLES WITH S-AWC>
1. Raise the vehicle.
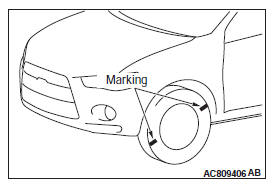
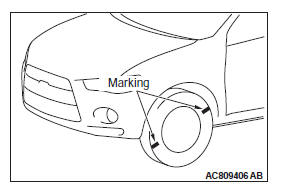
2. For easy identification of tire rotation, mark the front and rear tires as shown in the figure.
3. Set the shift position to the P-position, and turn ON the ignition switch.
4. Set the wheel to the neutral position, and carry out the special function test No. 4 "Control OFF".
5. Rotate the left-front tire counterclockwise by your hand, and check that the right-front tire makes reverse rotation against the left-front tire.
6. Set the shift position to the N-position, and turn ON the ignition switch.
7. Set the wheel to the neutral position, and carry out the special function test No. 5 "Front coupling operation check".
NOTE: Time limit for the special function test No. 5 "Front coupling operation check" is 1 minute.
8. Rotate the left-front tire counterclockwise by your hand, and check that the right-front tire rotates to the same direction, viewed from the left-front tire.
Carry out the check above. Then when the tire operates as mentioned, it is judged that the AWC-ECU control and electronic control coupling (front) are normal. If the tire does not operate as mentioned, replace the transfer assembly.
ELECTRONIC CONTROL COUPLING (CENTER) OPERATION CHECK <VEHICLES WITH S-AWC>
1. Raise the vehicle.
2. Mark the front and rear tires for easy identification of tire rotation.
3. Adjust the parking brake lever to the normal conditions (Refer to GROUP 36 − On-vehicle Service, Parking Brake Lever Stroke Check and Adjustment).
4. Pull the parking brake lever by two notches.
NOTE: Applying the parking brake slightly prevents the drive force transferring to the rear wheels by a friction in the electronic control coupling. If it is checked without the parking brake apply, the drive force is transferred to the rear wheels by a friction in the electronic control coupling.
5. Turn the ignition switch to "ON" position and keep the steering wheel in the neutral position. Then carry out the special function test No. 4 "Control OFF".
6. Start the engine, and move the selector lever into D position.
7. Drive the vehicle straight with vehicle speed of less than 20 km/h.
CAUTION In order to protect the AWD drive system parts, check must be finished within 1 minute in total.
8. Check if the rear wheels do not rotate.
9. Stop the engine.
10.Turn the ignition switch to "ON" position and carry out the special function test No. 6 "Center coupling operation check".
NOTE: The limit time of "Center coupling operation check" is 1 minute.
11.Start the engine again, and move the selector lever into D position.
12.Drive the vehicle straight with vehicle speed of less than 20 km/h.
CAUTION In order to protect the AWD drive system parts, check must be finished within 1 minute in total.
13.Check if the rear wheels rotate.
14.Carry out the check above. Then when the tire operates as mentioned, it is judged that the AWC-ECU control and electronic control coupling (Center) are normal. If the tire does not operate as mentioned, replace the electronic control coupling (Center).
AUTOMATIC TRANSAXLE CONTROL COMPONENT CHECK
STOPLIGHT SWITCH CHECK
Refer to GROUP 35A, Brake Pedal − Brake Pedal Inspection.
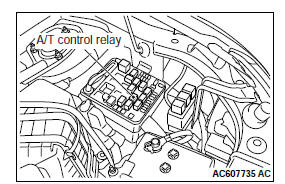
A/T CONTROL RELAY CHECK
1. Remove the A/T control relay.
2. Use jumper wires to connect A/T control relay terminal No.1 to the negative battery terminal and terminal No.2 to the positive battery terminal.
3. Check for continuity between A/T control relay terminals No.3 and No.4 when the jumper wires are connected to and disconnected from the battery.
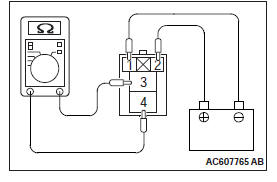
4. If there is any problem with the A/T control relay, replace it.
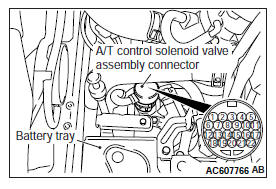
SOLENOID VALVE CHECK
1. Disconnect the A/T control solenoid valve assembly connector.
2. Measure the resistance between the terminals of the applicable solenoid valves and terminal No.13.
Standard value:
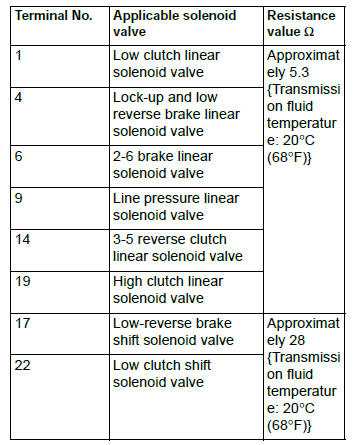
3. When the resistance is within the standard value, check the power supply and the ground circuits.
CAUTION Each solenoid valve cannot be removed or replaced as a single unit. When replacement of any one of the solenoid valves is necessary, replace the valve body assembly.
4. When the resistance is outside the standard value, replace the valve body assembly and the harness.
TRANSMISSION FLUID TEMPERATURE SENSOR CHECK
1. Disconnect the A/T control solenoid valve assembly connector.
2. Measure the resistance between the sensor-side connector terminal No. 2 and 3 of the A/T control solenoid valve assembly connector.

Standard value:
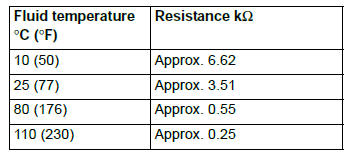
NOTE: In the information screen on the multi-information display, the fluid temperature warning comes on when the transmission fluid temperature is approximately 140ºC(284 ºF) or higher, and automatically goes out when the transmission fluid temperature dropped below approximately 135ºC(275ºF).
CAUTION The transmission fluid temperature sensor cannot be removed or replaced as a single unit. When the transmission fluid temperature sensor needs to be replaced, replace the valve body assembly.
3. When the resistance of the transmission fluid temperature sensor is outside the standard value, and the transmission fluid temperature warning comes on/goes out at other than the specified temperatures, replace the valve body assembly and the harness.
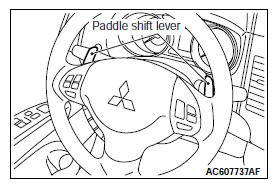
PADDLE SHIFT SWITCH CHECK
1. After operating the paddle shift levers (+ side, − side) by pulling them to the rearward of the vehicle, check that the levers are returned to the original positions quickly when released. Also, check that no looseness, friction or abnormal sound occurs.
2. Remove the paddle shift assembly.
3. Check for continuity between the paddle shift switch connector terminals.
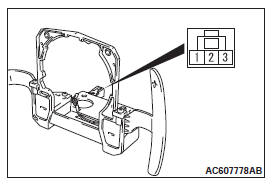
Standard value:
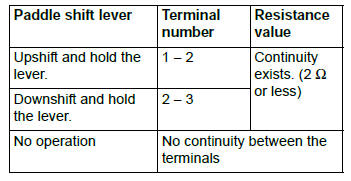
4. In the cases other than the above, replace the paddle shift assembly.
ELECTRONIC CONTROL COUPLING SOLENOID (FRONT) CHECK <VEHICLES WITH S-AWC>
1. Disconnect the B-28 connector, and measure the resistance value between the connector terminals on the electronic control coupling side. If the measured resistance value is out of the standard value range, replace the transfer assembly
Standard value: 1.8 − 4.0 Ω
2. Measure the resistance value between the connector terminal No.1 on the electronic control coupling side and the body ground. If the continuity exists, replace the transfer assembly).
ELECTRONIC CONTROL COUPLING SOLENOID (CENTER) CHECK <VEHICLES WITH S-AWC>
1. Disconnect the D-138 connector, and measure the resistance value between the connector terminals on the electronic control coupling side. If the measured resistance value is out of the standard value range, replace the electronic control coupling.
Standard value: 1.6 − 3.7 Ω
2. Measure the resistance value between the connector terminal No.1 on the electronic control coupling side and the body ground. If the continuity exists, replace the electronic control coupling.

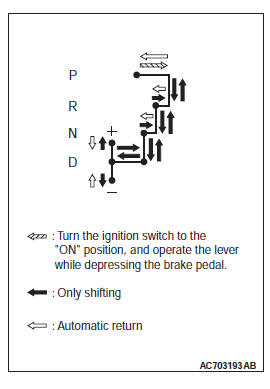
SELECTOR LEVER OPERATION CHECK
1. Put on the parking brake.
2. Move the selector lever to every range and check that the lever moves smoothly with secure feel of engagement.
3. Make sure that the engine starts when the selector lever is in the "N" or "P" range, and does not start when the selector lever is in other range.
4. Start the engine. Release the parking brake.
5. Make sure that the vehicle moves forward when the selector lever is moved from the "N" range to "D" range, or to the 1st to 6th speed in the sport mode. Also make sure that the vehicle moves backward when the selector lever is moved from the "N" to "R" range.
6. Stop the engine.
7. Turn ON the ignition switch, and move the selector lever from the "P" to "R" range. Check that the backup light comes on and the tone alarm sounds at this time.
NOTE: Since the vehicle is equipped with the A/T wrong-operation preventive device, the selector lever cannot be moved out of the "P" position without depressing the brake pedal after turning "ON" the ignition switch.
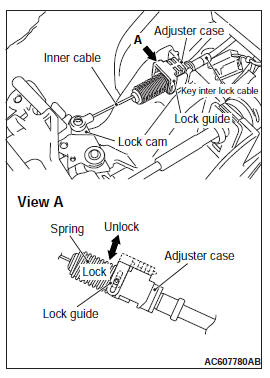
KEY INTERLOCK MECHANISM CHECK/ADJUSTMENT
1. Carry out the following check.
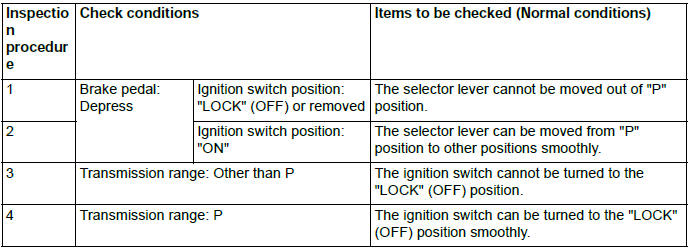
2. If the normal conditions are not obtained after performing the above operations, install the key interlock cable in the following procedures. (Automatic adjustment)
- Disconnect the key interlock cable connection (selector lever side).
CAUTION Leave the ignition switch in the "LOCK" (OFF) position until the key interlock cable installation is completed.
- Move the selector lever to the "P" position and turn the ignition switch to the "LOCK" (OFF) position.
- Install the tip of the key interlock cable to the lock cam of the selector lever assembly, taking care not to twist the inner cable.
- Install the adjuster case with its lock guide pulled up (unlocked).
- Securely push down the lock guide to lock it.
NOTE: The lock position of the key interlock cable is automatically adjusted by a spring.
SHIFT LOCK MECHANISM CHECK
SYSTEM CHECK
COMPONENT PARTS CHECK
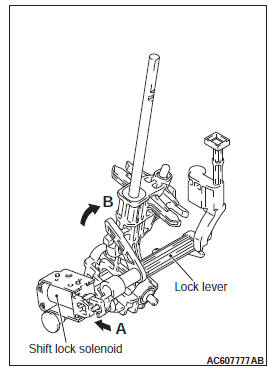
SHIFT LOCK LINK
Check each part for damage and disengagement.
Check that the lock lever smoothly moves in the direction of arrow B in the figure when the shift lock solenoid plunger is pressed in the direction of arrow A, and smoothly moves back to the original position when the plunger is released.
SHIFT LOCK SOLENOID
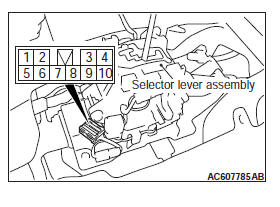
1. Measure the resistance between terminal No.3 and No.7 of the selector lever assembly connector.
Standard value: 24 +- 1.2 Ω
2. When the resistance is outside the standard value, replace the selector lever assembly.
READ NEXT:
 Transaxle Control
REMOVAL AND INSTALLATION
WARNING
When removing and installing the transaxle
control cable and shift lock cable unit, be
careful not to hit the SRS-ECU.
Pre-removal operation
Front floor console asse
Transaxle Assembly
REMOVAL AND INSTALLATION
Pre-removal operation
Engine compartment under cover and side cover removal
Transmission fluid draining
Air cleaner bracket removal
Battery and Battery Tray Removal
ECM
Automatic Transaxle Overhaul
Transaxle Models
General Specifications
Service Specifications
Torque Specifications
Transaxle
Transfer
Size of torque wrench used
Adjusting Plate, Snap Ring,
Shim, Spacer, Needle Bearing,
Thrus
SEE MORE:
Side Cover
DISASSEMBLY AND ASSEMBLY
Side cover
D-ring
2-6 brake piston
D-ring
Spring retainer
Snap ring
Seal ring
Required special tools:
MB992196: Spring compressor
DISASSEMBLY
1. Remove the seal rings from the side cover.
CAUTION
Ensure that the special tool MB992196 is correctly set,
directly
Crankshaft Oil Seal
REMOVAL AND INSTALLATION
Crankshaft front oil seal removal
steps
Crankshaft pulley
Crankshaft front oil seal
Crankshaft rear oil seal removal
steps
Transaxle assembly
Drive plate bolts
Adapter plate
Drive plate
Crankshaft rear oil seal
Required Special Tools:
MB991883: Flywheel Sto
