Mitsubishi Outlander: Outside Mirror
GENERAL INFORMATION
DOOR MIRROR OPERATION
Remote Controlled Mirror Operation
- The mirror on the door mirror moves up/down and left/right by operating the remote controlled door mirror switch when the ignition switch is at the "ON" or "ACC" position.
Heated Door Mirror Operation
- The rear window defogger relay switch is activated (ON) by turning on the A/C-ECU built-in rear window defogger switch when the ignition switch is in the "ON" position. When the rear window defogger relay is turned ON, power is supplied to the rear window defogger and door mirror, and the heater of the door mirror (heated door mirror) starts operations. The rear window defogger comes with a timer function and will automatically turn OFF the switch approximately 20 minutes after the rear window defogger switch is turned ON. The heated door mirror operations are also terminated along with the rear window defogger, at this time.
HEATED DOOR MIRROR DIAGNOSIS
TROUBLESHOOTING STRATEGY
Diagnosis should be carried out by the following procedures.
1. Gather the information from the customer.
2. Verify that the condition described by the customer exists.
3. Find the malfunction by the following Symptom Chart.
4. Verify the malfunction is eliminated.
TROUBLE SYMPTOM CHART

SYMPTOM PROCEDURES
INSPECTION PROCEDURE 1: None of the Heated Door Mirrors Operate
Heated Door Mirror Circuit
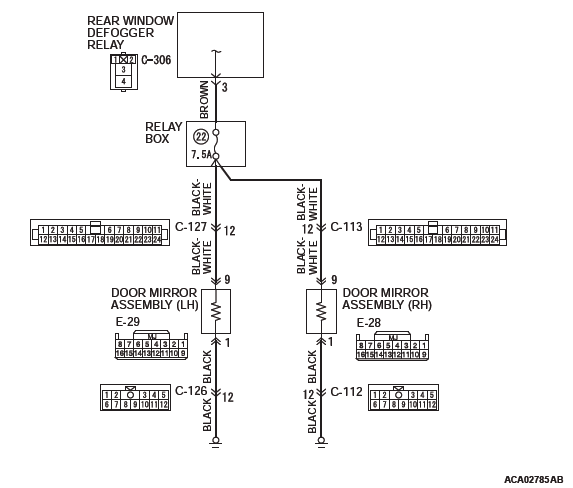

CIRCUIT OPERATION
If both of the door mirror heaters do not operate normally it may be due to a malfunction in the rear window defogger system.
TROUBLESHOOTING HINTS
- Malfunction of the rear window defogger system
- The wiring harness or connectors may have loose, corroded or damaged terminals, or terminals pushed back in the connector.
DIAGNOSIS
Required Special Tools:
- MB991223: Test Harness Set
STEP 1. Check the rear window defogger.
Check that the rear window defogger works normally as follows.
- Turn the ignition switch to the "ON" position.
- Push the rear window defogger switch to operate the defogger.
Q: Does the defogger work normally?
YES : Go to Step 2.
NO : Because of malfunction of the rear window defogger, carry out the troubleshooting.
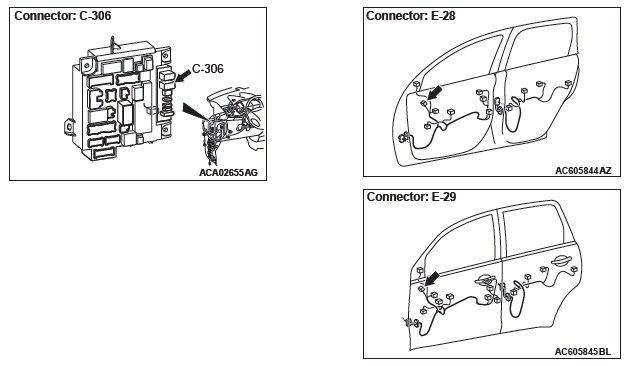
STEP 2. Check the door mirror (RH) connector E-28 door mirror assembly and rear window defogger relay connector C-306 for loose, corroded or damaged terminals, or terminals pushed back in the connector.
Q: Is the door mirror (RH) connector E-28 door mirror assembly and rear window defogger relay connector C-306 in good condition?
YES : Go to Step 3.
NO : Repair or replace the damaged component(s). Refer to GROUP 00E, Harness Connector Inspection. Check if the door mirrors works normally.
STEP 3. Check the wiring harness between the door mirror (RH) connector E-28 door mirror assembly (terminal 9) and rear window defogger relay connector C-306 (terminal 3).
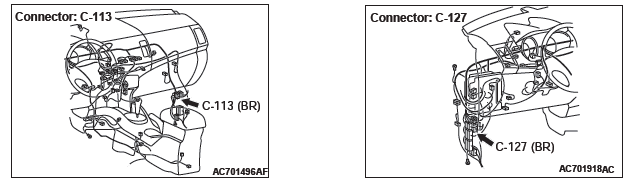
NOTE: Also check intermediate connector C-113 for loose, corroded or damaged terminals, or terminals pushed back in the connector. If intermediate connector C-113 is damaged, repair or replace the damaged component(s) as described in GROUP 00E, Harness Connector Inspection.
Q: Is the wiring harness between door mirror (RH) connector E-28 door mirror assembly (terminal 9) and rear window defogger relay connector C-306 (terminal 3) in good condition?
YES : Go to step 4.
NO : Repair the wiring harness as necessary. Check if all heated door mirrors work normally.
STEP 4. Check door mirror (LH) connector E-29 door mirror assembly.
Q: Is the door mirror (LH) connector E-29 door mirror assembly in good condition?
YES : Go to Step 5.
NO : Repair or replace the damaged component(s). Check if all heated door mirrors work normally.
STEP 5. Check the wiring harness between door mirror (LH) connector E-29 (terminal 9) and rear window defogger relay connector C-306 (terminal 3).
NOTE: Also check intermediate connector C-127 for loose, corroded or damaged terminals, or terminals pushed back in the connector. If intermediate connector C-127 is damaged, repair or replace the damaged component(s) as described in GROUP 00E, Harness Connector Inspection.
Q: Is the wiring harness between door mirror (RH) connector E-29 door mirror assembly (terminal 9) and rear window defogger relay connector C-306 (terminal 3) in good condition?
YES : The procedure is complete.
NO : Repair the wiring harness as necessary. Check if the all heated door mirrors work normally.
INSPECTION PROCEDURE 2: Left or right side heated door mirror does not operate
Heated Door Mirror Circuit
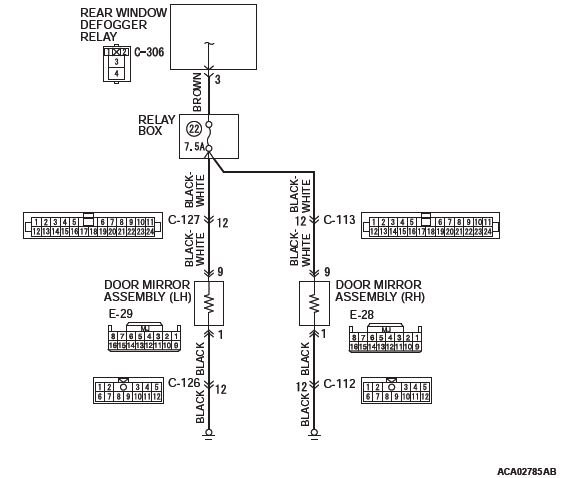
CIRCUIT OPERATION
If either of the heated door mirror do not operate normally, it may be due to malfunctions in the heated door mirror circuit or door mirror.
TROUBLESHOOTING HINTS
- Malfunction of the heated door mirror circuit
- Malfunction of the door mirror
- The wiring harness or connectors may have loose, corroded or damaged terminals, or terminals pushed back in the connector.
DIAGNOSIS
Required Special Tools:
- MB991223: Test Harness Set
STEP 1. Verify the operation of each heated door mirror.
Q: Which door mirror does not heat? Door mirror (LH) : Go to Step 2.
Door mirror (RH) : Go to Step 8.
STEP 2. Check door mirror (LH) connector E-29 door mirror assembly for loose, corroded or damaged terminals, or terminals pushed back in the connector.
Q: Is door mirror (LH) connector E-29 door mirror assembly in good condition?
YES : Go to Step 3.
NO : Repair or replace the damaged component(s). Refer to GROUP 00E, Harness Connector Inspection. And then check to see that the heater function of the door mirror (LH) operates normally.
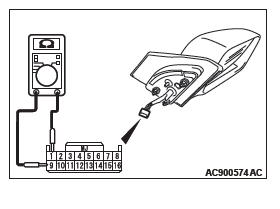
STEP 3. Check the heater of the door mirror (LH).
CAUTION When relocating the car between locations of extremely different temperatures (warm and cold), leave the car in a location for a while to adapt to the temperature prior to checking it.
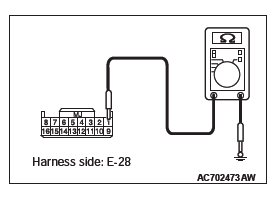
Check to see that the resistance between terminal 1 and 2 of the door mirror (LH) connector 9 of E-29 door mirror assembly.
- The resistance should be 7.2 +- 1.4 Ω at 25ºC (77ºF).
Q: Is the resistance normal?
YES : Go to Step 4.
NO : Replace the door mirror (LH). And then check to see that the heater function of the door mirror (LH) is operating normally.
STEP 4. Check the ground circuit between door mirror (LH) connector E-29 door mirror assembly and ground for open circuit. Measure the resistance at door mirror (LH) connector E-29 door mirror assembly.
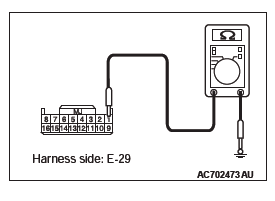
- Disconnect door mirror (LH) connector E-29 door mirror assembly and check at the wiring harness side connector.
- Measure the resistance value between terminal 1 and ground.
- The resistance should be 2Ω or less.
Q: Is the measured resistance 2Ω or less?
YES : Go to Step 6.
NO : Go to Step 5.
STEP 5. Check the wiring harness between door mirror (LH) connector E-29 door mirror assembly (terminal 1) and ground.
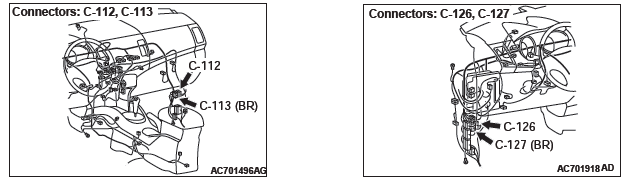
NOTE: Also check intermediate connector C-126 for loose, corroded or damaged terminals, or terminals pushed back in the connector. If intermediate connector C-126 is damaged, repair or replace the damaged component(s) as described in GROUP 00E, Harness Connector Inspection.
Q: Is the wiring harness between door mirror (LH) connector E-29 door mirror assembly (terminal 1) and ground in good condition?
YES : No action is necessary and testing is complete.
NO : The wiring harness may be damaged. Repair the wiring harness as necessary. And then check to see that the heater function of the door mirror (LH) operates normally.
STEP 6. Check rear window defogger relay connector C-306 for loose, corroded or damaged terminal, or terminals pushed back in the connector.
Q: Is rear window defogger relay connector C-306 in good condition?
YES : Go to Step 7.
NO : Repair or replace the damaged component(s). Refer to GROUP 00E, Harness Connector Inspection. And then check to see that the heater function of the door mirror (LH) operates normally.
STEP 7. Check the wiring harness between door mirror (LH) connector E-29 door mirror assembly (terminal 9) and rear window defogger relay connector C-306 (terminal 3).
NOTE: Also check intermediate connector C-127 for loose, corroded or damaged terminals, or terminals pushed back in the connector. If intermediate connector C-127 is damaged, repair or replace the damaged component(s) as described in GROUP 00E, Harness Connector Inspection.
Q: Is the wiring harness between door mirror (LH) connector E-29 door mirror assembly (terminal 9) and rear window defogger relay connector C-306 (terminal 3) in good condition?
YES : No action is necessary and testing is complete.
NO : Repair the wiring harness as necessary. And then check to see that the heater function of the door mirror (LH) operates normally.
STEP 8. Check the door mirror (RH) connector E-28 door mirror assembly for loose, corroded or damaged terminals, or terminals pushed back in the connector.
Q: Is the door mirror (RH) connector E-28 door mirror assembly in good condition?
YES : Go to Step 9.
NO : Repair or replace the damaged component(s). Refer to GROUP 00E, Harness Connector Inspection. And then check to see that the heater function of the door mirror (RH) operates normally.
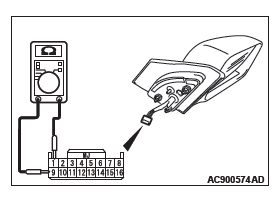
STEP 9. Check the heater function of the door mirror (RH).
CAUTION When relocating the car between locations of extremely different temperatures (warm and cold), leave the car in a location for a while to adapt to the temperature prior to checking it.
Check to see that the resistance between terminal 1 and 2 of the door mirror (RH) connector E-28 door mirror assembly.
- The resistance should be 7.2 +- 1.4 Ω at 25ºC (77ºF).
Q: Is the resistance normal?
YES : Go to Step 10.
NO : Replace the door mirror (RH). And then check to see that the heater function of the door mirror (RH) operates normally.
STEP 10. Check the ground circuit between door mirror (RH) connector E-28 door mirror assembly and ground for open circuit. Measure the resistance at door mirror (RH) connector E-28 door mirror assembly.
- Disconnect door mirror (RH) connector E-28 door mirror assembly, and check at the wiring harness side connector.
- Measure the resistance value between terminal 1 and ground.
- The resistance should be 2Ω or less.
Q: Is the measured resistance 2Ω or less?
YES : Go to Step 12.
NO : Go to Step 11.
STEP 11. Check the wiring harness between door mirror (RH) connector E-28 door mirror assembly (terminal 1) and ground.
NOTE: Also check intermediate connector C-112 for loose, corroded or damaged terminals, or terminals pushed back in the connector. If intermediate connector C-112 is damaged, repair or replace the damaged component(s) as described in GROUP 00E, Harness Connector Inspection.
Q: Is the wiring harness between door mirror (RH) connector E-28 door mirror assembly (terminal 1) and ground in good condition?
YES : No action is necessary and testing is complete.
NO : The wiring harness may be damaged. Repair the wiring harness as necessary. And then check to see that the heater function of the door mirror (RH) operates normally.
STEP 12. Check rear window defogger relay connector C-306 for loose, corroded or damaged terminal, or terminals pushed back in the connector.
Q: Is rear window defogger relay connector C-306 in good condition?
YES : Go to Step 13.
NO : Repair or replace the damaged component(s). Refer to GROUP 00E, Harness Connector Inspection. And then check to see that the heater function of the door mirror (RH) operates normally.
STEP 13. Check the wiring harness between door mirror (RH) connector E-28 door mirror assembly (terminal 9) and rear window defogger relay connector C-306 (terminal 3).
NOTE: Also check intermediate connector C-113 for loose, corroded or damaged terminals, or terminals pushed back in the connector. If intermediate connector C-113 is damaged, repair or replace the damaged component(s) as described in GROUP 00E, Harness Connector Inspection.
Q: Is the wiring harness between door mirror (RH) connector E-28 door mirror assembly (terminal 9) and rear window defogger relay connector C-306 (terminal 3) in good condition?
YES : No action is necessary and testing is complete.
NO : Repair the wiring harness as necessary. And then check to see that the heater function of the door mirror (RH) operates normally.
OUTSIDE MIRROR
REMOVAL AND INSTALLATION
TYPE 1 (WITHOUT SIDE TURN-SIGNAL LIGHT)
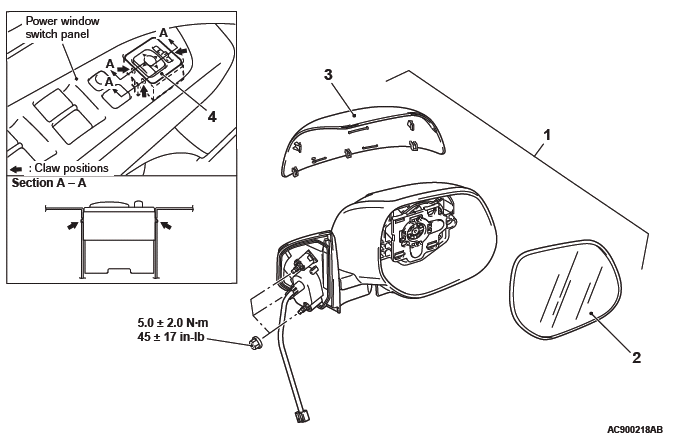
Door mirror assembly removal steps
- Front door trim
- Door mirror assembly
Mirror removal
- Mirror
Door mirror outer cover removal steps
- Mirror
- Door mirror outer cover
Remote controlled mirror switch removal steps
- Front door trim
- Remote controlled mirror switch
TYPE 2 (WITH SIDE TURN-SIGNAL LIGHT)
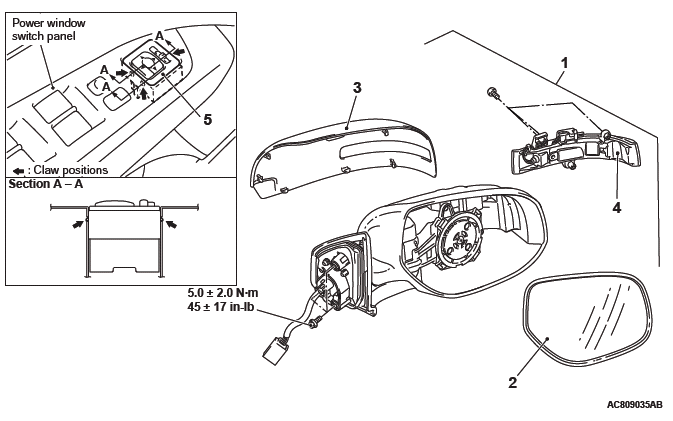
Door mirror assembly removal steps
- Front door trim
- Door mirror assembly
Mirror removal
- Connection of heated mirror connector
- Mirror
Door mirror outer cover removal steps
- Mirror
- Door mirror outer cover
Side turn-signal light assembly removal steps
- Connection of heated mirror connector
- Mirror
- Door mirror outer cover
- Connection of side turn-signal light connector
- Side turn-signal light assembly
Remote controlled mirror switch removal steps
- Front door trim
- Remote controlled mirror switch
REMOVAL SERVICE POINTS
MIRROR REMOVAL
CAUTION The tab of the mirror is prone to breakage when working in cold temperatures. Always use a hair drier or the like to warm up the mirror tab and its periphery to 20ºC (68ºF) or higher prior to works. When the mirror is heated too quickly from its cold state, it may be broken.

1. Slant the mirror upward with your hands. Then insert a flat-tipped screwdriver wrapped with protective tape between the pivot plate and mirror. Now pry off the mirror claws and release the lower side of the mirror as shown in the illustration.
2. Release the upper side of the mirror claws while pulling out the mirror.
3. Disconnect the connectors of the heated mirror.
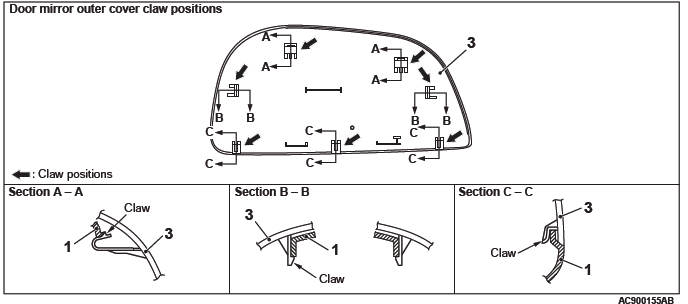
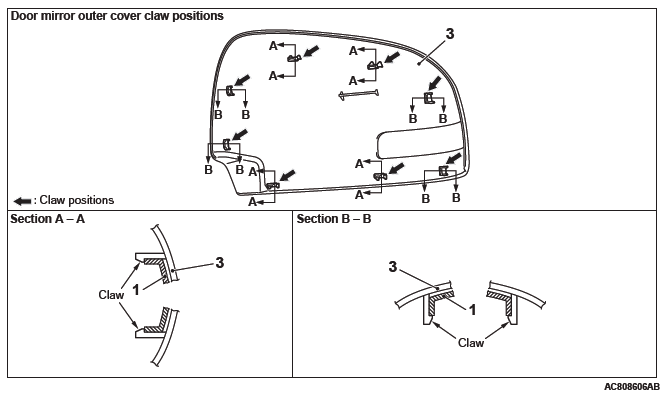
DOOR MIRROR OUTER COVER REMOVAL <TYPE 1>
1. Remove the mirror (Refer to the step A of the REMOVAL SERVICE POINTS).
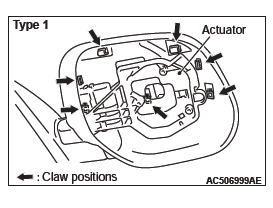
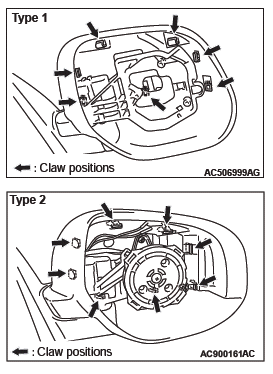
2. Remove the door mirror outer cover claws as shown in the figure and remove the outer cover from the door mirror housing.
NOTE: If claw(s) are difficult to disengage, remove the actuator mounting screws to release the actuator and disengage the claws.
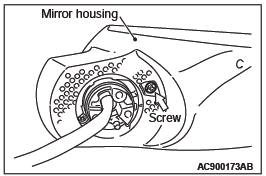
DOOR MIRROR OUTER COVER REMOVAL <TYPE 2>
1. Remove the mirror (Refer to the step A of the REMOVAL SERVICE POINTS).
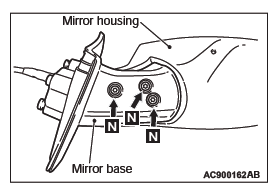
CAUTION When installing, always use new Torx screws.
2. Remove the 3 Torx screws connecting the mirror base and mirror housing.
3. Pull out the mirror housing from the mirror base; taking care not to damage the door mirror harness and connector.
CAUTION When installing, always use new Torx screw.
4. Remove the Torx screw connecting the plate and mirror housing.
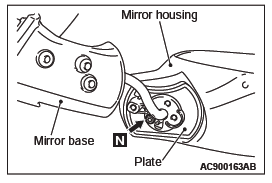
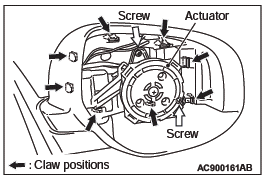
5. Remove the screw connecting the mirror housing and actuator lower part.
6. Remove the 2 screws connecting the actuator and mirror housing.
7. Slide the actuator and disengage the door mirror outer cover claws as shown in the figure. Remove the outer cover from the door mirror housing.
INSTALLATION SERVICE POINT
DOOR MIRROR OUTER COVER INSTALLATION
CAUTION Tap the claw positions to confirm that they are engaged and the door mirror outer cover is installed securely.
Install the door mirror outer cover by engaging the claws as shown in the figure.
INSPECTION
DOOR MIRROR ASSEMBLY OPERATION CHECK
Remove the door trim, and then connect the battery to the door mirror assembly connector to check that the door mirror operates.
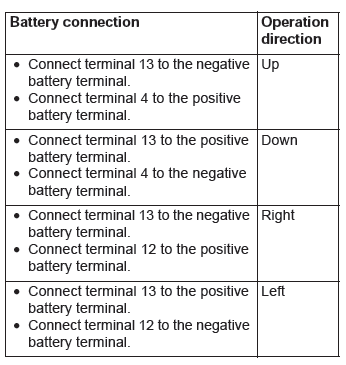
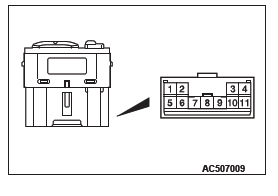
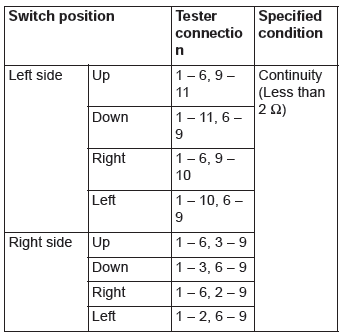
REMOTE CONTROLLED MIRROR SWITCH CONTINUITY CHECK
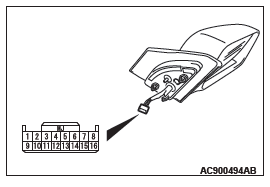
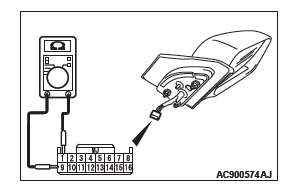
HEATED DOOR MIRROR CHECK
CAUTION When relocating the car between locations with extremely different temperatures (warm and cold), leave the car in the location for a while to adapt to the temperature prior to checking it.
Check that the resistance value between the connector terminals is at the standard value.
Standard value: 7.2 +- 1.4 Ω at 25ºC (77ºF)
READ NEXT:
 Instrument Panel Assembly
Adhesive
NOTE: The symbol in parentheses indicates a part
number.
Special Tool
Instrument Panel Assembly
REMOVAL AND INSTALLATION
The following bolts and screws are used for installing
the instrume
Floor Console Assembly
FRONT FLOOR CONSOLE ASSEMBLY
REMOVAL AND INSTALLATION
Removal steps
Lower side cover
Front floor console bracket
Front floor console panel
Rear floor console assembly
Front floor console as
SEE MORE:
DTC P1637, P1706, P1710, P1723, P1740, P1745, P1773, P1777, P1778,
P1902, U0001, U0100, U0121, U0141
DTC P1637: Malfunction of Memory Backup
Memory backup system circuit
DIAGNOSTIC FUNCTION
TCM checks the consistency between EEPROM and
the backup memory.
DESCRIPTIONS OF MONITOR METHODS
When the ignition switch is turned to the "ON"
position, TCM determines that the writing to the
EEPROM area h
Multi-information display
The following information is included on the multi-information display: warnings,
odometer/tripmeter, service reminders, engine coolant temperature, fuel remaining,
outside temperature, 4WD operation status, average and momentary fuel consumption,
driving range, average speed and meter illumin
