Mitsubishi Outlander: Rear Wiper and Washer
REMOVAL AND INSTALLATION
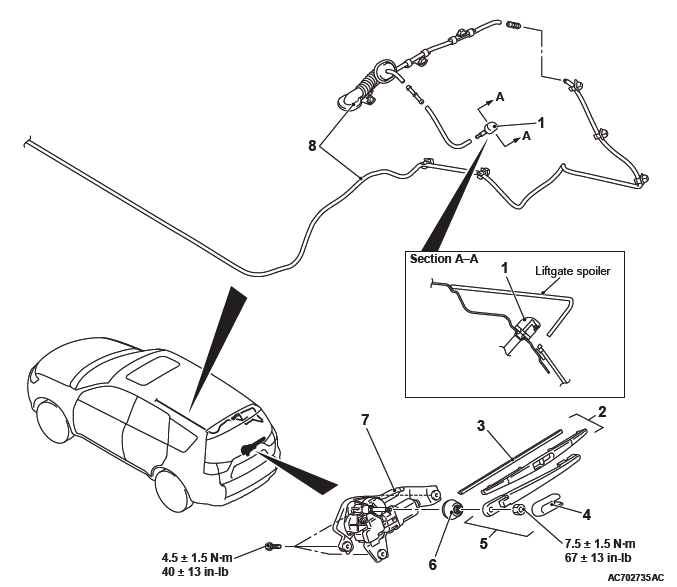
- Washer tank
- Washer motor
Rear washer nozzle removal steps
- Liftgate spoiler
- High-mounted stop light assembly
- Rear washer nozzle assembly
Rear wiper blade removal steps
- Rear wiper blade assembly
- Rear wiper blade
Rear wiper motor removal steps
- Cover
- Rear wiper arm assembly
- Liftgate trim
- Grommet
- Rear wiper motor assembly
Rear washer hose removal steps
- Front/rear scuff plate, cowl side trim, quarter trim
- Liftgate trim
- Rear washer hose
NOTE: For removal and installation of the wiper and washer switch, refer to GROUP 54A, Column Switch.
INSTALLATION SERVICE POINTS
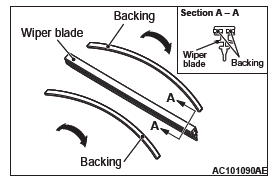
REAR WIPER BLADE INSTALLATION
CAUTION Use a curved backing like that shown for the backing of a wiper blade to ensure sustained wiper wiping performance.
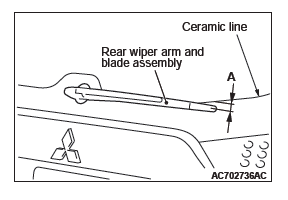
REAR WIPER ARM AND BLADE ASSEMBLY INSTALLATION
Install the rear wiper arm and blade assembly so that it stops at the specified position.
(A): 0 to 20 mm (0 to 0.79 in) from the ceramic line
INSPECTION
REAR WIPER MOTOR CHECK
Inspect the rear wiper motor by disconnecting the harness connector with the motor attached to the vehicle.
REAR WIPER MOTOR OPERATION CHECK
Connect the battery to the rear wiper motor to inspect the motor operation as shown in the illustration.
REAR WIPER MOTOR STOP POSITION CHECK
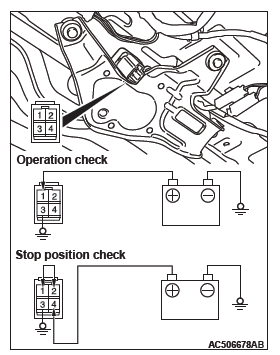
1. Connect the battery to the rear wiper motor as shown in the illustration.
2. Disconnect the battery in the middle of the motor rotation and check to see that the motor stops.
3. Reconnect the battery.
4. Check to see that the rear wiper motor runs and then stops at the automatic stop position.
REAR WASHER MOTOR INSPECTION
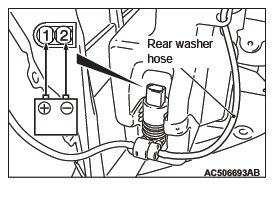
1. The rear washer motor must be checked with the washer tank installed and the washer fluid filled.
2. Connect the battery to the washer motor connector as shown. Check that the washer motor delivers washer strongly to the rear washer hose side.
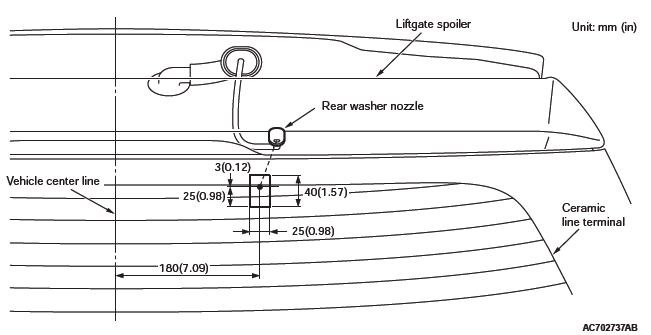
CHECKING THE REAR WASHER NOZZLE INJECTION DIRECTION
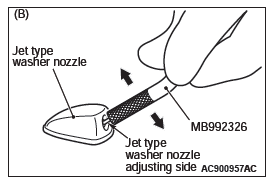
NOTE: Use special tool Adjustment tool, washer nozzle (MB992326) to adjust the splashing points of the nozzle.
ADJUSTMENT OF THE JET TYPE WASHER NOZZLE INJECTION POSITION
CAUTION Adjust the splashing position within the specified adjustment range, otherwise the windshield cannot be washed properly.
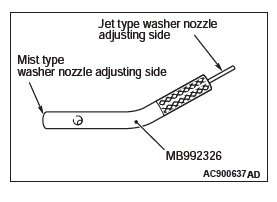
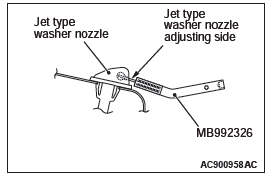
1. Use special tool Adjustment tool, washer nozzle (MB992326) to adjust the splashing points of the nozzle.
2. Insert the jet type washer nozzle adjusting side of the special tool Adjustment tool, washer nozzle (MB992326) into the injection part of the washer nozzle as shown in figure (A).
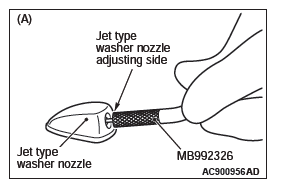
3. Move the special tool Adjustment tool, washer nozzle (MB992326) up and down to adjust the angle of the washer nozzle as shown in figure (B).
CHECKING THE REAR WIPER AND WASHER SWITCH
The rear wiper and washer switch can be checked for proper operation by confirming ETACS diagnosis trouble code.
Mark
REMOVAL AND INSTALLATION
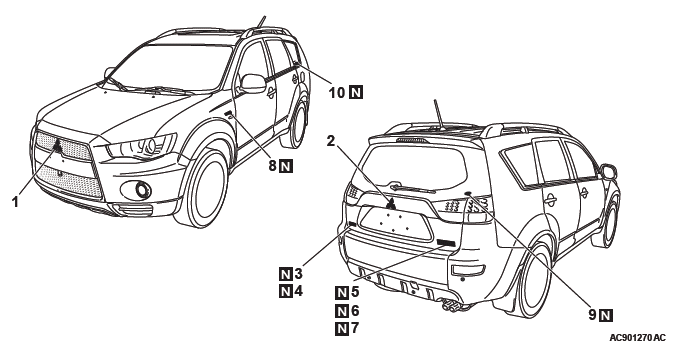
- Front three-diamond mark
- Rear three-diamond mark
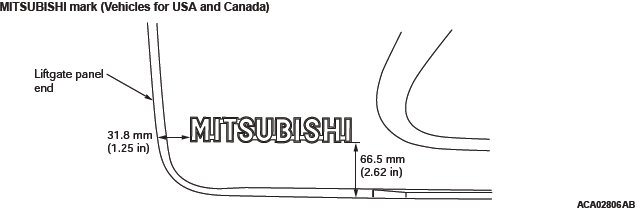
- MITSUBISHI mark <Vehicles for USA and Canada>
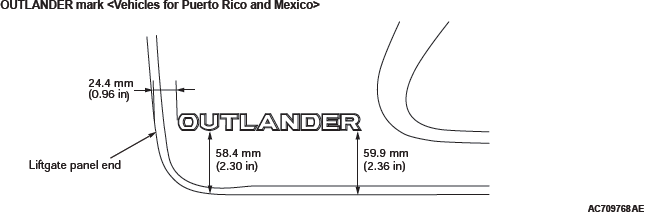
- OUTLANDER mark <Vehicles for Puerto Rico and Mexico>
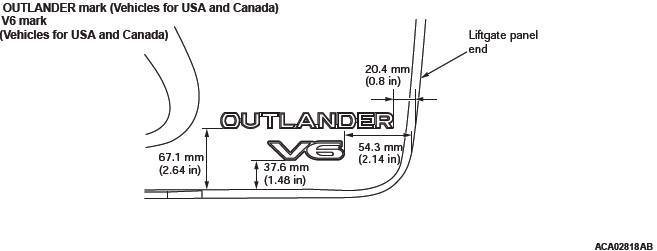
- OUTLANDER mark <Vehicles for USA and Canada>
- V6 mark <Vehicles for USA and Canada>
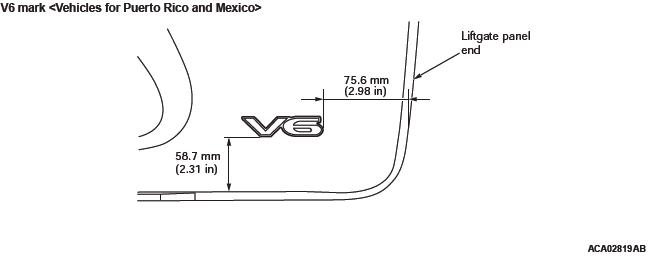
- V6 mark <Vehicles for Puerto Rico and Mexico>
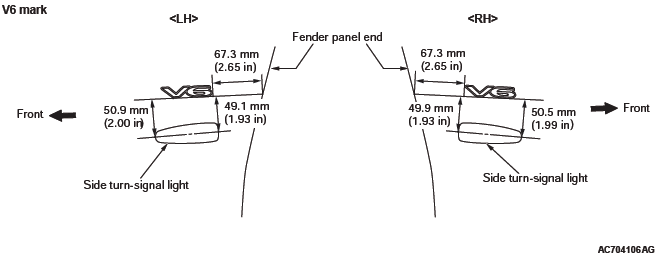
- V6 mark <3000>
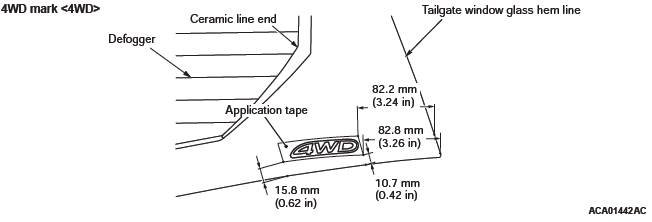
- 4WD mark<4WD>
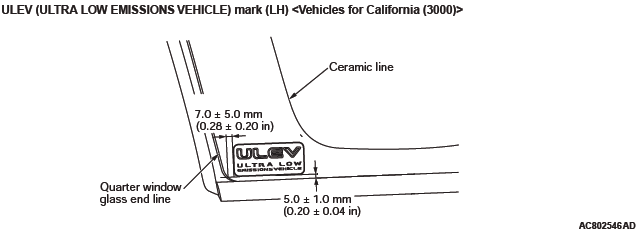
- ULEV (ULTRA LOW EMISSIONS VEHICLE) mark (LH) <Vehicles for California (3000)>
INSTALLATION SERVICE POINT
MARK APPLICATION
1. Installation position
Attach each mark to the position shown in the illustration.
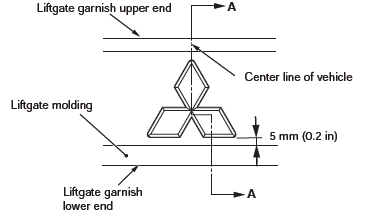
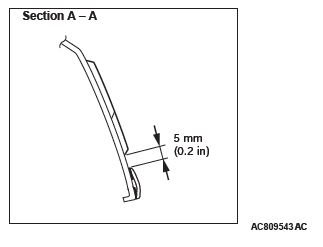
2. Rear three-diamond mark <Vehicles without liftgate molding>
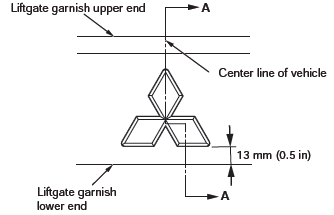

2. Rear three-diamond mark <Vehicles with liftgate molding>
3. MITSUBISHI mark (Vehicles for USA and Canada)
4. OUTLANDER mark <Vehicles for Puerto Rico and Mexico>
5. OUTLANDER mark (Vehicles for USA and Canada)
6. V6 mark (Vehicles for USA and Canada)
7.V6 mark <Vehicles for Puerto Rico and Mexico>
8. V6 mark
9. 4WD mark <4WD>
10. ULEV (ULTRA LOW EMISSIONS VEHICLE) mark (LH) <Vehicles for California (3000)>
2. Installation procedure
- Use 3M AAD Part number 8906 or equivalent to clean the mark installation surfaces on the body.
CAUTION When attaching the marks, the ambient temperature should be 20 − 38ºC (60 − 100ºF) and air should be completely free of dust. If the ambient temperature is lower than 20ºC (60ºF), the marks and places on the body where the marks are to be attached should be heated to 20 − 30ºC (60 − 86ºF).
- Peel off the protection sheet on the back of the marks to paste it on the installation position.
READ NEXT:
 Outside Mirror
GENERAL INFORMATION
DOOR MIRROR OPERATION
Remote Controlled Mirror Operation
The mirror on the door mirror moves up/down
and left/right by operating the remote controlled
door mirror switch when
Instrument Panel Assembly
Adhesive
NOTE: The symbol in parentheses indicates a part
number.
Special Tool
Instrument Panel Assembly
REMOVAL AND INSTALLATION
The following bolts and screws are used for installing
the instrume
SEE MORE:
Doors
CAUTION:
● Make sure the doors are closed: driving with doors not completely closed is
dangerous.
● Never leave children in the vehicle unattended.
● Be careful not to lock the doors while the keys is inside the vehicle.
NOTE:
● When the driver’s door is open, neithe
Diagnosis
STANDARD FLOW OF DIAGNOSTIC
TROUBLESHOOTING
Refer to GROUP 00 − How to Use Troubleshooting/Inspection
Service Points.
DIAGNOSTIC FUNCTION
HOW TO CONNECT THE SCAN TOOL (M.U.T.-III)
Required Special Tools:
MB991958: Scan Tool (M.U.T.-III Sub Assembly)
MB991824: Vehicles Communication Interf
