Mitsubishi Outlander: Windshield Wiper, Windshield Washer
WINDSHIELD WIPER
REMOVAL AND INSTALLATION
Wiper blade removal steps
- Wiper blade assembly
- Wiper blade
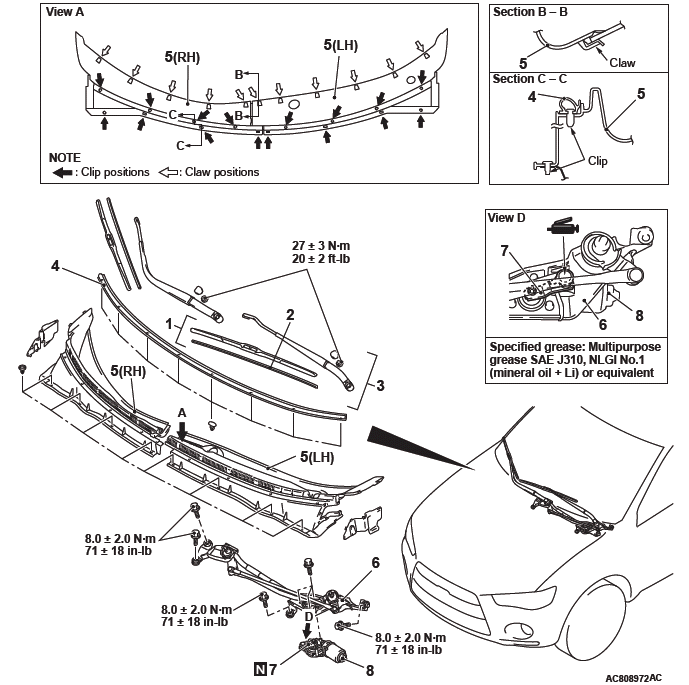
Windshield wiper motor and link assembly removal steps
- Wiper arm and blade assembly
- Hood weatherstrip rear
- Front deck garnish
- Windshield wiper link
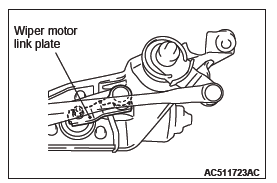
- Wiper motor link plate
- Windshield wiper motor
Required Special Tool:
- MB991955: M.U.T.-III sub-assembly
- MB991223: Harness set
NOTE: For removal and installation of the wiper and washer switch, refer to GROUP 54A, Column switch.
REMOVAL SERVICE POINT
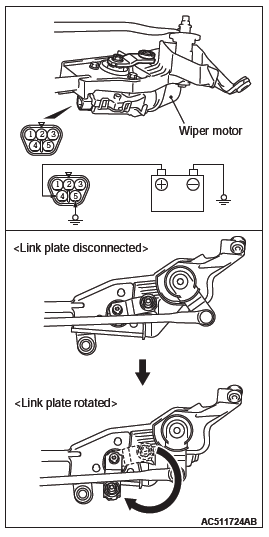
WINDSHIELD WIPER MOTOR REMOVAL
1. Remove the wiper link rod joint from the wiper motor link plate.
2. Connect the wiper motor to a battery, and rotate the link plate as shown.
3. In this position, withdraw the link plate from the wiper link assembly.
INSTALLATION SERVICE POINT
WINDSHIELD WIPER MOTOR INSTALLATION
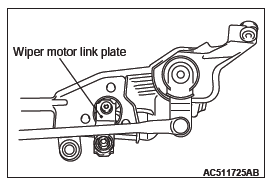
1. Position the wiper motor link plate as shown, and assemble it to the wiper link assembly.
NOTE:
- The link plate can be assembled to the wiper link assembly only at this position. If not, rotate the link plate to this position.
- Wiper motor replacement parts are supplied with the link plate positioned as shown.
2. Connect the assembled wiper motor to a battery, and set it to the automatic stop position.
3. Apply grease to the inside of link rod joint (as required) and connect the link rod to wiper motor link plate.
WIPER ARM AND BLADE ASSEMBLY INSTALLATION
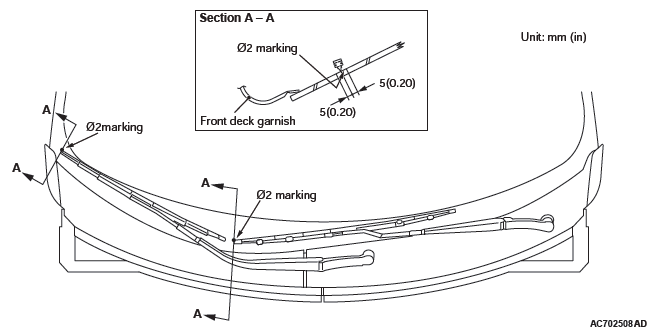
Install the wiper arm and blade assembly at the specified positions.
(A): φ 2 marking +- 5 mm(0.20 in)
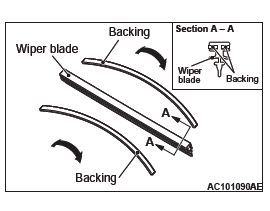
WIPER BLADE INSTALLATION
CAUTION Use a curved backing like that shown for the backing of a wiper blade to ensure sustained wiper wiping performance.
INSPECTION
WINDSHIELD WIPER MOTOR CHECK
Remove the windshield wiper motor and inspect it at the harness connector.
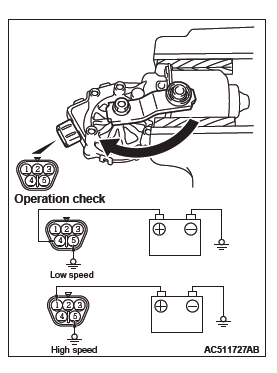
WINDSHIELD WIPER MOTOR AT LOW OR HIGH SPEED OPERATION
Connect the battery to the windshield wiper motor to inspect the operation of motor rotation at low or high speed.
WINDSHIELD WIPER MOTOR AT STOP POSITION OPERATION
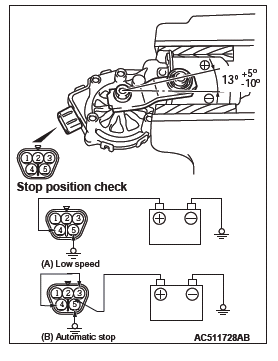
1. Connect the battery to the windshield wiper motor as shown in the illustration (A).
2. Run the windshield wiper motor at low speed, then disconnect the battery in the middle of the motor rotation and check to see that the motor stops.
3. Connect the battery to the windshield wiper motor as shown in the illustration (B).
4. Connect the terminals of the windshield wiper motor connector as shown in the illustration (B).
5. Check to see that the windshield wiper motor runs at low speed and then stops at the automatic stop position.
WINDSHIELD WIPER SWITCH CHECK
Check the windshield wiper switch (mist, intermittent, low speed and high speed) from the ETACS diagnosis codes for proper operations.
WINDSHIELD WASHER
REMOVAL AND INSTALLATION
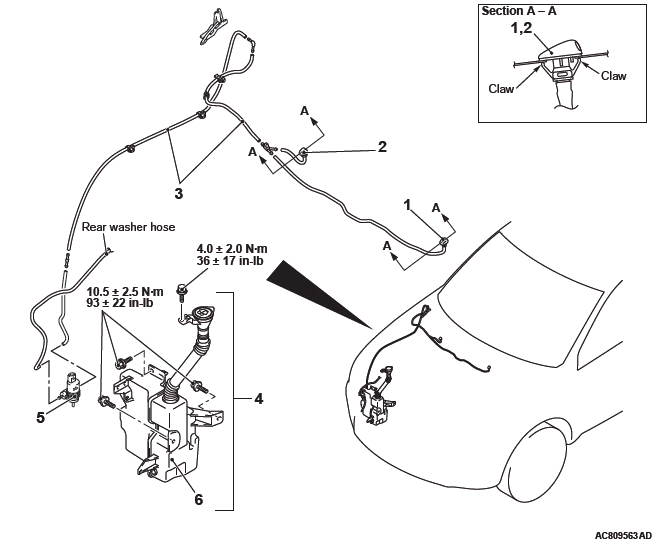
Windshield washer nozzle removal steps
- Connection of windshield washer hose
- Windshield washer nozzle assembly <LH>
- Windshield washer nozzle assembly <RH>
Washer hose removal steps
- Splash shield (RH) mounting clips
- Connection of washer nozzle/washer motor
- Windshield washer hose
Washer tank removal steps
- Engine room under cover front
- Splash shield (RH) mounting clips
- Connection of front/rear washer hose
- Windshield washer tank assembly
- Windshield washer motor
- Windshield washer tank
Washer motor removal steps
- Engine room under cover front
- Connection of front/rear washer hose
- Windshield washer motor
INSPECTION
FRONT WASHER MOTOR INSPECTION
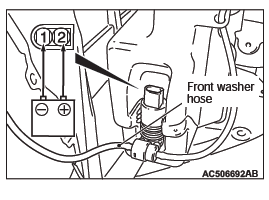
1. The front washer motor must be checked with the washer tank installed and the washer fluid filled.
2. Connect the battery to the washer motor connector as shown. Check that the washer motor delivers washer strongly to the front washer hose side.
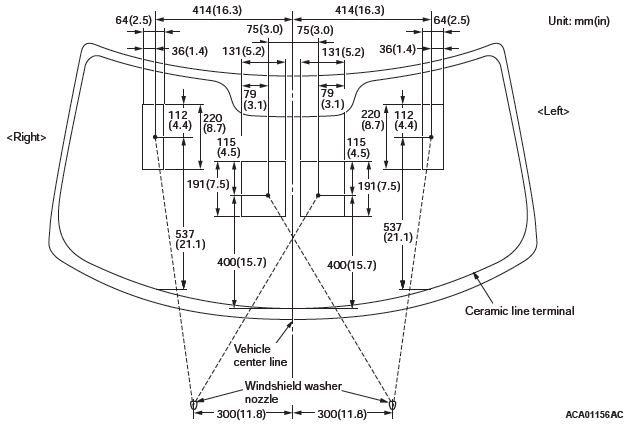
WINDSHIELD WASHER FLUID EJECTION CHECK
NOTE: The splashing point cannot be adjusted by the nozzle. If the splashing point of the washer fluid is different from the figure below, replace the nozzle.
NOTE: Use special tool Adjustment tool, washer nozzle (MB992326) to adjust the splashing points of the nozzle.
ADJUSTMENT OF THE MIST TYPE WASHER NOZZLE INJECTION POSITION
CAUTION Do not use tools other than the special tool (MB992326) to adjust the injection angle because the washer nozzle may get damaged.
CAUTION Adjust the splashing position within the specified adjustment range, otherwise the windshield cannot be washed properly.
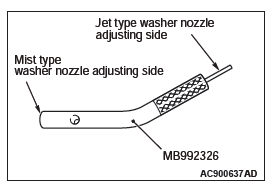
1. Use special tool Adjustment tool, washer nozzle (MB992326) to adjust the splashing points of the nozzle.
2. Insert the mist type washer nozzle adjusting side of the special tool Adjustment tool, washer nozzle (MB992326) into the injection part of the mist type washer nozzle as shown in figure (A).
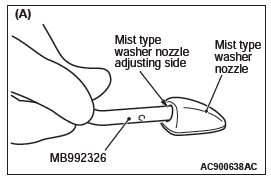
3. Move the special tool Adjustment tool, washer nozzle (MB992326) up and down to adjust the angle of the washer nozzle as shown in figure (B).
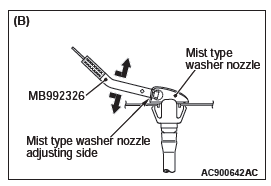
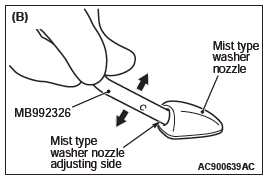
NOTE: If the washer nozzle cannot be moved smoothly, adjust the angle while pressing the special tool Adjustment tool, washer nozzle (MB992326) against the washer nozzle.
WINDSHIELD WASHER SWITCH CHECK
Check the windshield washer switch from the ETACS diagnostic trouble codes for proper operation.
LIGHTING CONTROL SENSOR
REMOVAL AND INSTALLATION
Refer to GROUP 54A−Lighting control sensor.
ADAPTATION
CAUTION
- Before performing the adaptation, check if the lighting control sensor (rain sensor)-related diagnostic trouble code is set.
- Turn the wiper switch to the OFF position.
1. Clean the windshield in fine weather.
2. Wipe the surface of the windshield thoroughly, and check that the surface is dry.
3. Turn the ignition switch to the ON position.
4. Turn the ignition switch to the LOCK (OFF) position.
CAUTION Before connecting or disconnecting scan tool MB991958, always turn the ignition switch to the LOCK (OFF) position.
5. Connect the scan tool MB991958 to the data link connector.
6. Turn the ignition switch to the ON position.
7. Wipe the windshield surface of the lighting control sensor section thoroughly, and check that the surface is dry.
8. Select "LIN" on the "System Select" screen, and press the "OK" button.
9. Select "Rain light sensor" on the "System Select" screen, and press the "OK" button.
10.Select "Special Function" on the "Rain light sensor" screen.
11.Select "Rain Sensor Adaptation" on the "Special Function" screen.
12.Press the "OK" button, and execute the "Rain Sensor Adaptation".
13.Press the "OK" button after the execution screen is displayed.
14.Press the "OK" button after "Completed" is displayed.
READ NEXT:
 Rear Wiper and Washer
GENERAL INFORMATION
REAR WIPER AND WASHER
REAR WIPER OPERATION
If the rear wiper and washer switch is turned to
the "INT" position with the ignition switch at
"ACC" or "ON" position, the ETACS-EC
Rear Wiper and Washer
REMOVAL AND INSTALLATION
Washer tank
Washer motor
Rear washer nozzle removal
steps
Liftgate spoiler
High-mounted stop light assembly
Rear washer nozzle assembly
Rear wiper blade removal s
Outside Mirror
GENERAL INFORMATION
DOOR MIRROR OPERATION
Remote Controlled Mirror Operation
The mirror on the door mirror moves up/down
and left/right by operating the remote controlled
door mirror switch when
SEE MORE:
DTC B1B1A, B1B1B, B1B20, B1B21, B1B22, B1B23
DTC B1B1A: Curtain Air Bag Module (LH) (Squib) System (Squib Circuit
Open)
Curtain Air Bag Module (Squib) (LH) Circuit
CAUTION
If DTC B1B1A is set in the SRS-ECU, always diagnose
the CAN main bus line.
CIRCUIT OPERATION
The SRS-ECU judges how severe a collision is
by detecting signals from the
Power Steering Oil Pump
Assembly
REMOVAL AND INSTALLATION
Pre-removal operation
Power Steering Fluid Draining
Engine Upper Cover Removal
Engine Room Side Cover (RH) Removal
Generator and Others Belt Removal
Post-installation operation
Generator and Others Belt Installation
Generator and Others Belt Tension Check
Engin
