Mitsubishi Outlander: Basic Brake System Diagnosis
INTRODUCTION TO BASIC BRAKE SYSTEM DIAGNOSIS
Hydraulic brakes are composed of the brake pedal, master cylinder, brake booster and disc brakes. Malfunctions such as insufficient braking power or the generation of noise may occur due to wear, damage or incorrect adjustment of these components.
BASIC BRAKE SYSTEM DIAGNOSTIC TROUBLESHOOTING STRATEGY
Use these steps to plan your diagnostic strategy. If you follow them carefully, you will be sure that you have exhausted most of the possible ways to find a basic brake system fault.
1. Gather information from the customer.
2. Verify that the condition described by the customer exists.
3. Find the malfunction by following the symptom chart.
4. Verify malfunction is eliminated.
SYMPTOM CHART
SYMPTOM PROCEDURES
INSPECTION PROCEDURE 1: Vehicle Pulls to One Side when Brakes are Applied
DIAGNOSIS
STEP 1. Check for oil, water, etc., on the pad contact surface of all brakes.
Q: Is oil, water, etc., on the pad contact surface?
YES : Replace the part and determine the source/cause of foreign material. Then go to Step 5.
NO : Go to Step 2.
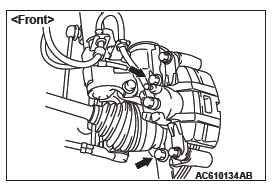
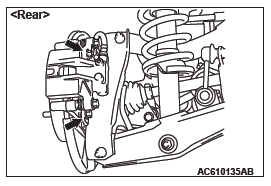
STEP 2. Check disc brake pistons for smooth operation.
- With engine not running, depress the brake pedal rapidly several times to deplete booster vacuum reserves.
- Test each disc brake assembly one at a time.
- Remove the lower caliper bolt, then remove caliper from mount.
- Have an assistant slowly depress the brake pedal. Confirm piston(s) extend slowly and smoothly with no jumpiness. Repeat for each disc brake assembly.
Q: Do (does) the piston(s) move correctly?
YES : Go to Step 3.
NO : Disassemble and inspect the brake assembly. Then go to Step 5.
STEP 3. Check brake disc(s) for runout.
Q: Is runout outside of specifications?
YES : Repair or replace the brake disc(s) as necessary. Then go to Step 5.
NO : Go to Step 4.
STEP 4. Check brake discs for correct thickness.
Q: Is the thickness outside of specifications?
YES : Repair or replace the brake disc(s) as necessary. Then go to Step 5.
NO : Perform the brake line bleeding. Then go to Step 5.
STEP 5. Retest the system.
Q: Is the symptom eliminated?
YES : The procedure is complete.
NO : Start over at Step 1. If a new symptom appears, refer to the appropriate symptom chart.
INSPECTION PROCEDURE 2: Insufficient Braking Power
DIAGNOSIS
STEP 1. Check that the specified brake fluid is used, its level is correct, and no contamination is found.
Q: Is there a fault?
YES : Refill or replace with the specified brake fluid DOT 3 or DOT 4. Bleed the brakes if necessary. Then go to Step 6.
NO : Go to Step 2.
STEP 2. Check for spongy (not firm) brakes.
- With engine not running, depress the brake pedal rapidly several times to deplete the booster vacuum reserve.
- With the brake pedal fully released, depress the brake pedal slowly until it stops.
- With a measuring device (ruler, etc.) next to the brake pedal, depress the pedal firmly and measure the distance the pedal traveled.
Q: Is the distance greater than 20 mm (0.8 inch)?
YES : Bleed the brakes to remove air in the fluid. Then go to Step 6.
NO : Go to Step 3.
STEP 3. Check the brake booster function.
Q: Is there a fault?
YES : Replace the brake booster. Then go to Step 6.
NO : Go to Step 4.
STEP 4. Check for pinched or restricted brake tube or hose.
Q: Is there a pinched or restricted brake tube or hose?
YES : Replace that complete section of brake tube or brake hose. Then go to Step 6.
NO : Go to Step 5.
STEP 5. Check for oil, water, etc., on the pad contact surfaces of all brakes.
Q: Is oil, water, etc., on the pad contact surface?
YES : Replace the part and determine the source/cause of foreign material. Recheck symptom. Then go to Step 6.
NO : The procedure is complete. If condition persists for vehicles without ABS, go to Step 6.
STEP 6. Recheck symptom.
Q: Is the symptom eliminated?
YES : The procedure is complete.
NO : Start over at step 1. If a new symptom surfaces, refer to the appropriate symptom chart.
INSPECTION PROCEDURE 3: Increased Pedal Stroke (Reduced Pedal-to-Floor Board Clearance)
DIAGNOSIS
STEP 1. Check for spongy (not firm) brakes.
- With engine not running, depress the brake pedal rapidly several times to deplete booster vacuum reserve.
- With the brake pedal fully released, depress the brake pedal slowly until it stops.
- With a measuring device (ruler, etc.) next to the brake pedal, depress the pedal firmly and measure the distance the pedal traveled.
Q: Is the distance greater than 20 mm (0.8 inch)?
YES : Bleed the brakes to remove air in the fluid. Then go to Step 6.
NO : Go to Step 2.
STEP 2. Check the pad for wear.
Q: Is the pad thickness outside of specifications?
YES : Replace the part. Then go to Step 6.
NO : Go to Step 3.
STEP 3. Check the vacuum hose and check valve for damage.
Q: Is there a damage?
YES : Replace the part. Then go to Step 6.
NO : Go to Step 4.
STEP 4. Check for brake fluid leaks.
Q: Is there a leak?
YES : Check the connection for looseness, corrosion, etc. Clean and repair as necessary. If leaking in any tube or hose section, replace the complete tube or hose.
Then go to Step 6.
NO : Go to Step 5.
STEP 5. Check the master cylinder assembly.
- Remove the master cylinder assembly.
- Check for brake fluid leaks from the master cylinder assembly seal.
Q: Is a brake fluid leaking from the master cylinder assembly seal present?
YES : Replace the master cylinder assembly and the brake booster assembly. Then go to Step 6.
NO : Go to Step 6.
STEP 6. Recheck symptom.
Q: Is the symptom eliminated?
YES : The procedure is complete.
NO : Start over at step 1. If a new symptom surfaces, refer to the symptom chart.
INSPECTION PROCEDURE 4: Brake Drag
DIAGNOSIS
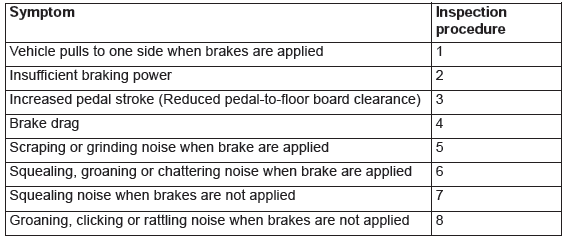
STEP 1. Check the parking brake operating lever return.
Q: Is the operation faulty?
YES : Repair it. Then go to Step 7.
NO : Go to Step 2.
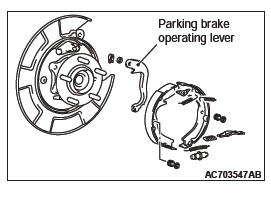
STEP 2. Check the brake shoe springs for breakage.
Q: Are the brake shoe springs broken?
YES : Replace the spring. Then go to Step 7.
NO : Go to Step 3.
STEP 3. Check the amount of grease at each sliding section.
Refer to GROUP 36, Parking Brake Lining and Drum <2.4L Engine: 5 persons seat> or <2.4L Engine: 7 persons seat, 3.0L Engine>.
Q: Is the grease amount low?
YES : Apply grease. Then go to Step 7.
NO : Go to Step 4.
STEP 4. Check the parking brake pull amount.
Refer to GROUP 36, On-vehicle Service − Parking Brake lever Stroke Check and Adjustment.
Q: Is there a fault?
YES : Adjust it. Then go to Step 7.
NO : Go to Step 5.
STEP 5. Check port for clogging.
Q: Is the port clogged?
YES : Repair it. Then go to Step 7.
NO : Go to Step 6.
STEP 6. Check disk brake pistons for sticking. Depress the brake pedal, then release. Confirm each wheel spins freely.
Q: Does any wheel stick?
YES : Inspect that brake assembly. Then go to Step 7.
NO : Go to Step 7.
STEP 7. Recheck symptom.
Q: Is the symptom eliminated?
YES : The procedure is complete.
NO : Start over at step 1. If a new symptom surfaces, refer to the symptom chart.
INSPECTION PROCEDURE 5: Scraping or Grinding Noise when Brakes are Applied
DIAGNOSIS
STEP 1. Check the front brakes, then rear brakes, for metal-to-metal condition.
Q: Is any metal-to-metal contact evident?
YES : Repair or replace the components. Then go to Step 6.
NO : Go to Step 2.
STEP 2. Check for interference between the caliper and wheel.
Q: Is there any interference?
YES : Repair or replace the part. Then go to Step 6.
NO : Go to Step 3.
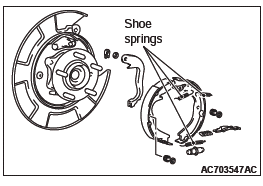
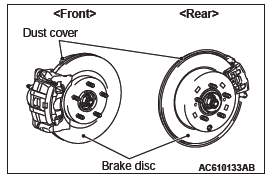
STEP 3. Check for interference between the dust cover and brake disc.
Q: Is there any interference?
YES : Repair or replace the part. Then go to Step 6.
NO : Go to Step 4.
STEP 4. Check the brake drums or discs for cracks.
Q: Are there cracks?
YES : Repair or replace the part. Then go to Step 6.
NO : Go to Step 5.
STEP 5. Check for bent backing plate(s).
Q: Is (Are) the backing plate(s) bent?
YES : Repair or replace the part. Then go to Step 6.
NO : Go to Step 6.

STEP 6. Recheck symptom.
Q: Is the symptom eliminated?
YES : The procedure is complete.
NO : Start over at step 1. If a new symptom surfaces, refer to the symptom chart.
INSPECTION PROCEDURE 6: Squealing, Groaning or Chattering Noise when Brakes are Applied
DIAGNOSIS
STEP 1. Check the brake disc and pads for wear or cutting.
Q: Is there wear or cutting?
YES : Repair or replace the part. Then go to Step 4.
NO : Go to Step 2.
STEP 2. Check the calipers for rust.
Q: Is there any rust?
YES : Remove the rust. Then go to Step 4.
NO : Go to Step 3.
STEP 3. Adjust the brake pedal.
Q: Is the brake pedal adjusted correctly?
YES : Go to Step 4.
NO : Adjust the brake pedal. Then go to Step 4.
STEP 4. Recheck symptom.
Q: Is the symptom eliminated?
YES : The procedure is complete.
NO : Start over at step 1. If a new symptom surfaces, refer to the symptom chart.
INSPECTION PROCEDURE 7: Squealing Noise when Brakes are not Applied
DIAGNOSIS
STEP 1. Check whether the backing plate is bent or loose and interfering with the drum.
Q: Is there a fault?
YES : Replace the part. Then go to Step 9.
NO : Go to Step 2.
STEP 2. Check whether the drum is damaged due to interference with the backing plate or shoe.
Q: Is there any damage?
YES : Replace the part. Then go to Step 9.
NO : Go to Step 3.
STEP 3. Check the brake drum for wear and the shoe spring for damage.
Q: Is there any wear or damage?
YES : Replace the part. Then go to Step 9.
NO : Go to Step 4.
STEP 4. Check the brake discs for rust.
Q: Are the brake discs rusted?
YES : Remove the rust by using sand paper. If still rusted, turn the rotors with an on-the-car brake lathe. Then go to Step 9.
NO : Go to Step 5.
STEP 5. Check the brake pads for correct installation.
Q: Are the pads installed incorrectly?
YES : Repair the pads. Then go to Step 9.
NO : Go to Step 6.
STEP 6. Check the calipers for correct installation.
Q: Are the calipers installed incorrectly?
YES : Repair the calipers. Then go to Step 9.
NO : Go to Step 7.
STEP 7. Check the wheel bearings for end play.
Refer to GROUP 26 − On-vehicle Service, Wheel bearing end play check <Front>, GROUP 27A − On-vehicle Service, Wheel bearing end play check <Rear (FWD)> or GROUP 27B − On-vehicle Service, Wheel bearing end play check <Rear (AWD)>.
Q: Does the measured end play exceed the limit?
YES : Replace the faulty hub assembly. Then go to Step 9.
NO : Go to Step 8.
STEP 8. Adjust the brake pedal.
Q: Is the brake pedal adjusted correctly?
YES : Go to Step 9.
NO : Adjust the brake pedal. Then go to Step 9.
STEP 9. Recheck symptom.
Q: Is the symptom eliminated?
YES : The procedure is complete.
NO : Start over at step 1. If a new symptom surfaces, refer to the symptom chart.
INSPECTION PROCEDURE 8: Groaning, Clicking or Rattling Noise when Brakes are not Applied.
DIAGNOSIS
STEP 1. Check whether foreign material has entered the wheel covers.
Q: Is there any foreign material?
YES : Remove it. Then go to Step 5.
NO : Go to Step 2.
STEP 2. Check for looseness of the wheel nuts.
Q: Are the wheel nuts loose?
YES : Tighten to 98 +- 10 N*m (73 +- 7 ft-lb). Then go to Step 5.
NO : Go to Step 3.
STEP 3. Check for looseness of the caliper installation bolt.
Q: Is the caliper installation bolt loose?
YES : Tighten to 100 +- 10 N*m (74 +- 7 ft-lb) for the front caliper. Tighten to 55 +- 5 N*m (41 +- 3 ft-lb) <2.4L Engine: 5 persons seat> or 58 +- 7 N*m (43 +- 5 ft-lb) <2.4L Engine: 7 persons seat, 3.0L Engine> for the rear caliper. Then go to Step 5.
NO : Go to Step 4.
STEP 4. Check the wheel bearings for end play.
Refer to GROUP 26 − On-vehicle Service, Wheel bearing end play check <Front>, GROUP 27A − On-vehicle Service, Wheel bearing end play check <Rear (FWD)> or GROUP 27B − On-vehicle Service, Wheel bearing end play check <Rear (AWD)>.
Q: Does the measured end play exceed the limit?
YES : Replace the faulty hub assembly. Then go to Step 5.
NO : Go to Step 5.
STEP 5. Recheck symptom.
Q: Is the symptom eliminated?
YES : The procedure is complete.
NO : Start over at step 1. If a new symptom surfaces, refer to the symptom chart.
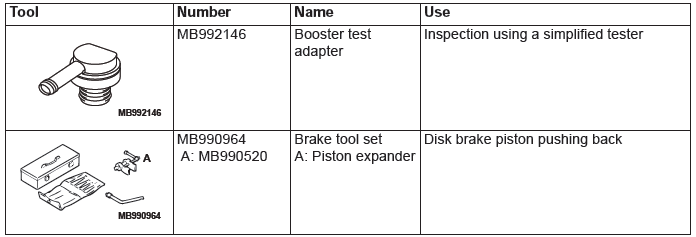
Special Tools
READ NEXT:
 On-vehicle Service
BRAKE PEDAL INSPECTION
CAUTION
Do not apply grease or lubricant to the switch and the
switch installation section to avoid malfunction of the
switch. In addition, do not use gloves which have grease
o
Front Disc Brake Assembly
REMOVAL AND INSTALLATION
Pre-removal operation
Brake Fluid Draining
Post-installation operation
Brake Fluid Refilling and Air Bleeding
Brake Disk Runout Inspection/Correction
Removal steps
B
Rear Disc Brake Assembly
REMOVAL AND INSTALLATION <2.4L ENGINE: 5 PERSONS SEAT>
Pre-removal operation
Brake Fluid Draining
Post-installation operation
Brake Fluid Refilling and Air Bleeding
Brake Disk Runout Inspe
SEE MORE:
DTC B1B78, B1B79, B1B7A, B1B7D, B1B7E, B1B7F, B1B82, B1B83, B1B84, B1B87,
B1B88, B1B89, B1B8C, B1B8D, B1B8E, B1B91, B1BA7, B1BA8
DTC B1B78: Passenger Seat Weight Sensor (front: LH) Performance
DTC B1B7D: Passenger Seat Weight Sensor (front: RH) Performance
DTC B1B82: Passenger Seat Weight Sensor (rear: LH) Performance
DTC B1B87: Passenger Seat Weight Sensor (rear: RH) Performance
CAUTION
If DTC B1B78, B1B7D, B1B82 or B1B87
On-vehicle Service
CONTROL SYSTEM COMPONENT PART CONFIGURATION DIAGRAM
ESSENTIAL SERVICE
TRANSMISSION FLUID CHECK
CAUTION
Replace the transmission fluid whenever the transaxle is
replaced with a new one or the vehicle is driven in harsh
conditions.
1. Drive the vehicle until the transmission fluid is warmed up t
