Mitsubishi Outlander: Crankshaft Oil Seal
REMOVAL AND INSTALLATION
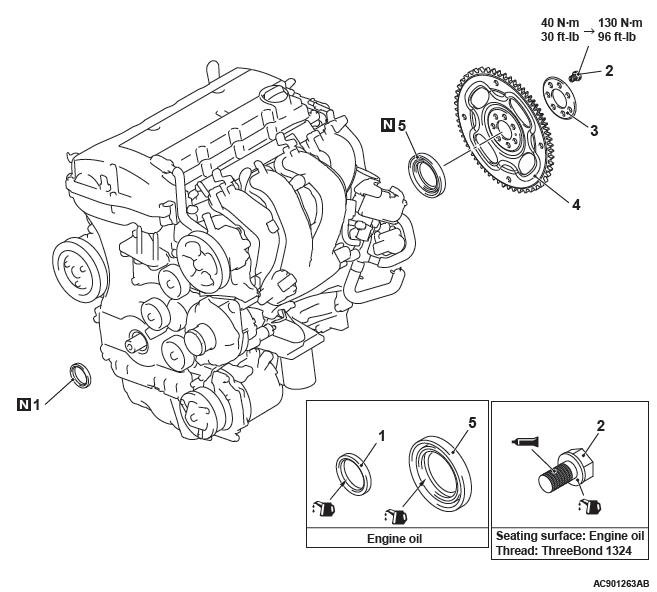
Crankshaft front oil seal removal steps
- Crankshaft pulley
- Crankshaft front oil seal
Crankshaft rear oil seal removal steps
- Transaxle assembly
- Drive plate bolts
- Adapter plate
- Drive plate
- Crankshaft rear oil seal
Required Special Tools:
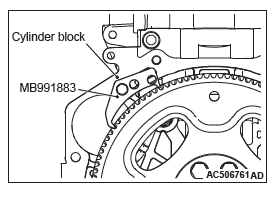
- MB991883: Flywheel Stopper
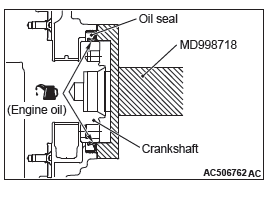
- MD998718: Crankshaft Rear Oil Seal Installer
- MB991448: Bush Remover and Installer Base
REMOVAL SERVICE POINT
DRIVE PLATE BOLTS REMOVAL
Fix the drive plate using special tool MB991883, and loosen the drive plate bolts.

INSTALLATION SERVICE POINTS
CRANKSHAFT REAR OIL SEAL INSTALLATION
1. Apply a small amount of engine oil to the entire inner diameter of the oil seal lip.
2. Using special tool MD998718, press in the crankshaft rear oil seal up to the cylinder block assembly end surface.
DRIVE PLATE/ADAPTER PLATE/DRIVE PLATE BOLTS INSTALLATION
1. Remove the sealant, the engine oil, and other adhering materials from the drive plate and adapter plate installation face, the crankshaft screw hole and drive plate bolts.
2. Install the drive plate and adapter plate to the crankshaft.
3. Use special tool MB991883 to secure the drive plate and adapter plate in the same manner as removal.
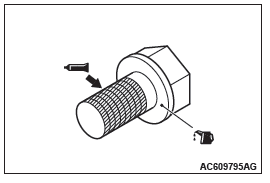
4. Apply a small amount of engine oil to the screw holes of the crankshaft and the bearing surface of the drive plate bolts and the adapter plate bolts.
5. Apply sealant to the thread of the drive plate bolts.
6. Apply specified sealant to the drive plate bolts.
Specified sealant: ThreeBond 1324
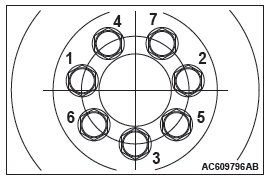
7. Tighten drive plate bolts to specified torque in the order shown in the illustration.
Tightening torque: 40 N*m (30 ft-lb)
8. Tighten drive plate bolts to specified torque in the order shown in the illustration.
Tightening torque: 130 N*m (96 ft-lb)
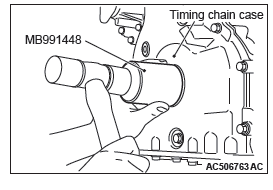
CRANKSHAFT FRONT OIL SEAL INSTALLATION
1. Apply a small amount of engine oil to the entire inner diameter of the oil seal lip.
CAUTION
When installing the crankshaft front oil seal, be careful to avoid damage to the crankshaft front oil seal.
2. Using special tool MB991448, press in the crankshaft front oil seal up to the chamfered surface of timing chain case.
READ NEXT:
 Cylinder Head Gasket
REMOVAL AND INSTALLATION
Pre-removal operation
Fuel Line Pressure Reduction
Engine Room Under Cover Front B and Engine Room
Side Cover (RH) Removal
Engine Coolant Draining
Air Cleaner Assembl
Timing Chain
REMOVAL AND INSTALLATION
Pre-removal operation
Engine Room Under Cover Front B and Engine Room
Side Cover (RH) Removal
Engine Oil Draining
Rocker Cover Assembly Removal
Engine Oil Pan Removal
Balancer Timing Chain, Balancer Shaft and Oil Pump Module
REMOVAL AND INSTALLATION
Pre-removal and Post-installation Operation
Timing Chain Removal and Installation
Removal steps
Timing chain tensioner
Balancer timing chain guide
Balancer timing chai
SEE MORE:
Trims
INTERIOR TRIM
REMOVAL AND INSTALLATION
Removal steps
Front scuff plate
Cowl side trim
Rear scuff plate
Front door opening trim
Rear door opening trim
Front pillar trim
Garnish clip
Center pillar trim lower cover
Seat belt pre-tensioner connector
Center pillar trim, lower
Center pill
Tools and jack
Storage
The tools and jack are stowed on the right side of the luggage area.
The storage location of the tools and jack should be remembered in case of an
emergency.
1- Jack.
2- Tools.
Tools
1- Tool case.
2- Wheel nut wrench.
3- Jack bar.
4- Towing hook.
Jack
To remove
1. Turn th
