Mitsubishi Outlander: Hood
HOOD DIAGNOSIS
INTRODUCTION TO HOOD DIAGNOSIS
Wind noise at the hood may be caused by improper hood adjustment.
HOOD DIAGNOSTIC TROUBLESHOOTING STRATEGY
Use these steps to plan your diagnostic strategy. If you follow them carefully, you will be sure that you have exhausted most of the possible ways to find a hood fault.
1. Gather information from the customer.
2. Verify that the condition described by the customer exists.
3. Find the malfunction by following the Symptom Chart.
4. Verify malfunction is eliminated.
SYMPTOM CHART

SYMPTOM PROCEDURES
INSPECTION PROCEDURE 1: Difficult Locking and Unlocking
DIAGNOSIS
STEP 1. Check that the release cable is routed correctly.
Q: Is the release cable routed correctly?
YES : Go to Step 2.
NO : Re-route the release cable. Then go to Step 4.
STEP 2. Check the engagement of the hood latch and hood striker.
Q: Are the hood latch and hood striker engaged correctly?
YES : Go to Step 3.
NO : Adjust the hood latch.
Then go to Step 4.
STEP 3. Check for proper lubrication of release cable.
Q: Is the release cable properly lubricated?
YES : Go to Step 4.
NO : Lubricate, then go to Step 4.
STEP 4. Retest the system.
Q: Does the hood lock operate normally?
YES : The procedure is complete.
NO : Return to Step 1.
INSPECTION PROCEDURE 2: Uneven Body Clearance
DIAGNOSIS
STEP 1. Check the clearance around the hood.
Q: Is the clearance around the hood even?
YES : Go to Step 2.
NO : Adjust the hood. Then go to Step 2 .
STEP 2. Retest the system.
Q: Is the clearance around the hood even?
YES : The procedure is complete.
NO : Return to Step 1.
INSPECTION PROCEDURE 3: Uneven Height
DIAGNOSIS
STEP 1. Check the hood damper height.
Q: Is the hood damper height proper?
YES : Go to Step 2.
NO : Adjust the hood damper.
Then go to Step 2.
STEP 2. Retest the system.
Q: Is the hood damper height proper?
YES : The procedure is complete.
NO : Return to Step 1.
ON-VEHICLE SERVICE
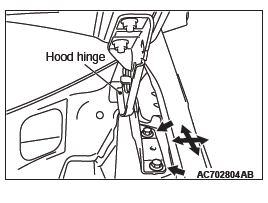
ADJUSTMENT OF CLEARANCE AROUND HOOD
1. Remove the front deck garnish.
2. Loosen the hood hinge mounting bolts but do not remove them. Move the hood hinge back/forth and left/right to align the hood level.
3. After the adjustment, tighten the hood hinge mounting bolts to 23 +- 6 N*m (17 +- 5 ft-lb).
4. Install the front deck garnish.
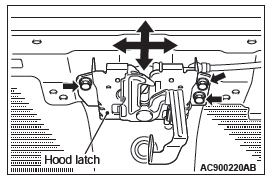
ADJUSTMENT OF HOOD LEVEL AND HOOD STRIKER ENGAGEMENT
1. Remove the headlamp support panel cover.
2. Remove the front bumper assembly.
3. Remove the headlamp support upper panel cover.
4. Loosen the hood latch mounting bolts but do not remove them. Move the hood latch up/down and left/right to align the hood level and adjust the hood striker engagement.
5. After the adjustment, tighten the hood latch mounting bolts to 9.0 +- 1.0 N*m (80 +- 9 in-lb).
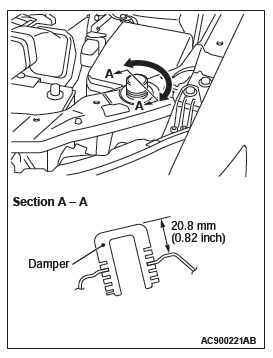
ADJUSTMENT OF HOOD HEIGHT
Turn the damper to the dimension shown in the figure to adjust the hood height. If the hood height is still not even, turn the damper again until the height is even. The damper height is altered by roughly 3 mm (0.12 inch) when the damper is rotated once.
NOTE: If a rattling noise is heard due to the vibration of the hood when the vehicle is being driven, adjust the damper height until the damper is seated on the hood.
HOOD
REMOVAL AND INSTALLATION
Post-installation operation
- Adjustment of clearance around hood
- Adjustment of hood level and hood striker engagement
- Adjustment of hood height
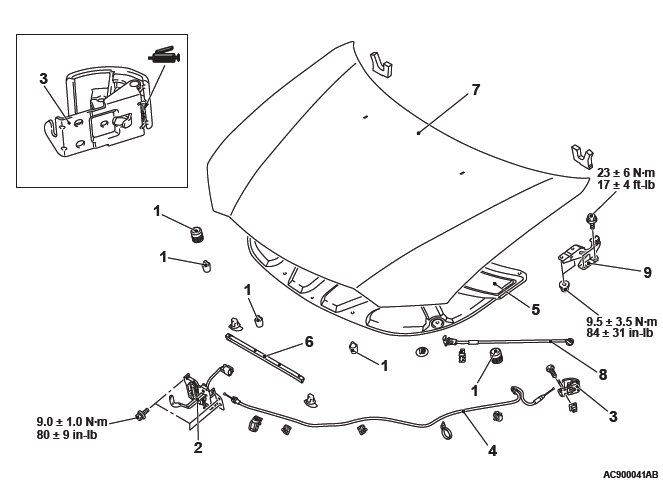
Damper removal
- Damper
Removal steps for hood latch and hood lock release cable
- Headlamp support upper panel cover
- Hood latch
- Hood lock release handle
- Front splash shield
- Front bumper assembly
- Headlamp assembly
- Hood lock release cable
Hood removal steps
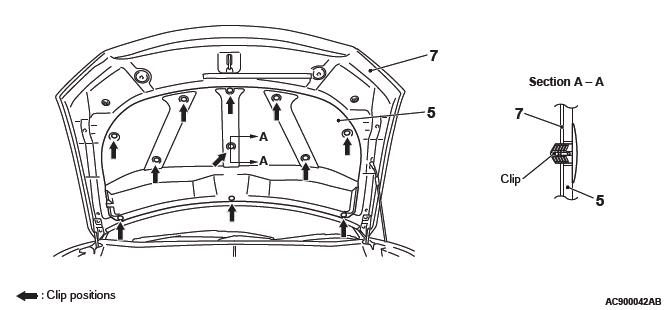
- Hood insulator
- Hood weatherstrip front
- Windshield washer hose and washer nozzles
- Hood
- Hood support rod
- Front deck garnish
- Hood hinge
INSPECTION
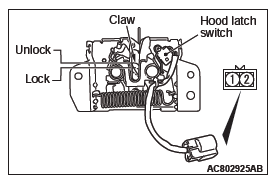
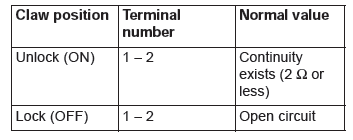
HOOD LATCH SWITCH CONTINUITY CHECK
READ NEXT:
 Fender, Splash Shield, Fuel Filler Lid, Strut Tower Bar
Fender
REMOVAL AND INSTALLATION
Pre-removal and post-installation operation
Splash shield front removal and installation
Front bumper side bracket removal and installation
Headlight assembly remo
Window Glass
SPECIFICATIONS
ADHESIVE
LUBRICANT
GENERAL
The windshield glass, quarter window glass and liftgate
window glass are attached by an urethane-base
adhesive to the window frame. This adhesive provides
SEE MORE:
Electric window control
The electric windows can only be operated with the ignition switch in the “ON”
position.
WARNING:
● Before operating the electric window control, make sure that nothing is capable
of being trapped (head, hand, finger, etc.).
● Never leave the vehicle without removing the key.
Cylinder Head Gasket
REMOVAL AND INSTALLATION
Pre-removal operation
Fuel Line Pressure Reduction
Engine Room Under Cover Front B and Engine Room
Side Cover (RH) Removal
Engine Coolant Draining
Air Cleaner Assembly Removal
Ignition Coil Removal
Strut Tower Bar Removal
Exhaust Manifold Removal
Throttle Bod
