Mitsubishi Outlander: Timing Chain
REMOVAL AND INSTALLATION
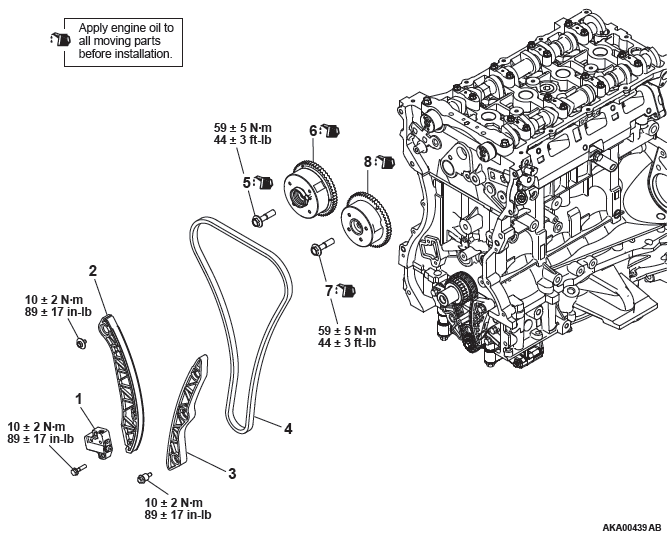
Removal steps
- Timing chain tensioner
- Tensioner lever
- Timing chain guide
- Timing chain
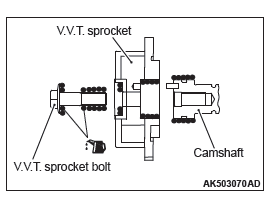
- Exhaust V.V.T. sprocket bolt
- Exhaust V.V.T. sprocket assembly
- Intake V.V.T. sprocket bolt
- Intake V.V.T. sprocket assembly
REMOVAL SERVICE POINTS
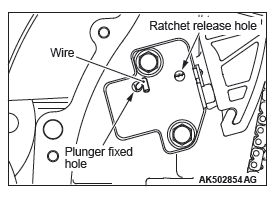
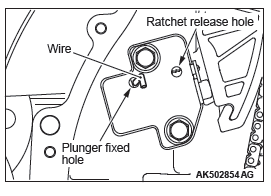
TIMING CHAIN TENSIONER REMOVAL
1. Insert a flatblade screwdriver into the release hole of the timing chain tensioner to release the latch.
2. Push the tensioner lever by hand and push in the plunger of the timing chain tensioner until it hits the bottom. Then, insert a hard wire (piano wire or the like) of φ1.5 or hexagonal bar wrench (1.5 mm [0.06 inch] ) into the fixing hole of the plunger.
3. Remove the timing chain tensioner.
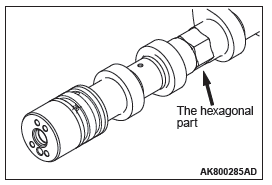
EXHAUST V.V.T. SPROCKET BOLT
REMOVAL
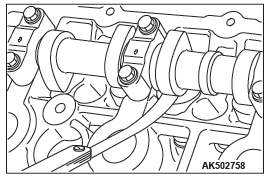
Hold the hexagonal portion of the exhaust camshaft with a wrench and loosen the exhaust V.V.T. sprocket bolt.
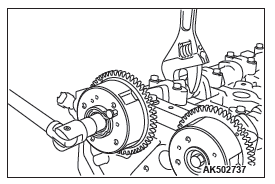
INTAKE V.V.T. SPROCKET BOLT REMOVAL
Hold the hexagonal portion of the intake camshaft with a wrench and loosen the intake V.V.T. sprocket bolt.
INSTALLATION SERVICE POINTS
INTAKE V.V.T. SPROCKET BOLT INSTALLATION
1. Assemble the intake V.V.T. sprocket assembly in the following procedure.
- Make sure that the knock pin of the inlet camshaft assembly is positioned facing straight upward.
- Apply an appropriate and minimum amount of engine oil to the circumference of the tip of the intake V.V.T. sprocket assembly and the entire circumference of the area into which the intake V.V.T. sprocket assembly is inserted.
- Slowly insert the intake V.V.T. sprocket assembly into the normal position of the inlet camshaft assembly with its knock pin hole facing straight upward.
2. Install the V.V.T. sprocket.
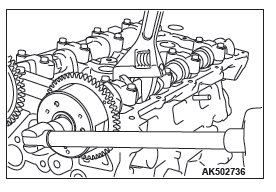
3. Make sure that the V.V.T. sprocket is securely inserted into the bottom and that the V.V.T. sprocket does not rotate with the hexagonal portion of the camshaft secured with a wrench.
4. Hold the hexagonal portion of the camshaft with a wrench and tighten the intake V.V.T. sprocket bolt to the specified tightening torque.
Tightening torque: 59 +- 5 N*m (44 +- 3 ft-lb)
EXHAUST V.V.T. SPROCKET BOLT INSTALLATION
1. Assemble the exhaust V.V.T. sprocket assembly in the following procedure.
- Make sure that the knock pin of the exhaust camshaft assembly is positioned facing straight upward.
- Apply an appropriate and minimum amount of engine oil to the circumference of the tip of the exhaust V.V.T. sprocket assembly and the entire circumference of the area into which the exhaust V.V.T. sprocket assembly is inserted.
- Slowly insert the exhaust V.V.T. sprocket assembly into the normal position of the exhaust camshaft assembly with its knock pin hole facing straight upward.
2. Install the V.V.T. sprocket.
3. Make sure that the V.V.T. sprocket is securely inserted into the bottom and that the V.V.T. sprocket does not rotate with the hexagonal portion of the camshaft secured with a wrench.
4. Hold the hexagonal portion of the camshaft with a wrench and tighten the camshaft sprocket bolt to the specified tightening torque.
Tightening torque: 59 +- 5 N*m (44 +- 3 ft-lb)
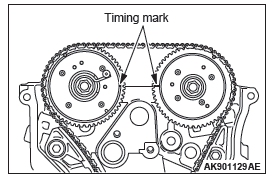
TIMING CHAIN INSTALLATION
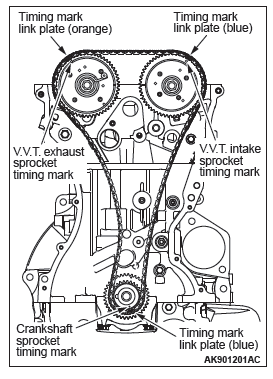
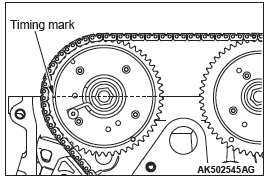
1. Align the timing mark of the V.V.T. sprocket.
2. Align the crankshaft sprocket keys with illustrated positions.
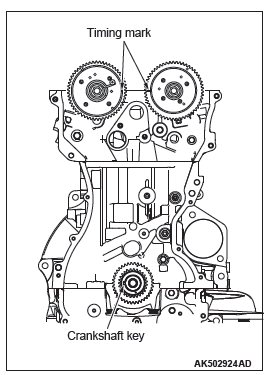
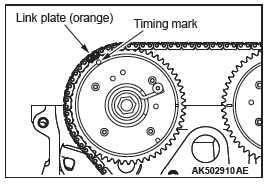
3. Align the link plate (orange) with the timing mark of the exhaust V.V.T. sprocket and loop the timing chain.
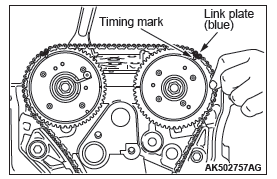
4. Align the link plate (blue) with the timing mark of the intake V.V.T. sprocket to loop the timing chain.
Rotate the intake V.V.T. sprocket by one or two teeth to align with the timing mark.
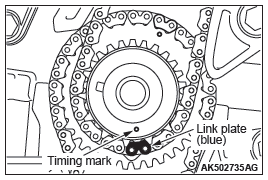
5. Align the timing mark of the crankshaft sprocket with the link plate (blue) to loop the timing chain. Because the timing chain slacks, hold it to prevent the timing mark from coming off the link plate.
6. Make sure that the timing mark of each sprocket is aligned with the link plate of the timing chain at all of three locations.
7. Install the timing chain guide and tensioner lever.
TIMING CHAIN TENSIONER INSTALLATION
1. Install the timing chain tensioner on the cylinder block and tighten it to the specified torque.
Tightening torque: 10 +- 2 N*m (89 +- 17 in-lb)
2. Remove the hard wire (piano wire or the like) of φ1.5 or hexagonal bar wrench (1.5 mm [0.05 inch] ) from the timing chain tensioner. This enables the plunger of the timing chain tensioner to push the tensioner lever to keep the timing chain tight.
INSPECTION
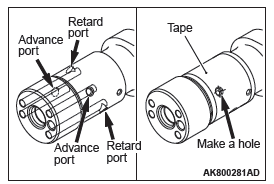
INTAKE V.V.T. SPROCKET
CAUTION
Never overhaul the V.V.T. sprocket.
1. Seal with a tape all the intake camshaft ports for the advanced angle and the retarded angle.
2. Make a hole on the port for the advanced angle.
CAUTION
Fix the camshaft on a vise not to damage it.
3. Fixing the hexagonal area of the intake camshaft on a vise, install the intake V.V.T. sprocket.

CAUTION
When applying air pressure, keep in mind that oil could splash.
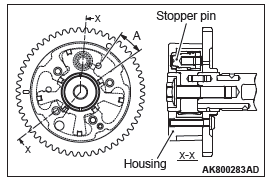
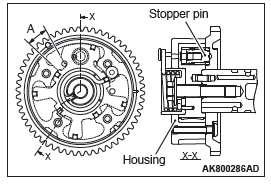
4. By applying air pressure slowly to the holed port for the advanced angle, remove the stopper pin.
5. Turn the intake V.V.T. sprocket housing in the right and left directions. Check it smoothly moves in the range of A (approximately 20º)
NOTE: The stopper pin is locked in the most retarded angle position.
6..After the check, remove the intake V.V.T. sprocket from the intake camshaft
7. Completely remove the tape sealing the intake camshaft ports for the advanced angle and for the retarded angle.
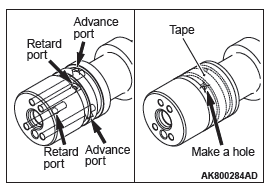
EXHAUST V.V.T. SPROCKET
CAUTION
Never overhaul the V.V.T. sprocket.
1. Seal with a tape all the exhaust camshaft ports for the advanced angle and the retarded angle.
2. Make a hole on the port for the retarded angle.
CAUTION
Fix the camshaft on a vise not to damage it.
3. Fixing the hexagonal area of the exhaust camshaft on a vise, install the exhaust V.V.T. sprocket.
CAUTION
When applying air pressure, keep in mind that oil could splash.
4. By applying air pressure slowly to the holed port for the retarded angle, remove the stopper pin.
5. Turn the exhaust V.V.T. sprocket housing in the right and left directions. Check it smoothly moves in the range of A (approximately 10º)
NOTE: The stopper pin is locked in the most advanced angle position.
6. After the check, remove the exhaust V.V.T. sprocket from the exhaust camshaft
7. Completely remove the tape sealing the exhaust camshaft ports for the advanced angle and for the retarded angle.
VALVE CLEARANCE ADJUSTMENT
Measure valve clearance in the following procedure.
CAUTION
Always rotate the crankshaft clockwise.
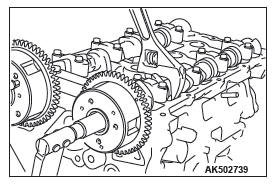
1. Rotate the crankshaft clockwise to align the timing mark of the V.V.T. sprocket with the top surface of the cylinder head as illustrated. (Set the Number 1 piston at top dead center on the compression stroke.)
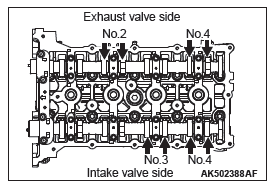
2. Valve clearance can be measured at the illustrated location in this condition.
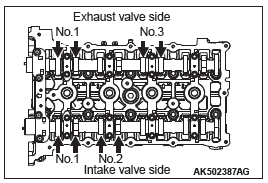
3. Use a free gauge to measure clearance between the camshaft and valve tappet.
Standard value (when engine is cold):
Intake side: 0.20 +- 0.03 mm (0.008 +- 0.001inch)
Exhaust side: 0.30 +- 0.03 mm (0.012 +- 0.001 inch)
4. If measured values are out of the standard value, record measured values.
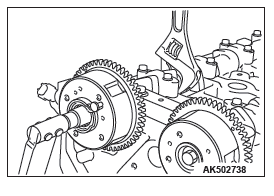
5. Rotate the crankshaft by one turn clockwise to set the Number 4 piston at top dead center on the compression stroke.
NOTE: The timing mark of the V.V.T. exhaust sprocket must be at the illustrated position.
6. Valve clearance can be measured at the illustrated location in this condition.
7. If measured values are out of the standard value, record measured values.
8. If the measured value is out of the standard value, replace the valve tappet.
NOTE: There are 47 kinds of valve tappets at intervals of 0.015 mm (0.0006 inch) in the range between 3.000 mm (0.1181 inch) and 3.690 mm (0.145 inch).
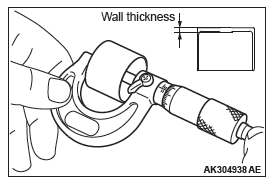
9. Select a valve tappet in the following procedure.
- Measure thickness of a removed valve tappet.
- Calculate thickness of a valve tappet so that valve clearance meets the standard value.
A: Thickness of valve tappet to be selected
B: Thickness of removed valve tappet
C: Measured valve clearance
Formula
Intake side: A = B + (C − 0.20 mm [0.08 inch] )
Exhaust side: A = B + (C − 0.30 mm [0.012 inch] )
Refer to "Removal and installation of camshaft" for removal, installation and inspection procedure of valve tappets.
READ NEXT:
 Camshaft
REMOVAL AND INSTALLATION
Removal steps
Engine oil control valve (OCV)
exhaust
O-ring
Engine oil control valve (OCV)
intake
O-ring
Front camshaft bearing cap
Oil feeding camshaft bearing cap
Cylinder Head and Valves
REMOVAL AND INSTALLATION
Removal steps
Cylinder head bolt
Cylinder head bolt washer
Cylinder head bolt & washer
assembly
Cylinder head assembly
Cylinder head gasket
Engine oil control val
Balancer Chain
REMOVAL AND INSTALLATION
Removal steps
Drive plate bolt
Adapter plate
Drive plate
Rear oil seal
Balancer shaft chain tensioner
Balancer shaft tensioner lever
Balancer shaft chain guide
Balan
SEE MORE:
Genuine Parts
MITSUBISHI MOTORS has gone to great lengths to bring you a superbly crafted automobile
offering the highest quality and dependability.
Use MITSUBISHI MOTORS Genuine Parts, designed and manufactured to maintain your
MITSUBISHI MOTORS automobile at top performance. MITSUBISHI MOTORS Genuine Parts
Inspection Procedure
INSPECTION PROCEDURE 1: The vehicle does not run at any range
(including low power).
TROUBLESHOOTING HINTS (THE MOST
LIKELY CAUSES FOR THIS CONDITION:)
Malfunction of the engine
Insufficient transmission fluid level
Poor adjustment of transaxle control cable
Malfunction of the torque converter
