Mitsubishi Outlander: Camshaft
REMOVAL AND INSTALLATION
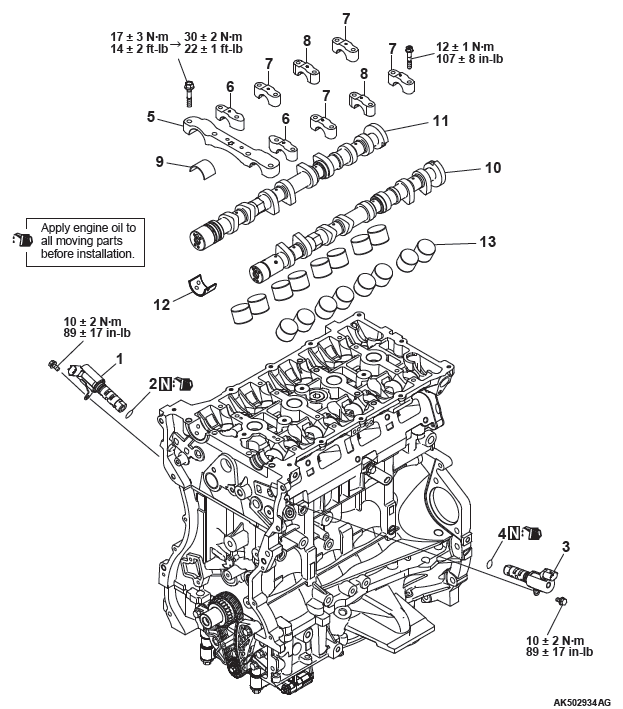
Removal steps
- Engine oil control valve (OCV) exhaust
- O-ring
- Engine oil control valve (OCV) intake
- O-ring
- Front camshaft bearing cap
- Oil feeding camshaft bearing cap
- Camshaft bearing cap
- Thrust camshaft bearing cap
- Bearing
- Camshaft intake
- Camshaft exhaust
- Bearing
- Valve tappet
REMOVAL SERVICE POINTS
FRONT CAMSHAFT BEARING CAP / CAMSHAFT BEARING CAP REMOVAL
CAUTION
Loosing the installation bolts for the camshaft bearing cap at the same time causes the valve spring force, which makes the installation bolts jump out, resulting in the damaged threads. Always loose them four or five times.
First remove a mounting bolt of the front camshaft bearing cap and then a mounting bolt of each camshaft bearing cap in the order shown in the illustration.
VALVE TAPPET REMOVAL
Pick out valve tappets with fingers and store removed valve tappets with tags describing the installed position attached for reassembly.
INSTALLATION SERVICE POINTS
VALVE TAPPET INSTALLATION
Install valve tappets at the same position based on tags describing the installed position for reassembly.
CAMSHAFT / BEARING / CAMSHAFT BEARING CAP INSTALLATION
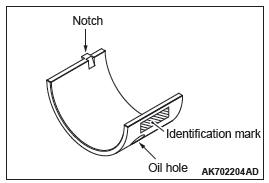
1. When replacing a camshaft bearing, select a bearing with the size corresponding to the identification mark in the table below.
2. Install camshaft bearings on the cylinder head.
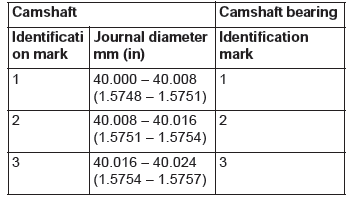
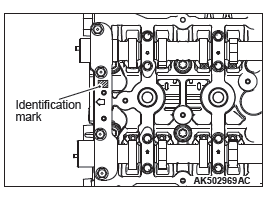
3. The identification mark of the camshaft bearing is painted at the illustrated position.
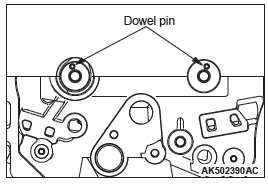
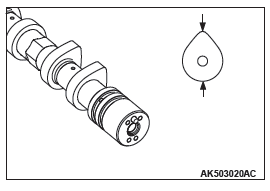
4. Set the dowel pins of the camshaft at the illustrated positions.
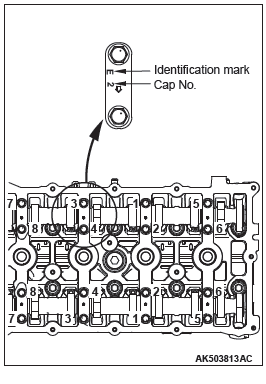
5. Camshaft bearing caps Number 1 to Number 4 are of the same shape. Install them upon checking the identification mark so as not to misidentify cap Number and to confuse the intake side with the exhaust side.
Identification mark (stamped on front and Number 1 to
Number 4 bearing caps)
I: Intake side
E: Exhaust side
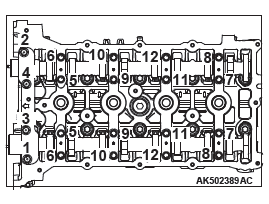
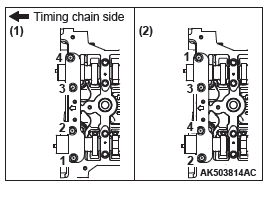
6. Tighten each camshaft bearing cap mounting bolt to the specified tightening torque of 12 +- 1 N*m (107 +- 1 in-lb) in the order of number shown in the figure in two or three steps.
7. Tighten each front camshaft bearing cap mounting bolt to the temporarily torque of 17 +- 3 N*m (14 +- 2 ft-lb) in the order of number shown (1).
8. Tighten each front camshaft bearing cap mounting bolt to the specified tightening torque of 30 +- 2 N*m (22 +- 1 ft-lb) in the order of number shown (2).
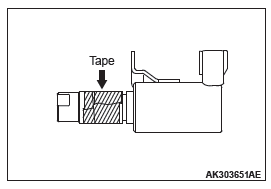
O-RING / ENGINE OIL CONTROL VALVE INSTALLATION
CAUTION
- The O-ring must not be reused.
- Wind non-adhesive tape (seal tape, etc.) around the notch of the oil passage of the oil feeder control valve before installing the O-ring to prevent damage. Damage to the O-ring causes oil leakage.
1. Apply a small amount of engine oil to the O-ring of the oil feeder control valve.
2. Install the oil feeder control valve on the cylinder head.
3. Tighten the oil feeder control valve to the specified tightening torque of 10 +- 2 N*m (89 +- 17 in-lb).
INSPECTION
CAMSHAFT
Measure camshaft height (camshaft major axis). If the height exceeds the limit, replace the camshaft.
Standard value:
Intake: 44.1 mm (1.736 inch)
Exhaust: 45.0 mm (1.772 inch)
Limit:
Intake: 43.6 mm (1.717 inch)
Exhaust: 44.5 mm (1.752 inch)
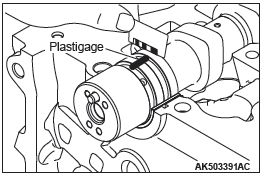
CAMSHAFT OIL CLEARANCE (PLASTIGAGE METHOD)
1. Thoroughly wipe oil on the outside diameter of the camshaft and the inside diameter of the bearing.
2. Install the bearing to the camshaft.
3. Put straightly the plastigage having the length of the bearing width on the journal axis, centering the axis.
4. Carefully install the bearing cap. Tighten the bolt as instructed in >>B<< Bolt Installation Point.
5. Remove the bolt and the bearing cap carefully.
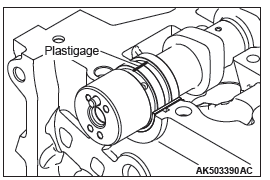
6. Measure the plastigage whose width is most compressed using the scale printed on the plastigage bag. When the measured value deviates from the standard one, replace the bearing.
Standard value: 0 − 0.032 mm (0.0013 inch)
CAUTION
When the bearing is used again, be careful not to reverse the cylinder head side and the camshaft side at the installation.
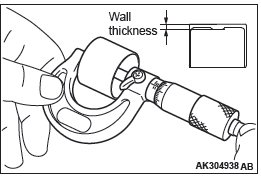
VALVE TAPPET
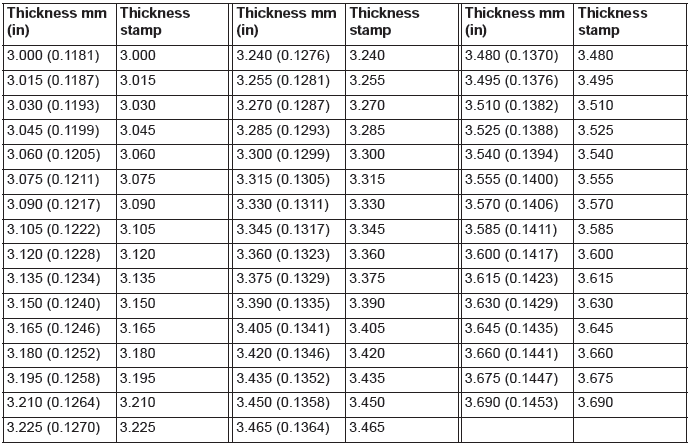
1. Check the thickness stamp.
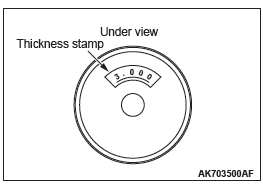
2. If the measured value in the table value is not in agreement with the value in the table to the thickness stamp, replace the valve tappet.
There are 47 kinds of valve tappets at intervals of 0.015 mm (0.0006 inch) in the range between 3.000 (0.1181 inch) and 3.690 mm (0.1453 inch).
READ NEXT:
 Cylinder Head and Valves
REMOVAL AND INSTALLATION
Removal steps
Cylinder head bolt
Cylinder head bolt washer
Cylinder head bolt & washer
assembly
Cylinder head assembly
Cylinder head gasket
Engine oil control val
Balancer Chain
REMOVAL AND INSTALLATION
Removal steps
Drive plate bolt
Adapter plate
Drive plate
Rear oil seal
Balancer shaft chain tensioner
Balancer shaft tensioner lever
Balancer shaft chain guide
Balan
Piston and Connecting Rod
REMOVAL AND INSTALLATION
Removal steps
Connecting rod cap bolt
Connecting rod cap
Connecting rod bearing
Connecting rod bearing
Piston connecting rod assembly
Piston ring Number 1
Piston ring
SEE MORE:
Automatic Transaxle Diagnosis (A/T)
DIAGNOSTIC TROUBLESHOOTING FLOW
INTRODUCTION TO A/T DIAGNOSIS
When the A/T is failed, have an interview with the
user to gather precise information on the failure status.
After that, perform on-board test to check if the
failure is reproduced, and then start repair work. If
the repair work is sta
Diagnostic Item 6-13
DIAGNOSTIC ITEM 6: Diagnose when the scan tool cannot receive the data
sent by AWD-ECU
<Electronic controlled AWD>.
CAUTION
When servicing a CAN bus line, ground yourself by touching a metal object such
as an unpainted
water pipe. If you fail to do so, a component connected to the CAN bus li
