Mitsubishi Outlander: Door Assembly, Door Glass and Regulator, Door Handle and Latch
Door Assembly
REMOVAL AND INSTALLATION
Post-installation operation
- Door adjustment
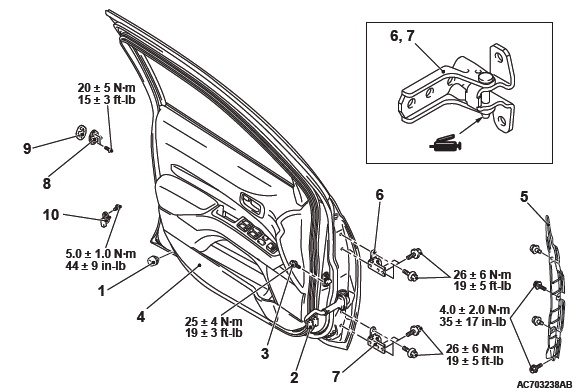
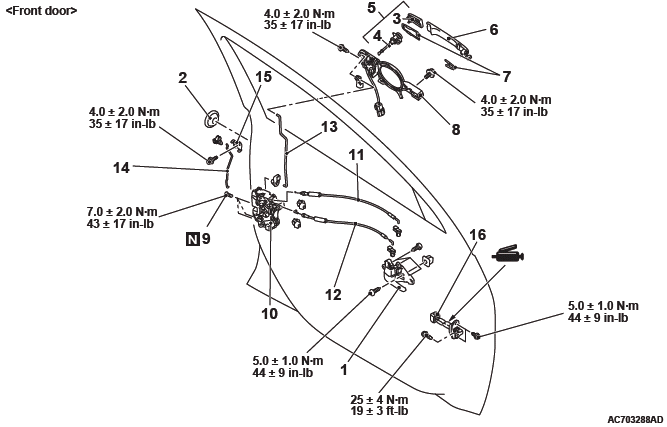
<Front door>
Damper removal
- Damper
Door assembly and front door hinge removal steps
- Front scuff plate, cowl side trim
- Wiring harness connector connection
- Door check connecting bolt
- Door assembly
- Side air dams
- Fender rear protector
- Front door upper hinge
- Front door lower hinge
Striker removal steps
- Striker
- Striker shim
Door switch removal
- Door switch
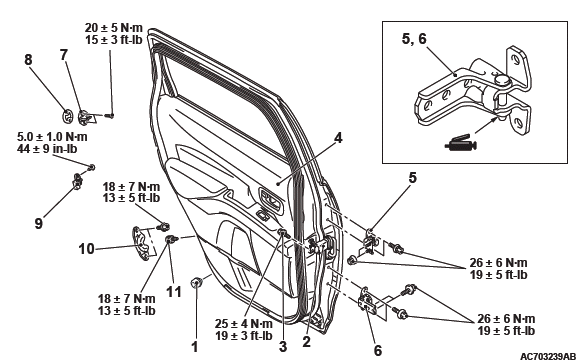
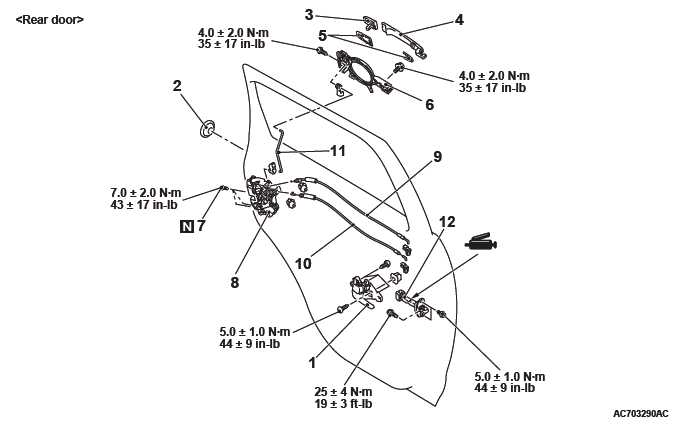
<Rear door>
Damper removal
- Damper
Door assembly removal steps
- Wiring harness connector connection
- Door check connecting bolt
- Door assembly
Rear door hinge removal steps
- Center pillar trim
- Rear door upper hinge
- Rear door lower hinge
Striker removal steps
- Striker
- Striker shim
Door switch removal
- Door switch
Rear door catch removal
- Rear door catch
Rear door lock hook removal
- Rear door lock hook
INSTALLATION SERVICE POINT
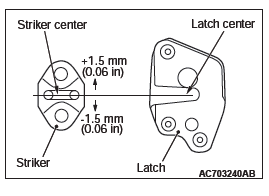
STRIKER INSTALLATION
Install the striker so that the striker center does not deviate more than +-1.5 mm (0.06 inch) from the latch center.
INSPECTION
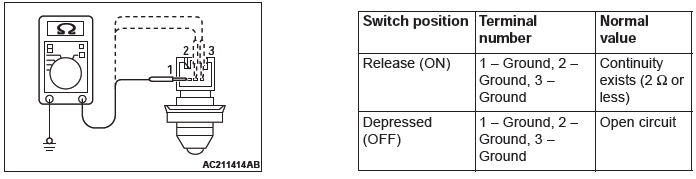
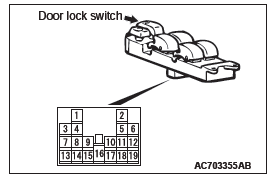
DOOR SWITCH CHECK
Door Glass and Regulator
REMOVAL AND INSTALLATION
Post-installation operation
- Door window glass adjustment
<Front door>
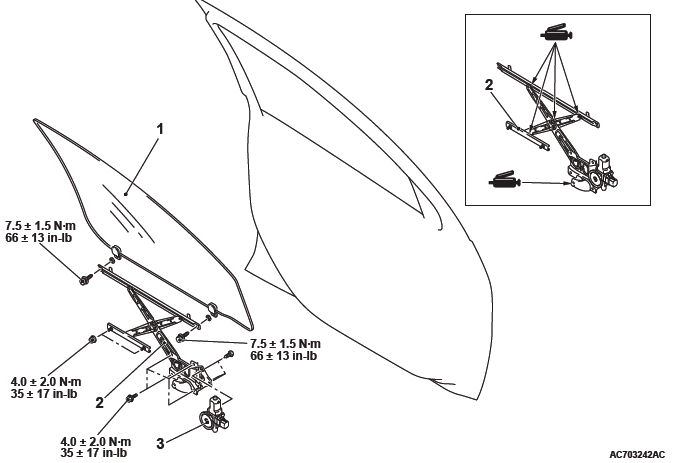
Door window glass assembly removal steps
- Door trim assembly
- Waterproof film, belt line molding, belt line weatherstrip inner, and speaker bracket
- Door window glass assembly
Power window regulator assembly removal steps
- Post-installation operation check <Driver's side only>
- Door trim assembly
- Waterproof film and speaker bracket
- Power window regulator assembly
- Power window motor
Required Special Tool:
- MB990480: Window Glass Holder
<Rear door>

Door window glass assembly removal steps
- Door trim assembly
- Waterproof film, belt line molding, belt line weatherstrip inner, door window glass channel, and speaker bracket
- Door latch assembly
- Door window glass assembly
Power window regulator assembly removal steps
- Door trim assembly
- Waterproof film and speaker bracket
- Power window regulator assembly
- Power window motor
Required Special Tool:
- MB990480: Window Glass Holder
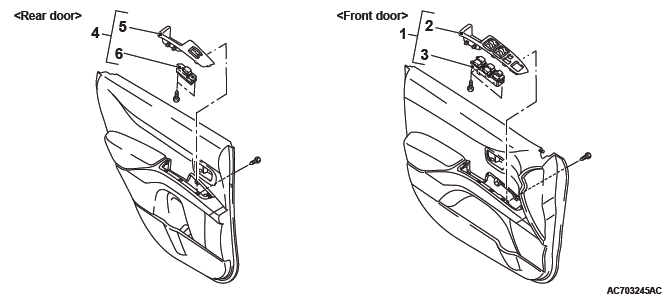
Power window switch <Front door> removal step
- Post-installation operation check <Driver's side only>
- Door trim assembly
- Power window switch panel assembly
- Power window switch panel
- Power window main switch <Driver's side>, power window sub switch <Front passenger's side>
Power window sub switch <Rear door> removal step
- Door trim assembly
- Power window switch panel assembly
- Power window switch panel
- Power window sub switch
REMOVAL SERVICE POINT
POWER WINDOW REGULATOR REMOVAL
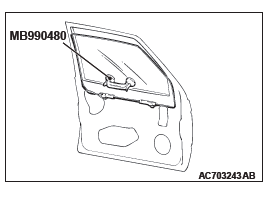
1. Remove the door window glass installation bolts.
CAUTION If tinting film is adhered to the door window glass, attach special tool MB990480 to the outside of the glass to prevent the film from peeling off.
2. Lift the door window glass, and attach special tool MB990480 to the glass as shown to prevent the glass from falling.
3. Remove the power window regulator.
INSTALLATION SERVICE POINT
POST-INSTALLATION OPERATION CHECK <DRIVER'S SIDE ONLY>
When the following procedures are carried out, carry out the learning procedures of the power window fully closed position.
- Power window regulator removal or replacement
- Power window switch removal or replacement
INSPECTION
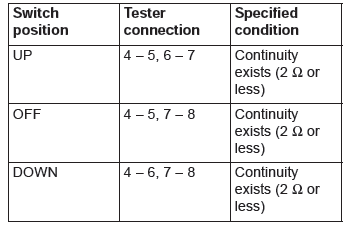
POWER WINDOW SWITCH CONTINUITY CHECK
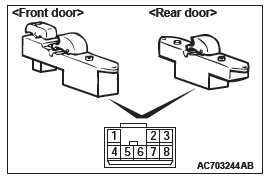
Sub switch
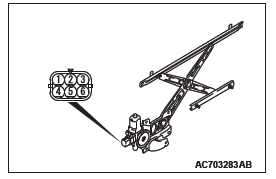
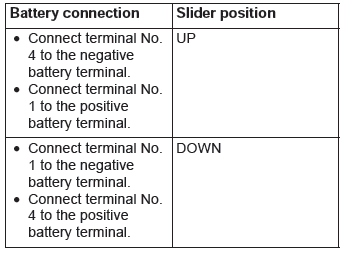
DOOR WINDOW REGULATOR CHECK
1. Connect a battery directly to the motor terminals and check that the motor runs smoothly.
2. Check that the motor runs in the opposite direction when the battery is connected with the polarity reversed.
3. If a defect is found, replace the window regulator as an assembly.
<Front door (passenger's side)>


<Rear door>
Door Handle and Latch
REMOVAL AND INSTALLATION
CAUTION When the door lock cylinder of the vehicle with WCM is replaced as a full service key set, the key must be registered with the barcode No. attached to the ignition key.
Pre-removal operation
- Door trim assembly removal
- Waterproof film removal
Post-installation operation
- Door inside handle play check
- Door outside handle play check
- Waterproof film installation
- Door trim assembly installation
<Front door>
Door inside handle removal
- Door inside handle
Door lock key cylinder and door outside handle removal steps
- Rear lower sash
- Plug
- Door outside handle cover assembly <driver's side only>
- Door lock key cylinder <driver's side only>
- Door outside handle cover
- Door outside handle
- Door outside handle gasket
- Door outside handle base
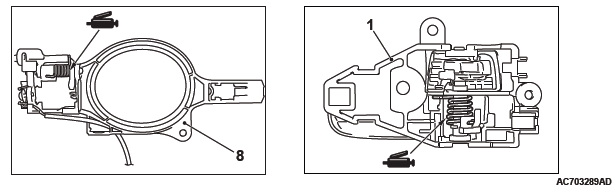
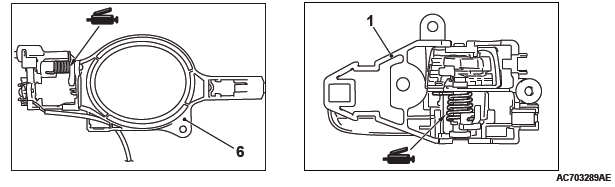
Door handle and door latch removal steps
- Rear lower sash
- Screw
- Door latch assembly
- Inside lock cable
- Inside handle cable
- Outside handle rod
- Front door outside lock rod
- Front door panel bracket
Door check removal steps
- Front door speaker
- Door check
<Rear door>
Door inside handle removal
- Door inside handle
Door lock key cylinder and door outside handle removal steps
- Rear lower sash
- Plug
- Door outside handle cover
- Door outside handle
- Door outside handle gasket
- Door outside handle base
Door handle and door latch removal steps
- Rear lower sash
- Screw
- Door latch assembly
- Inside lock cable
- Inside handle cable
- Outside handle rod
Door check removal steps
- Rear door speaker
- Door check
INSTALLATION SERVICE POINTS
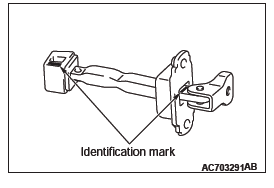
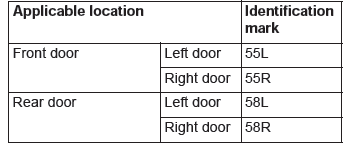
DOOR CHECK INSTALLATION
Install the door check with the following identification marks facing upward.
DOOR INSIDE HANDLE INSTALLATION
When connecting the inside cable to the door inside handle, ensure that the door latch and the inside handle are unlocked.
INSPECTION
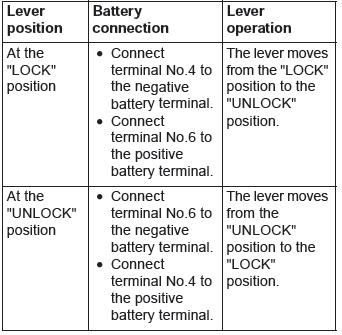
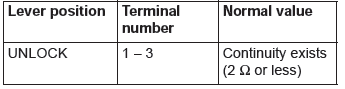
FRONT DOOR LOCK ACTUATOR CHECK

ACTUATOR OPERATION CHECK
ACTUATOR SWITCH CHECK <DRIVER'S SIDE>
ACTUATOR SWITCH CHECK <PASSENGER'S SIDE [Vehicles with keyless operation system (KOS) ] >

REAR DOOR LOCK ACTUATOR CHECK
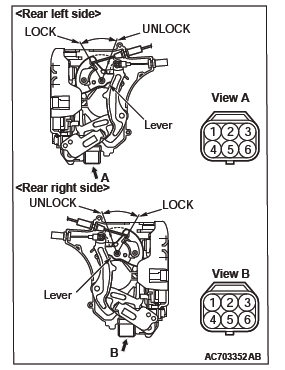
ACTUATOR OPERATION CHECK
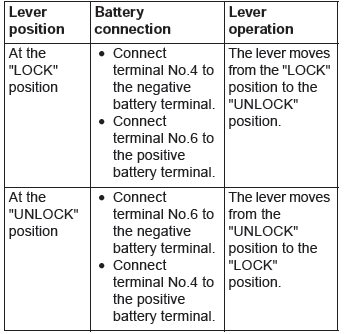
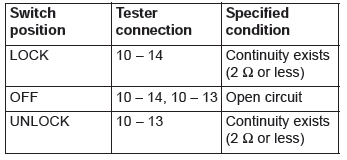
CENTRAL DOOR LOCK SWITCH CONTINUITY CHECK
Remove the power window switch.
<DRIVER'S SIDE>
<PASSENGER'S SIDE>
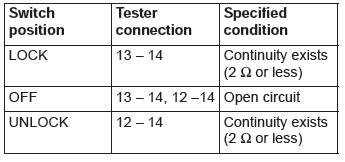
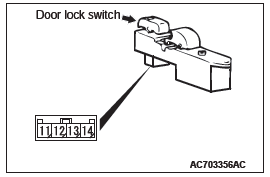
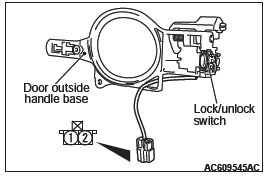
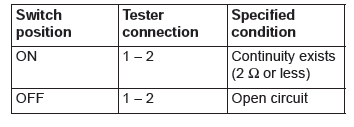
LOCK/UNLOCK SWITCH CHECK
<VEHICLE WITH KOS>
READ NEXT:
 Window Glass Runchannel and Door Opening Weatherstrip
REMOVAL AND INSTALLATION
<Front door>
Waterproof film removal steps
Pull handle bracket
Waterproof film
Door window glass runchannel
removal steps
Door window glass runchannel
Door bel
Liftgate
GENERAL INFORMATION
LIFTGATE OPENER CONTROL FUNCTION
When the liftgate lock release handle is operated to
open the liftgate (the liftgate lock release handle
open switch turns ON) while the vehicle
Sunroof
SPECIFICATIONS
SERVICE SPECIFICATION
SEALANT
GENERAL INFORMATION
SUNROOF FUNCTION
A motor-driven inner slide-type glass sunroof with a
tilt-up mechanism is available in some models as
optional equip
SEE MORE:
Towing
If your vehicle needs to be towed
If you need to tow your vehicle, we recommend that you contact a MITSUBISHI MOTORS
Authorised Service Point or tow truck company.
In the following cases, transport the vehicle using a tow truck.
● The engine runs but the vehicle does not move, or an abn
Automatic air conditioning
The air conditioning can only be used while the engine is running.
Control panel
1- Temperature control dial.
2- Air selection switch.
3- Blower speed selection dial.
4- Air conditioning switch.
5- Mode selection dial.
6- Rear window demister switch → P. 3-70.
NOTE:
● There
