Mitsubishi Outlander: Inspection Procedure
INSPECTION PROCEDURE 1: The vehicle does not run at any range (including low power).
TROUBLESHOOTING HINTS (THE MOST LIKELY CAUSES FOR THIS CONDITION:)
- Malfunction of the engine
- Insufficient transmission fluid level
- Poor adjustment of transaxle control cable
- Malfunction of the torque converter
- Malfunction of the valve body assembly
- A/T failure: Hydraulic system (valve body assembly, oil pump), driving force transmission system (parking mechanism, clutch/brake, gears)
DIAGNOSIS
STEP 1. Check the engine performance.
Q: Is the check result normal?
YES : Go to Step 2.
NO : Repair the failure, and perform adjustment.
STEP 2. Check the transaxle control cable.
Check the installation status of transaxle control cable and transmission range switch.
Q: Is the check result normal?
YES : Go to Step 3.
NO : Adjust the installation status of transaxle control cable and transmission range switch.
STEP 3. Check the transmission fluid.
Check the transmission fluid for seizure, fouling, and foreign material.
Q: Is the check result normal?
YES : Go to Step 4.
NO : Go to Step 7.
STEP 4. Check the transmission fluid level.
Check if the transmission fluid level is adequate.
Q: Is the check result normal?
YES : Go to Step 5.
NO : Check and repair the leakage point of the transmission fluid, add the transmission fluid, and then go to Step 5.
STEP 5. Perform a hydraulic test.
Q: Is the check result normal?
YES : Go to Step 6.
NO : Go to Step 7.
STEP 6. Replace the torque converter.
Q: Is the failure resolved? YES : The procedure is complete.
NO : Go to Step 7.
STEP 7. Remove the transaxle assembly from the vehicle.
Disassemble and check the transaxle assembly to check if there is a foreign material inside.
Q: Is the check result satisfactory?
YES : Replace the transaxle assembly.
NO : Replace the failure part.
INSPECTION PROCEDURE 2: The vehicle does not run at the "D" or the "R" range.
TROUBLESHOOTING HINTS (THE MOST LIKELY CAUSES FOR THIS CONDITION:)
- Poor adjustment of transaxle control cable
- A/T failure: Hydraulic system (valve body assembly), driving force transmission system (clutch/brake)
DIAGNOSIS
STEP 1. Check the transaxle control cable.
Check the installation status of transaxle control cable and transmission range switch.
Q: Is the check result normal?
YES : Go to Step 2.
NO : Adjust the installation status of transaxle control cable and transmission range switch.
STEP 2. Check the transmission fluid.
Check the transmission fluid for seizure, fouling, and level.
Q: Is the check result normal?
YES : The procedure is complete.
NO : Go to Step 3.
STEP 3. Remove the transaxle assembly from the vehicle.
Disassemble and check the transaxle assembly to check if there is a foreign material inside.
Q: Is the check result satisfactory?
YES : Replace the transaxle assembly.
NO : Replace the failure part.
INSPECTION PROCEDURE 3: The acceleration is poor.
TROUBLESHOOTING HINTS (THE MOST LIKELY CAUSES FOR THIS CONDITION:)
- Malfunction of the engine
- Malfunction of the TCM
- TCM power supply or ground failure
- Malfunction of the torque converter
- A/T failure: Hydraulic system (valve body assembly), driving force transmission system (clutch/brake)
DIAGNOSIS
STEP 1. Check the engine performance.
Q: Is the check result normal?
YES : Go to Step 2.
NO : Repair the failure, and perform adjustment.
STEP 2. Compare with another same model vehicle.
Q: Is there a difference from the same model vehicle?
YES : Go to Step 3.
NO : The procedure is complete.
STEP 3. Check the TCM power supply and ground.
Q: Is the check result satisfactory?
YES : Go to Step 4.
NO : Repair the wiring.
STEP 4. Replace the TCM.
Q: Is the failure resolved?
YES : The procedure is complete.
NO : Go to Step 5.
STEP 5. Check the transmission fluid.
Check the transmission fluid for seizure, fouling, and foreign material. Also, check that the fluid level is adequate.
Q: Is the check result normal?
YES : Go to Step 6.
NO : Go to Step 7.
STEP 6. Replace the torque converter.
Q: Is the failure resolved?
YES : The procedure is complete.
NO : Go to Step 7.
STEP 7. Remove the transaxle assembly from the vehicle.
Disassemble and check the transaxle assembly to check if there is a foreign material inside.
Q: Is the check result satisfactory?
YES : Replace the transaxle assembly.
NO : Replace the failure part.
INSPECTION PROCEDURE 4: The vehicle moves at the "N" range.
TROUBLESHOOTING HINTS (THE MOST LIKELY CAUSES FOR THIS CONDITION:)
- Poor adjustment of transaxle control cable
- A/T failure: Hydraulic system (valve body assembly), driving force transmission system (clutch/brake)
DIAGNOSIS
STEP 1. Check the engine performance.
Q: Is the check result normal?
YES : Go to Step 2.
NO : Repair the failure, and perform adjustment.
STEP 2. Compare with another same model vehicle.
Q: Is there a difference from the same model vehicle?
YES : Go to Step 3.
NO : The procedure is complete.
STEP 3. Check the transaxle control cable.
Check the installation status of transaxle control cable and transmission range switch.
Q: Is the check result normal?
YES : Go to Step 4.
NO : Adjust the installation status of transaxle control cable and transmission range switch.
STEP 4. Check the transmission fluid.
Check the transmission fluid for seizure, fouling, and foreign material.
Q: Is the check result normal?
YES : The procedure is complete.
NO : Go to Step 5.
STEP 5. Remove the transaxle assembly from the vehicle.
Disassemble and check the transaxle assembly to check if there is a foreign material inside.
Q: Is the check result satisfactory?
YES : Replace the transaxle assembly.
NO : Replace the failure part.
INSPECTION PROCEDURE 5: Gears cannot be shifted at all, or a certain gear shift (1st to 2nd, 2nd to 3rd, etc.) is not made.
TROUBLESHOOTING HINTS (THE MOST LIKELY CAUSES FOR THIS CONDITION:)
- Non-genuine device installation: TCM voltage drop
- Improper fixing of the electric wiring, poor insertion of the connector, poor contact of the inside PIN
- Poor adjustment of transmission range switch
- Failure of the transmission range switch main unit
- Malfunction of the TCM
- TCM power supply or ground failure
- A/T failure: Hydraulic system (valve body assembly), driving force transmission system (clutch/brake)
DIAGNOSIS
STEP 1. Check the electrical equipment.
Q: Is the non-genuine electrical equipment (car navigator, audio devices, etc.) installed? YES : Remove the power supply wiring and signal lines of the equipment.
NO : Go to Step 2
STEP 2. Check the electric system.
Check if there is an improper fixing of the electric wiring, poor insertion of the connector, and poor contact.
Q: Is the check result normal?
YES : Go to Step 3.
NO : Adjust and repair.
STEP 3. Check and adjust the transmission range switch.
If the transmission range switch has a failure, replace it, and then check the trouble symptom again.
Q: Is the check result normal?
YES : The procedure is complete.
NO : Go to Step 4.
STEP 4. Check the TCM power supply and ground.
Q: Is the check result normal?
YES : Go to Step 5.
NO : Repair the wiring.
STEP 5. Replace the TCM.
Q: Is the failure resolved? YES : The procedure is complete.
NO : Go to Step 6.
STEP 6. Remove the transaxle assembly from the vehicle.
Disassemble and check the transaxle assembly to check if there is a foreign material inside.
Q: Is the check result satisfactory? YES : Replace the transaxle assembly.
NO : Replace the failure part.
INSPECTION PROCEDURE 6: The torque converter is not locked up.
TROUBLESHOOTING HINTS (THE MOST LIKELY CAUSES FOR THIS CONDITION:)
- Poor adjustment of transmission range switch
- Failure of the transmission range switch main unit
- Malfunction of the TCM
- Poor installation of A/T and engine
- Malfunction of the torque converter
DIAGNOSIS
STEP 1. Check and adjust the transmission range switch.
If the transmission range switch has a failure, replace it, and then check the trouble symptom again.
Q: Is the check result normal?
YES : The procedure is complete.
NO : Go to Step 2.
STEP 2. Replace the TCM.
Q: Is the failure resolved? YES : The procedure is complete.
NO : Go to Step 3.
STEP 3. Check the installation position of the transaxle assembly and the engine.
Is the installation of transaxle assembly and the engine normal? Compare and check the axial direction position with the same model vehicle.
Q: Is the check result normal?
YES : Go to Step 4.
NO : Repair the installation.
STEP 4. Check the transmission fluid.
Check the transmission fluid for burning, fouling, and foreign material.
Q: Is the check result normal?
YES : Replace the torque converter.
NO : Replace the transaxle assembly.
INSPECTION PROCEDURE 7: The clutch slips when the vehicle starts or during gear shift.
TROUBLESHOOTING HINTS (THE MOST LIKELY CAUSES FOR THIS CONDITION:)
- Poor adjustment of transaxle control cable
- Inadequate transmission fluid level
- A/T failure: Hydraulic system (valve body assembly), driving force transmission system (clutch/brake)
DIAGNOSIS
STEP 1. Check the transaxle control cable. <When the clutch slips at vehicle start>
Check the installation status of transaxle control cable and transmission range switch.
Q: Is the check result normal?
YES : Go to Step 2.
NO : Adjust the installation status of transaxle control cable and transmission range switch.
STEP 2. Check the transmission fluid.
Check the transmission fluid for seizure, fouling, and foreign material.
Q: Is the check result normal?
YES : Go to Step 3.
NO : Go to Step 5.
STEP 3. Check the transmission fluid level.
Check if the transmission fluid level is adequate.
Q: Is the check result normal?
YES : Go to Step 4.
NO : Check and repair the leakage point of the transmission fluid, add the transmission fluid, and then go to Step 4.
STEP 4. Perform a hydraulic test.
Q: Is the check result normal?
YES : The procedure is complete.
NO : Go to Step 5.
STEP 4. Perform a hydraulic test.
Q: Is the check result normal?
YES : The procedure is complete.
NO : Go to Step 5.
STEP 5. Remove the transaxle assembly from the vehicle.
Disassemble and check the transaxle assembly to check if there is a foreign material inside.
Q: Is the check result satisfactory? YES : Replace the transaxle assembly.
NO : Replace the failure part.
INSPECTION PROCEDURE 8: The engine brake is not applied.
TROUBLESHOOTING HINTS (THE MOST LIKELY CAUSES FOR THIS CONDITION:)
- Poor adjustment of transaxle control cable
- Inadequate transmission fluid level
- Malfunction of the TCM
- A/T failure: Hydraulic system (valve body assembly), driving force transmission system (clutch/brake)
DIAGNOSIS
STEP 1. Check the transaxle control cable.
Check the installation status of transaxle control cable and transmission range switch.
Q: Is the check result normal?
YES : Go to Step 2.
NO : Adjust the installation status of transaxle control cable and transmission range switch.
STEP 2. Check the transmission fluid.
Check the transmission fluid for burning, fouling, and foreign material.
Q: Is the check result normal?
YES : Go to Step 3.
NO : Go to Step 7.
STEP 3. Check the transmission fluid level.
Check if the transmission fluid level is adequate.
Q: Is the check result normal?
YES : Go to Step 4.
NO : Check and repair the leakage point of the transmission fluid, add the transmission fluid, and then go to Step 4.
STEP 4. Perform a hydraulic test.
Q: Is the check result normal? YES : Go to Step 5.
NO : Go to Step 7.
STEP 5. Replace the TCM.
Q: Is the failure resolved? YES : Go to Step 6.
NO : Go to Step 7.
STEP 6. Compare with another same model vehicle.
Q: Is there a difference from the same model vehicle? YES : Go to Step 7.
NO : The procedure is complete.
STEP 7. Remove the transaxle assembly from the vehicle.
Disassemble and check the transaxle assembly to check if there is a foreign material inside.
Q: Is the check result satisfactory? YES : Replace the transaxle assembly.
NO : Replace the failure part.
INSPECTION PROCEDURE 9: The shift shock is large at a certain gear shift. (1st to 2nd, 2nd to 3rd, etc.)
TROUBLESHOOTING HINTS (THE MOST LIKELY CAUSES FOR THIS CONDITION:)
- Malfunction of the engine: Engine output change
- Malfunction of the TCM
- A/T failure: Hydraulic system (valve body assembly), driving force transmission system (clutch/brake)
NOTE: When the engine output is low, shock occurs.
Care must also be taken during cold, after warm up, and temperature, humidity, and air pressure differences.
DIAGNOSIS
STEP 1. Check the engine performance.
- Check the ECM side especially for throttle signal-related abnormality.
- Check the stall speed. If the speed is low, check the engine side.
Q: Is the check result normal?
YES : Go to Step 2.
NO : Repair the failure, and perform adjustment.
STEP 2. Replace the TCM.
Q: Is the failure resolved? YES : The procedure is complete.
NO : Go to Step 3.
STEP 3. Perform a hydraulic test.
Q: Is the check result normal?
YES : The procedure is complete.
NO : Go to Step 4.
STEP 4. Compare with another same model vehicle.
Q: Is there a difference from the same model vehicle? YES : Go to Step 5.
NO : The procedure is complete.
STEP 5. Remove the transaxle assembly from the vehicle.
Disassemble and check the transaxle assembly to check if there is a foreign material inside.
Q: Is the check result satisfactory? YES : Replace the transaxle assembly.
NO : Replace the failure part.
INSPECTION PROCEDURE 10: The select shock is large when the transmission range is shifted from "N" to "D", and "N" to "R".
TROUBLESHOOTING HINTS (THE MOST LIKELY CAUSES FOR THIS CONDITION:)
- Malfunction of the engine: Idle speed
- Poor adjustment of transmission range switch
- Malfunction of the TCM
- A/T failure: Hydraulic system (valve body assembly), driving force transmission system (clutch/brake)
DIAGNOSIS
STEP 1. Check the engine performance.
Especially check that the idle speed does not exceed the specified value.
Q: Is the check result normal?
YES : Go to Step 2.
NO : Repair the failure, and perform adjustment.
STEP 2. Check and adjust the transmission range switch. If the transmission range switch has a failure, replace it, and then check the trouble symptom again.
Q: Is the check result normal?
YES : The procedure is complete.
NO : Go to Step 3.
STEP 3. Replace the TCM.
Q: Is the failure resolved? YES : The procedure is complete.
NO : Go to Step 4.
STEP 4. Compare with another same model vehicle.
Q: Is there a difference from the same model vehicle? YES : Go to Step 5.
NO : The procedure is complete.
STEP 5. Remove the transaxle assembly from the vehicle.
Disassemble and check the transaxle assembly to check if there is a foreign material inside.
Q: Is the check result satisfactory? YES : Replace the transaxle assembly.
NO : Replace the failure part.
INSPECTION PROCEDURE 11: Abnormal sound occurs during idling.
TROUBLESHOOTING HINTS (THE MOST LIKELY CAUSES FOR THIS CONDITION:)
- Malfunction of the engine: Abnormal sound of auxiliary parts
- Transmission fluid level
- Installation of torque converter
- A/T failure: Hydraulic system (valve body assembly, hydraulic circuit)
NOTE:
Inspection items for abnormal sound
- Check of sound source and incoming route (radiated sound, propagation sound, resonance, etc.), and measurement at driver's seat, front passenger's seat, and rear passenger's seat
- Change of sound during cold and after warm up (Change of fluid, and hydraulic pressure)
- Change of sound with the engine speed
- Check of tone, and continuous/discontinuous sound
DIAGNOSIS
STEP 1. Check the engine performance.
Check the sound of engine, auxiliary parts, and resonance/non-resonance.
Q: Is the check result normal?
YES : Go to Step 2.
NO : Repair the failure, and perform adjustment.
STEP 2. Check the transmission fluid level.
Check if the transmission fluid level is adequate.
Q: Is the check result normal?
YES : Go to Step 4.
NO : Go to Step 3.
STEP 3. Check and repair the leakage point of the transmission fluid.
Check and repair the leakage point of the transmission fluid, and adjust the transmission fluid level. Then check if the abnormal sound is generated.
Q: Is the check result normal?
YES : The procedure is complete.
NO : Go to Step 4.
STEP 4. Check the transmission fluid.
Check the transmission fluid for burning, fouling, and foreign material.
Q: Is the check result normal?
YES : Go to Step 5.
NO : Go to Step 8.
STEP 5. Retest the system.
Check if the abnormal sound during idling occurs with vibration.
Q: Is the check result normal?
YES : Go to Step 6.
NO : Go to Step 7.
STEP 6. Check the torque converter.
Check the torque converter installation, change the installation phase, and then check the trouble symptom.
Q: Is the check result normal?
YES : The procedure is complete.
NO : Go to Step 7.
STEP 7. Compare with another same model vehicle.
Q: Is there a difference from the same model vehicle? YES : Go to Step 8.
NO : The procedure is complete.
STEP 8. Remove the transaxle assembly from the vehicle.
Disassemble and check the transaxle assembly to check if there is a foreign material inside.
Q: Is the check result satisfactory? YES : Replace the transaxle assembly.
NO : Replace the failure part.
INSPECTION PROCEDURE 12: Abnormal sound occurs during driving.
TROUBLESHOOTING HINTS (THE MOST LIKELY CAUSES FOR THIS CONDITION:)
- Engine- and body-related failures: Abnormal sound of auxiliary parts, drive shaft, wheel bearing
- Installation of non-genuine aeroparts to the body
- Abnormal incoming route of sound: Installation of transaxle control cable, damping device, sound isolation device
- Malfunction of the torque converter
- A/T failure: Driving force transmission system (gear), hydraulic system (valve body assembly, hydraulic circuit)
NOTE:
Inspection items for abnormal sound
- Check of sound source and incoming route (radiated sound, propagation sound, resonance, etc.), and measurement at driver's seat, front passenger's seat, and rear passenger's seat
- Change of sound during cold and after warm up (Change of fluid, and hydraulic pressure)
- Change of sound with the engine speed (r/min order change)
- Change of sound with the vehicle speed (r/min order change, wind noise)
- Change of sound with the throttle valve opening (engine output change, hydraulic pressure change)
DIAGNOSIS
STEP 1. Check the body and engine performance.
- Check if a non-genuine aeropart is installed to the body.
- Check the engine auxiliary parts, drive shaft, and wheel bearing.
- Check if the abnormal sound changes in accordance with the engine speed, or the vehicle speed.
Q: Is the check result normal?
YES : Go to Step 2.
NO : Repair the failure, and perform adjustment.
STEP 2. Check the installation of the transaxle control cable, damping device, and sound isolation device.
Q: Is the check result normal?
YES : Go to Step 3.
NO : Repair the failure, and perform adjustment.
STEP 3. Check the abnormal sound.
Q: Does the abnormal sound change in accordance with the vehicle speed? YES : Go to Step 5.
NO : Go to Step 4.
STEP 4. Check the abnormal sound.
Q: Does the abnormal sound change in accordance with the throttle valve opening? Or is it the transmission fluid sound especially caused at start-up? YES : Replace the torque converter.
NO : Go to Step 5.
STEP 5. Compare with another same model vehicle.
Q: Is there a difference from the same model vehicle? YES : Go to Step 6.
NO : The procedure is complete.
STEP 6. Remove the transaxle assembly from the vehicle.
Disassemble and check the transaxle assembly to check if there is a foreign material inside.
Q: Is the check result satisfactory?
YES : Replace the transaxle assembly.
NO : Replace the failure part.
INSPECTION PROCEDURE 13: Abnormal sound occurs during gear shift.
TROUBLESHOOTING HINTS (THE MOST LIKELY CAUSES FOR THIS CONDITION:)
- Abnormal incoming route of sound: Installation of transaxle control cable, damping device, sound isolation device
- A/T failure: Driving force transmission system (gear), hydraulic system (valve body assembly, hydraulic circuit)
NOTE:
Inspection items for abnormal sound
- Check of sound source and incoming route (radiated sound, propagation sound, resonance, etc.), and measurement at driver's seat, front passenger's seat, and rear passenger's seat
- Change of sound during cold and after warm up (Change of fluid, and hydraulic pressure)
- Change of sound with the throttle valve opening (engine output change, hydraulic pressure change)
- Change of sound on a flat road, upslope, and downslope
- Check of tone
DIAGNOSIS
STEP 1. Check the installation of the transaxle control cable, damping device, and sound isolation device.
Q: Is the check result normal?
YES : Go to Step 2.
NO : Repair the failure, and perform adjustment.
STEP 2. Compare with another same model vehicle.
Q: Is there a difference from the same model vehicle?
YES : Go to Step 3.
NO : The procedure is complete.
STEP 3. Remove the transaxle assembly from the vehicle.
Disassemble and check the transaxle assembly to check if there is a foreign material inside.
Q: Is the check result satisfactory?
YES : Replace the transaxle assembly.
NO : Replace the failure part.
INSPECTION PROCEDURE 14: Engine stall
TROUBLESHOOTING HINTS (THE MOST LIKELY CAUSES FOR THIS CONDITION:)
- Engine system failure
- Malfunction of the transmission fluid
- Malfunction of the torque converter
- A/T failure: Hydraulic system (valve body assembly), driving force transmission system (clutch/brake)
DIAGNOSIS
STEP 1. Check the engine performance.
Q: Is the check result normal?
YES : Go to Step 2.
NO : Repair the failure, and perform adjustment.
STEP 2. Check the transmission fluid.
Check the transmission fluid for burning, fouling, and foreign material.
Q: Is the check result normal?
YES : Go to Step 3.
NO : Go to Step 6.
STEP 3. Check the transmission fluid level.
Check if the transmission fluid level is adequate.
Q: Is the check result normal?
YES : Go to Step 4.
NO : Check and repair the leakage point of the transmission fluid, add the transmission fluid, and then go to Step 4.
STEP 4. Perform a hydraulic test.
Q: Is the check result normal?
YES : Go to Step 5.
NO : Go to Step 6.
STEP 5. Compare with another same model vehicle.
Q: Is there a difference from the same model vehicle?
YES : Go to Step 6.
NO : The procedure is complete.
STEP 6. Retest the system.
Does the engine stall occur again?
Q: Is the check result normal?
YES : Replace the transaxle assembly.
NO : The procedure is complete.
INSPECTION PROCEDURE 15: Oil leaks from the air breather.
TROUBLESHOOTING HINTS (THE MOST LIKELY CAUSES FOR THIS CONDITION:)
- Poor adjustment of the transmission fluid level
- A/T failure: Driving force transmission system
DIAGNOSIS
STEP 1. Check the transmission fluid.
Check the transmission fluid for burning, fouling, and foreign material.
Q: Is the check result normal?
YES : Go to Step 2.
NO : Replace the transaxle assembly.
STEP 2. Check the transmission fluid level.
Check if the transmission fluid level is adequate.
Q: Is the check result normal?
YES : Go to Step 3.
NO : Check and repair the leakage point of the transmission fluid, add the transmission fluid, and then go to Step 3.
STEP 3. Perform a hydraulic test.
Q: Is the check result normal?
YES : The procedure is complete.
NO : Replace the transaxle assembly.
INSPECTION PROCEDURE 16: The starter does not rotate at the "P" or "N" range. (The engine does not start.)
TROUBLESHOOTING HINTS (THE MOST LIKELY CAUSES FOR THIS CONDITION:)
- Engine system failure
- Poor adjustment of transaxle control cable
- Poor adjustment of transmission range switch
- Failure of the transmission range switch main unit
- The starter electric wiring
- Damaged harness or connector
- Malfunction of the TCM
DIAGNOSIS
STEP 1. Check the engine performance.
Q: Is the check result normal?
YES : Go to Step 2.
NO : Repair the failure, and perform adjustment.
STEP 2. Check the transaxle control cable.
Check the installation of the transaxle control cable.
Q: Is the check result normal?
YES : Go to Step 3.
NO : Adjust the transaxle control cable.
STEP 3. Check and adjust the transmission range switch.
If the transmission range switch has a failure, replace it, and then check the trouble symptom again.
Q: Is the check result normal?
YES : The procedure is complete.
NO : Go to Step 4.
STEP 4. Check the electric system.
Check the starter-related wiring for poor insertion of connector or open circuit.
Q: Is the check result normal?
YES : Replace the TCM.
NO : Repair the failure, and perform adjustment.
DATA LIST REFERENCE TABLE
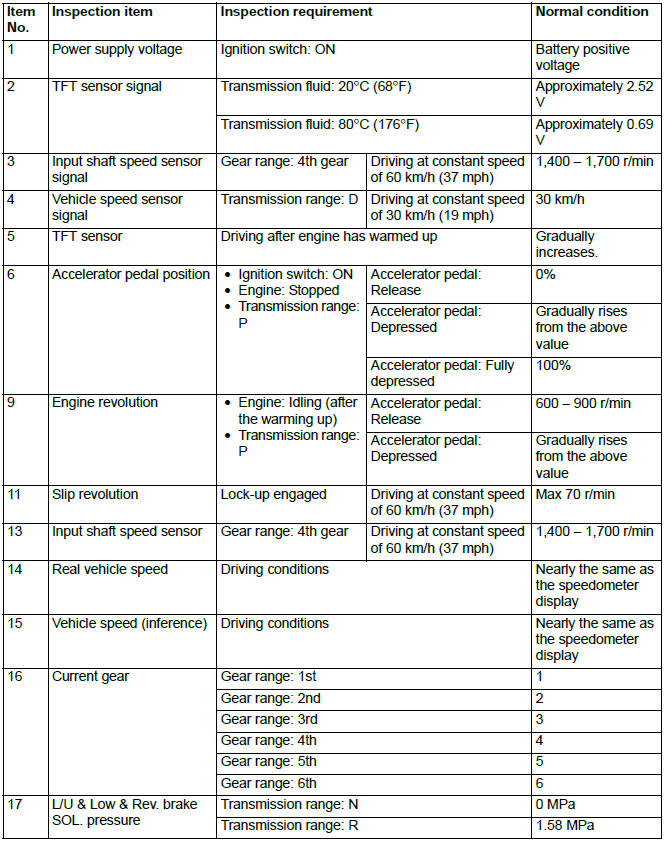
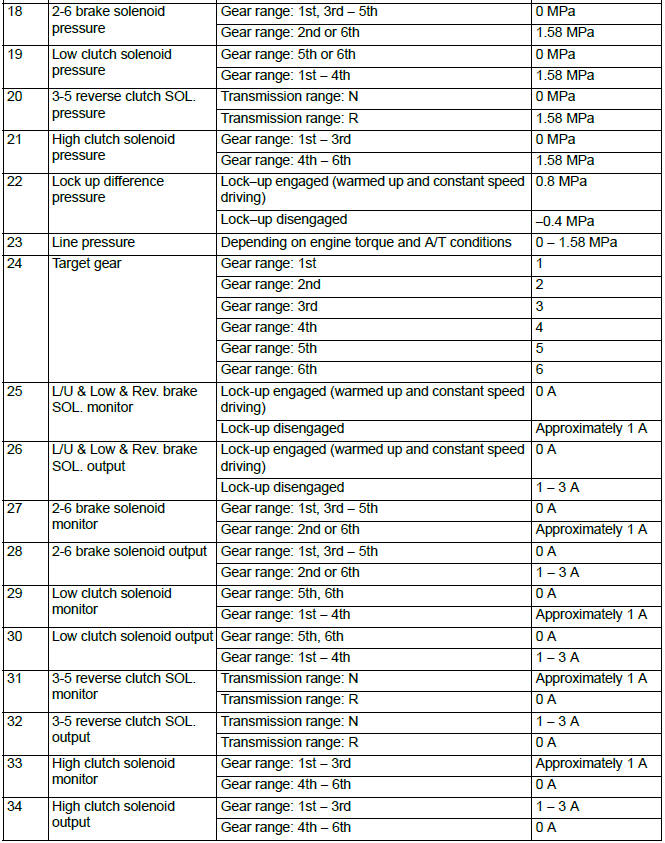
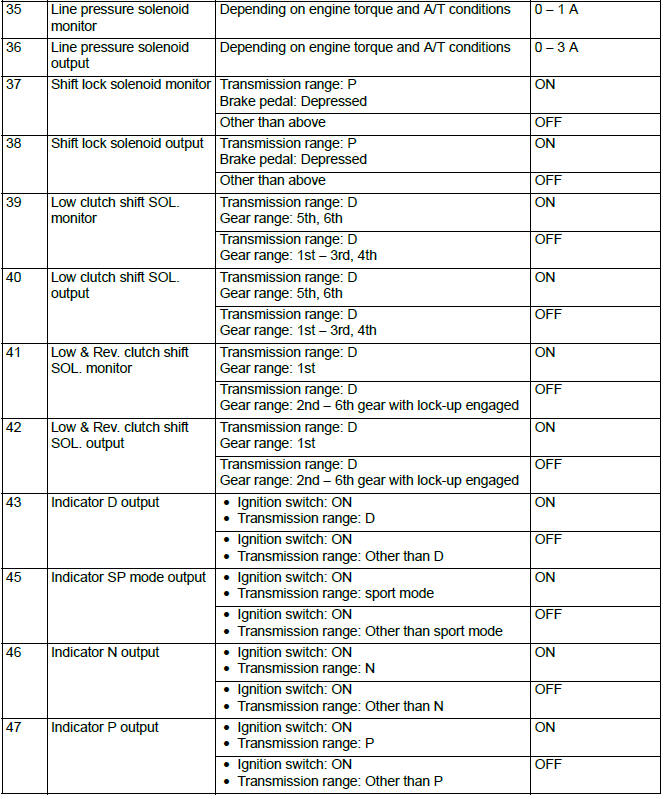
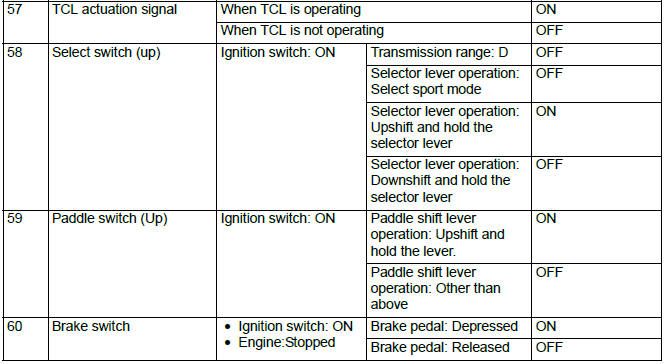
TCM TERMINAL VOLTAGE REFERENCE CHART FOR TRANSAXLE OPERATION

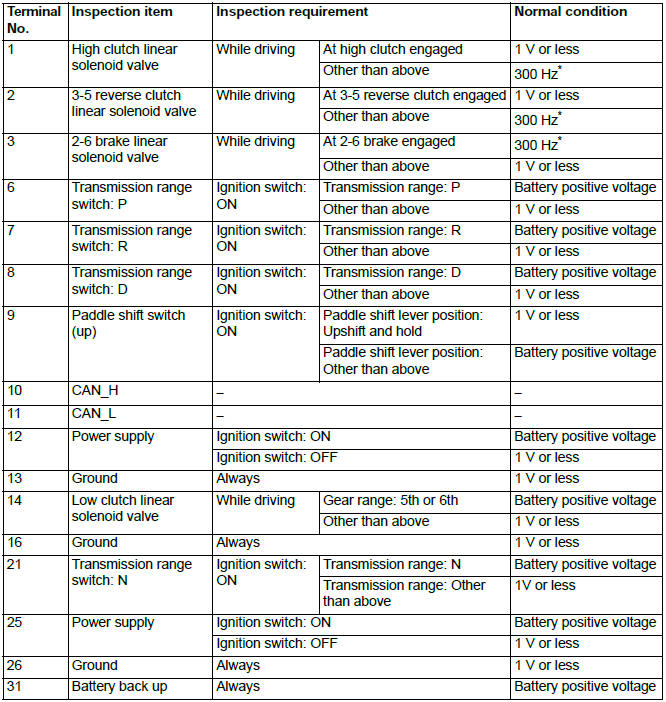
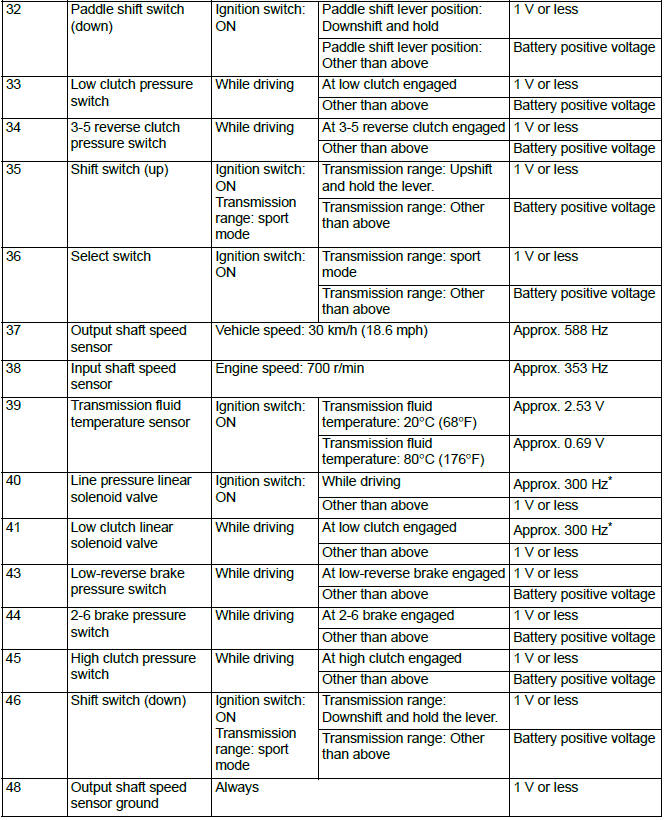
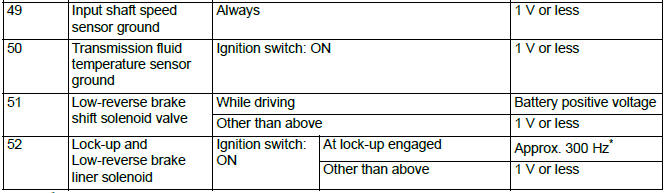
NOTE: * The operation is performed at 300 Hz in a voltage range of 0 to 12 V when measured by an oscilloscope.
READ NEXT:
 Diagnosis S-AWC (Super All Wheel Control)
TROUBLESHOOTING STRATEGY
Refer to GROUP 00 − How to Use Troubleshooting/
Inspection Service Points.
PRECAUTIONS FOR DIAGNOSIS
Before diagnosis, check that all the following items
are normal.
DTC No.C100A, C1015, C1020, C102B, C1011, C101C, C1027, C1032,
C1014, C101F, C102A, C1035, C1078, C1219, C121A, C123C, C1242, C145F, C1460,
C1610, C1614, C1616
Code No.C100A <FL>, C1015 <FR>, C1020 <RL>, C102B <RR>: Wheel Speed
Sensor System (Faulty
Circuit)
CAUTION
If there is any problem in the CAN bus lines,
an incorrect diagno
DTC No.C161F, C1621, C1624, C1626, C1627,
C1628, C1629, C1630, C1631, C1632, C1633, C2100, C2101, C2203, C2205
Code No.C161F: AWC actuator protection 1
CAUTION
If there is any problem in the CAN bus lines,
an incorrect diagnostic trouble code may be
set. Prior to this diagnosis, diagnose the CAN
bus lines
SEE MORE:
Manual transmission
The shift pattern is shown on the gearshift lever knob. Be sure to always fully
depress the clutch pedal before attempting to shift the lever.
CAUTION:
● Do not put the gearshift lever into the reverse position while the vehicle
is moving forward. Doing so could damage the transmission
Differential
DISASSEMBLY AND ASSEMBLY
Disassembly Steps
Final gear
Differential side bearing
(transmission case side)
Differential side bearing (converter
housing side)
Differential sub-assembly
Required special tools:
MB990801: Real axle bearing puller
MB990811: Side bearing puller cap
MB990956: Ne
