Mitsubishi Outlander: Oil Pan
REMOVAL AND INSTALLATION
Pre-removal operation
- Engine Room Under Cover Front B and Engine Room Side Cover (RH) Removal
- Engine Oil Draining
- Drive Belt Removal
Post-installation operation
- Drive Belt Installation
- Engine Oil Refilling
- Engine Room Under Cover Front B and Engine Room Side Cover (RH) Installation
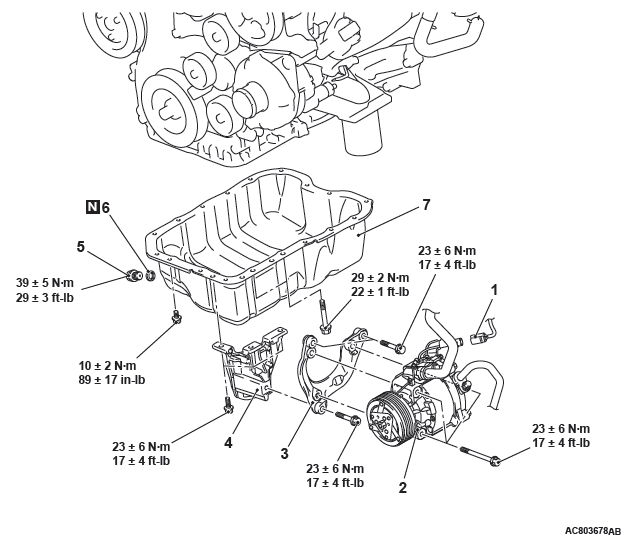
Removal steps
- A/C compressor and clutch connector connection
- A/C compressor and clutch assembly
- A/C compressor bracket A
- A/C compressor bracket B
- Engine oil pan drain plug
- Engine oil pan drain plug gasket
- Engine oil pan
Required Special Tool:
- MD998727: Oil Pan FIPG Cutter
REMOVAL SERVICE POINTS
A/C COMPRESSOR AND CLUTCH ASSEMBLY REMOVAL
1. Remove the A/C compressor and clutch assembly together with the hose from the bracket.
2. Tie the removed A/C compressor and clutch assembly with a string at a position where they will not interfere with the removal and installation of engine oil pan.
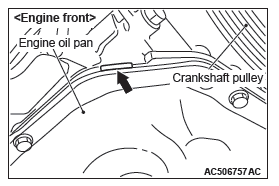
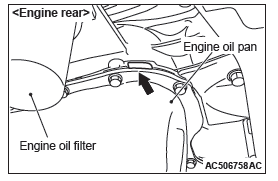
ENGINE OIL PAN REMOVAL
1. Remove the engine oil pan mounting bolts.
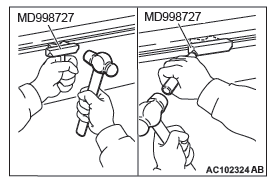
CAUTION
Do not forcibly drive in special tool MD998727 to avoid damage to the engine oil pan seal surface of cylinder block assembly.
2. Insert special tool MD998727 to the engine oil pan removal groove of the cylinder block assembly.
3. Lightly tap the special tool with a hammer to slide the oil pan seal surface, cut off the liquid gasket, and remove the engine oil pan.
INSTALLATION SERVICE POINTS
ENGINE OIL PAN INSTALLATION
1. Remove thoroughly the sealant from the engine oil pan and cylinder block assembly with a remover.
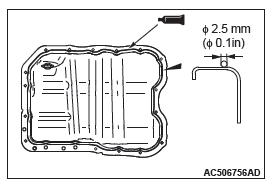
2. Apply the sealant without any gap to the mating surface of engine oil pan as shown in the figure, and install the engine oil pan to the cylinder block assembly.
Specified sealant: ThreeBond 1227D or equivalent
NOTE: Install the engine oil pan immediately after applying sealant.
CAUTION
After the installation, until a sufficient period of time (one hour or more) elapses, do not apply the oil or water to the sealant application area or start the engine.
3. Tighten the engine oil pan mounting bolts to the specified torque.
Tightening torque:
M6: 10 +- 2 N*m (89 +- 17 in-lb)
M8: 29 +- 2 N*m (22 +- 1 ft-lb)
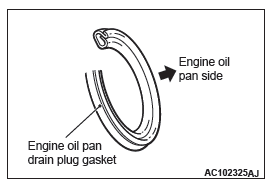
ENGINE OIL PAN DRAIN PLUG GASKET INSTALLATION
Replace the engine oil pan drain plug gasket with a new one.
Install the new gasket in the direction shown in the illustration.
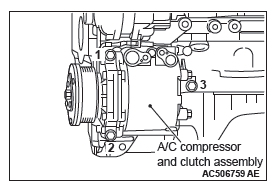
A/C COMPRESSOR AND CLUTCH ASSEMBLY INSTALLATION
Tighten A/C compressor and clutch assembly mounting bolts to the specified torque in the order of number shown in the illustration.
Tightening torque: 23 +- 6 N*m (17 +- 4 ft-lb)
INSPECTION
- Check the engine oil pan for cracks.
- Check the engine oil pan sealant-coated surface for damage and deformation.
READ NEXT:
 Crankshaft Oil Seal
REMOVAL AND INSTALLATION
Crankshaft front oil seal removal
steps
Crankshaft pulley
Crankshaft front oil seal
Crankshaft rear oil seal removal
steps
Transaxle assembly
Drive plate bolts
Ad
Cylinder Head Gasket
REMOVAL AND INSTALLATION
Pre-removal operation
Fuel Line Pressure Reduction
Engine Room Under Cover Front B and Engine Room
Side Cover (RH) Removal
Engine Coolant Draining
Air Cleaner Assembl
Timing Chain
REMOVAL AND INSTALLATION
Pre-removal operation
Engine Room Under Cover Front B and Engine Room
Side Cover (RH) Removal
Engine Oil Draining
Rocker Cover Assembly Removal
Engine Oil Pan Removal
SEE MORE:
DTC P0703, P0705, P0712, P0713, P0715, P0720, P0729, P0731, P0732,
P0733, P0734, P0735, P0736
DTC P0703: Stoplight Switch Malfunction
Stoplight switch system circuit
DESCRIPTIONS OF MONITOR METHODS
Drive the vehicle at 30 km/h (18.6 mph) or more
for 10 seconds, and then turn the ignition switch
to the "LOCK" (OFF) position. In this sequential
operation, no variation has been found in
Front Suspension
General Information
The MacPherson strut type suspension is adopted.
CONSTRUCTION DIAGRAM
Fastener Tightening Specifications
General Specifications
COIL SPRING
NOTE: * : Heavyduty suspension for FWD
Service Specifications
Lubricant
Front Suspension Diagnosis
INTRODUCTION TO FRONT SUSPENSION DI
