Mitsubishi Outlander: On-vehicle Service
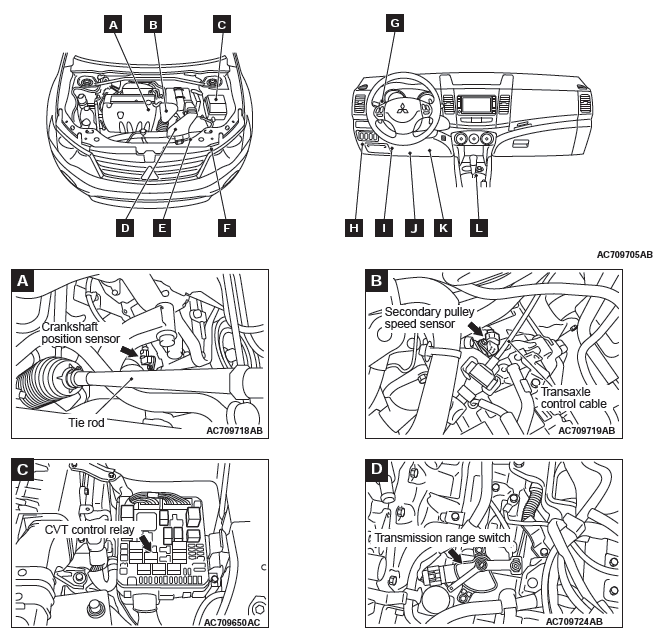
CONTROL SYSTEM COMPONENT PART CONFIGURATION DIAGRAM


ESSENTIAL SERVICE
TRANSMISSION FLUID CHECK
CAUTION Replace the transmission fluid whenever the transaxle is replaced with a new one or the vehicle is driven in harsh conditions.
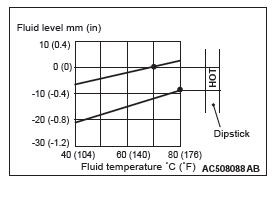
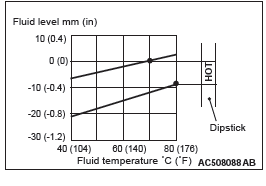
1. Drive the vehicle until the transmission fluid is warmed up to the normal operating temperature 70 − 80ºC (158 − 176ºF).
NOTE: Use scan tool MB991958 to measure the transmission fluid temperature.
NOTE: When a certain amount of time is required to warm up the transmission fluid to the normal operating temperature 70 − 80ºC (158 − 176ºF), check the oil level referring to the characteristics chart.
2. Park the vehicle on a level surface.
3. Move the selector lever to every position to fill the torque converter and the hydraulic circuit with the transmission fluid, and then move the selector lever to P or N range.
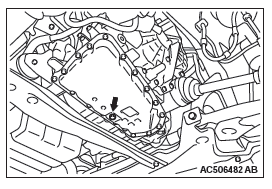
4. Wipe clean the area around the oil level gauge, and then remove the oil level gauge to check the condition of the transmission fluid.
NOTE: If the transmission fluid smells burnt or is excessively deteriorated or dirty, the transmission fluid is contaminated with particles of the metal bushings and friction material. In these cases, the transaxle must be overhauled.
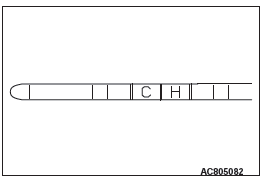
5. Check that the transmission fluid level is within the "H" area on the oil level gauge. If the fluid level is low, add the transmission fluid to the "H" level.
Transmission fluid: DIA QUEEN CVTF-J1

NOTE: When the transmission fluid level is low, the oil pump sucks air together with the transmission fluid, and produces air bubbles in the hydraulic circuit. The air bubbles in the hydraulic circuit decreases the hydraulic pressure, causing the delayed gearshift or slippage of the belt, clutch, and brake. When the transmission fluid level is too high, the fluid is stirred by the gear and foams up, and the problems similar to those when the transmission fluid level is low will occur. In either case, air bubbles cause the overheat and oxidation of the transmission fluid, which prevents normal operation of the valve, clutch, and brake. Beside, when the transmission fluid is foamy, it flows out of the transaxle vent hole. This may be taken as the fluid leakage by mistake.
6. Insert the oil level gauge securely.
TRANSMISSION FLUID REPLACEMENT
1. Remove the drain plug on the bottom of the transaxle case to drain the transmission fluid.
Draining amount: Approximately 5.5 dm3 (5.81 qt)
2. Install the drain plug with a new gasket to the transaxle case, and tighten it to the specified torque.
Tightening torque: 34 +- 2 N*m (25 +- 1 ft-lb)
CAUTION If the transaxle case becomes full before filling 5.5 dm3 (5.81 qt) of transmission fluid, stop filling the transmission fluid.
3. Fill in the new transmission fluid through the oil filler tube.
Filling amount: Approximately 5.5 dm3 (5.81 qt)
Transmission fluid: DIA QUEEN CVTF-J1
4. Start up the engine and let it idle for 1 to 2 minutes.
5. Move the selector lever to every position, and then move it to the P or N range.
6. Stop the engine and perform the above steps 1 to 5 again.
7. Stop the engine, and discharge a small amount of transmission fluid to check for fouling. If fouling is found, repeat steps 1 to 5 until clean transmission fluid comes out.
8. Drive the vehicle until the transmission fluid is warmed up to the normal operating temperature 70 − 80ºC (158 − 176ºF), and check the transmission fluid level. It must be within the "H" area on the oil level gauge.
NOTE: The "C" level is for reference only. Use the "H" level as the criteria.
NOTE: Use scan tool MB991958 to measure the transmission fluid temperature.
NOTE: When a certain amount of time is required to warm up the transmission fluid to the normal operating temperature 70 − 80ºC (158 − 176ºF), check the oil level referring to the characteristics chart.
9. Adjust the transmission fluid level to the specified level.
Refill the transmission fluid when the fluid level is low, and drain the transmission fluid through the drain plug when the fluid level is high.
10.Securely insert the oil level gauge into the oil filler tube.
11.TCM records the deterioration level of the transmission fluid.
After replacing the transmission fluid with new one, use scan tool MB991958 to reset the deterioration level recorded in TCM.
FLUSHING COOLERS AND TUBES
Required Special Tool:
MB995062: Flushing Tool
WARNING
- Wear protective eyewear that meets the requirements of ANSI Z87.1 − 1968 and OSHA. Wear standard industrial rubber gloves.
- Keep a
class B fire extinguisher in the area where the
flushing tool will be used. Keep the area well ventilated.
Do not let flushing solvent come in contact with eyes or skin. If it does, flush with water for 15 to 20 seconds. Remove contaminated clothing and wash affected skin with soap and water. Seek medical attention.
When a transaxle failure has contaminated the transmission fluid, the transaxle must be flushed. The transmission fluid warmer (transmission fluid cooler) on the transaxle must also be replaced. The torque converter must also be replaced with an exchange unit. This will ensure that metal particles or sludged transmission fluid are not later transferred back into the reconditioned (or replaced) transaxle. There are two different procedures for flushing coolers and lines. The recommended procedure is to use special tool MB995062 Flushing Tool. The other procedure is to use a hand suction gun and mineral spirits.
1. Remove the cover plate filler plug on special tool MB995062. Fill the reservoir 1/2 to 3/4 full with fresh flushing solution. Flushing solvents are petroleum based solutions generally used to clean transaxle components. Do not use solvents containing acids, water, gasoline, or any other corrosive liquids.
2. Reinstall the filler plug on special tool MB995062.
3. Verify that the pump power switch is turned "OFF". Connect the red alligator clip to the positive battery terminal. Connect the black alligator clip to a good ground.
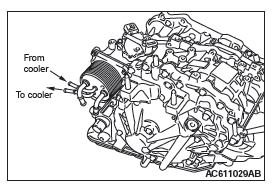
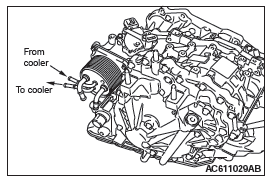
4. Disconnect the cooler lines at the transaxle.
NOTE: When flushing the transaxle cooler and lines, always reverse flush.
5. Connect the pressure line to the OUTLET line (from cooler).
6. Connect the return line to the INLET line (to cooler).
7. Turn the pump "ON" for two to three minutes to flush the cooler(s) and lines. Monitor the pressure readings. Clear the return lines. Pressure readings should stabilize below 138 kPa (20 psi) for vehicles equipped with a single cooler and 208 kPa (30 psi) for vehicles equipped with dual coolers. If flow is intermittent or exceeds these pressures, replace the cooler(s).
8. Turn the pump "OFF". 9. Disconnect the suction line from the reservoir at the cover plate. Disconnect the return line at the cover plate and place it in a drain pan.
10.Turn the pump "ON" for 30 seconds to purge flushing solution from the cooler(s) and lines. Turn the pump "OFF".
11.Place the suction line into a one quart container of DIA QUEEN CVTF-J1 transmission fluid.
12.Turn the pump "ON" until all transmission fluid is removed from the one quart container and lines. This purges any residual cleaning solvent from the transaxle cooler(s) and lines. Turn the pump "OFF". 13.Disconnect the alligator clips from the battery. Reconnect the flusher lines to the cover plate, and remove the flushing adapters from the cooler lines. Reconnect the cooler lines.
OIL COOLER FLOW CHECK
After the new or repaired transaxle has been installed, fill to the proper level with DIA QUEEN CVTF-J1. The flow should be checked using the following procedure:
CAUTION With the fluid set at the proper level, transmission fluid collection should not exceed one quart or internal damage to the transaxle may occur.
1. Disconnect the OUTLET line (from cooler) at the transaxle and place a collecting container under the disconnected line.
2. Run the engine at curb idle speed with the shift selector in neutral.
3. If transmission fluid flow is intermittent or it takes more than 20 seconds to collect one quart of transmission fluid, replace the cooler.
4. If flow is within acceptable limits, reconnect the cooler line.
Then fill the transaxle to the proper level, using DIA QUEEN CVTF-J1.
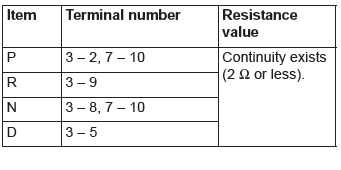
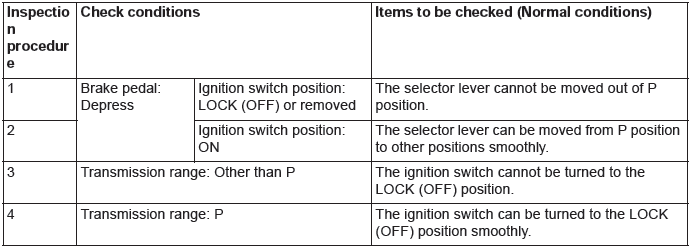
TRANSMISSION RANGE SWITCH CONTINUITY CHECK
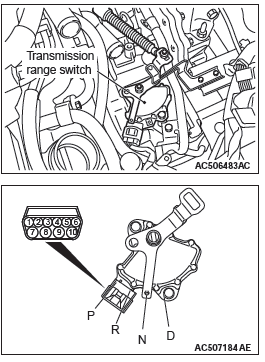
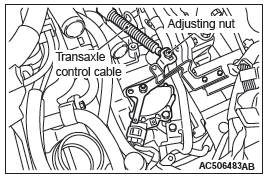
TRANSMISSION RANGE SWITCH AND CONTROL CABLE ADJUSTMENT
1. Move the selector lever to the N range.
2. Loosen the adjusting nut so that the manual control lever moves freely.
3. Move the manual control lever to Neutral position.
4. Align the hole at the end of the manual control lever and the hole in the transmission range switch body flange (section A − A).
NOTE: Insert a φ5 bar into the aligned holes in the transmission range switch body flange and on the tip of the manual control lever to position the transmission range switch body.

5. Use the adjusting nut to tighten the transaxle control cable to the specified torque.
Tightening torque: 9.5 +- 3.5 N*m (84 +- 30 in-lb)
6. Make sure that the selector lever is in the N range.
7. Make sure that the transaxle-side ranges that are corresponding to the transmission range operate and function without fail.
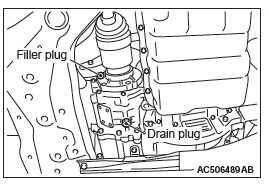
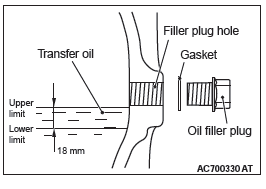
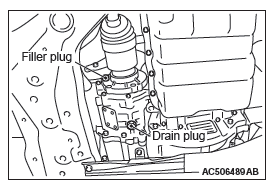
TRANSFER OIL CHECK <AWD>
1. Remove the filler plug and gasket.
2. Check that the oil level is not 18 mm below the bottom of the oil filler plug hole.
3. Check that the oil is not excessively foul and has moderate viscosity.
4. If the oil level is not in between the upper limit and the lower limit, refill the specified oil to the bottom of the oil filler plug hole.
Brand name: Hypoid gear oil API classification GL-5 SAE 80
5. Install the filler plug and new gasket, and tighten to the specified torque.
Tightening torque: 32 +- 2 N*m (24 +- 1 ft-lb)
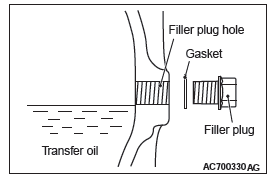
TRANSFER OIL REPLACEMENT <AWD>
1. Remove the drain plug and gasket, and gasket to drain the transfer oil.
2. Install the drain plug and new gasket, and new gasket, then tighten them to the specified torque.
Tightening torque: 32 +- 2 N*m (24 +- 1 ft-lb)
3. Remove the filler plug and gasket, then fill the oil up to the lower edge of the filler plug hole.
Brand name: Hypoid gear oil API classification GL-5
SAE 80
Filling amount: 0.49 dm3 (0.52 qt)
4. Install the filler plug and new gasket, then tighten them to the specified torque.
Tightening torque: 32 +- 2 N*m (24 +- 1 ft-lb)
CVT CONTROL COMPONENT CHECK
ACCELERATOR PEDAL POSITION SENSOR (APS) CHECK
Refer to GROUP 13A − Troubleshooting.
STOPLIGHT SWITCH CHECK
Refer to GROUP 35A − Brake Pedal.
CVT CONTROL RELAY CHECK
1. Remove the CVT control relay.
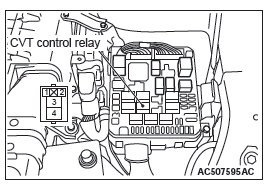
2. Use a jumper wire to connect the positive battery terminal (+) to the CVT control relay terminal No. 2, and the negative battery terminal (−) to the terminal No. 1.
3. Check for continuity between the CVT control relay terminals No. 3 and No. 4.

4. If not as specified, replace the CVT control relay.
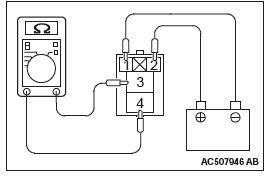
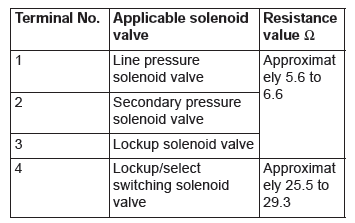
SOLENOID VALVE CHECK
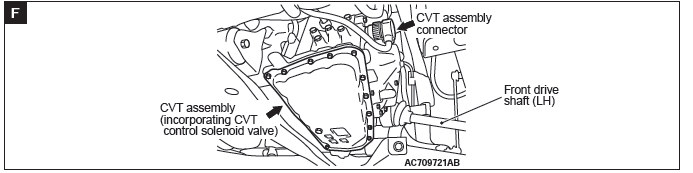
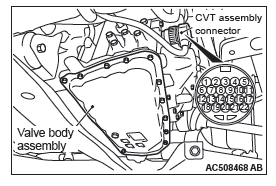
1. Disconnect the CVT assembly connector.
2. Measure the resistance between the terminals of the applicable solenoid valves and ground.
Standard value:
3. When the resistance is within the standard value, check the power supply and the ground circuits.
CAUTION Each solenoid valve cannot be removed or replaced as a single unit. When replacement of any one of the solenoid valves is necessary, replace the valve body assembly.
4. When the resistance is outside the standard value, replace the valve body assembly and the harness.
TRANSMISSION FLUID TEMPERATURE SENSOR CHECK
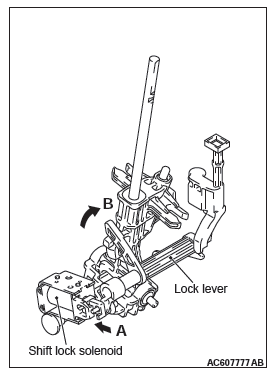
1. While pressing A in the figure, turn B counterclockwise to unlock the CVT assembly connector, and disconnect the connector.
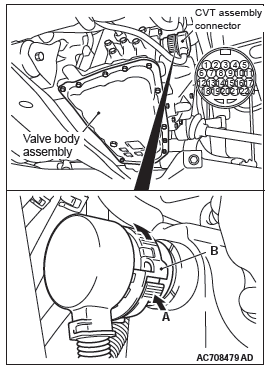
CAUTION Insert a thermometer which is made of metal or is put in a metal case (overall length: approximately 150 − 200 mm) into the transaxle case hole approximately 80 mm.
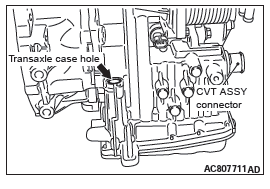
2. Remove the oil filler tube assembly (Refer to Transaxle Assembly), and insert a thermometer into the transaxle case hole.
NOTE: If a radiation thermometer (noncontact thermometer) is available, use it to measure the surface temperature of the oil pan.
3. Measure the resistance between the sensor-side connector terminal No. 17 of the CVT assembly connector and ground (terminal No.19).
Standard value:
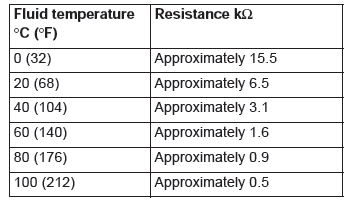
NOTE: In the information screen on the multi-information display, the fluid temperature warning comes on when the transmission fluid temperature is approximately 140ºC(284 ºF) or higher, and automatically goes out when the transmission fluid temperature dropped below approximately 135ºC(275ºF).
CAUTION The transmission fluid temperature sensor cannot be removed or replaced as a single unit. When the transmission fluid temperature sensor needs to be replaced, replace the valve body assembly.
4. When the resistance of the transmission fluid temperature sensor is outside the standard value, and the fluid temperature warning comes on/goes out at other than the specified temperatures, replace the valve body assembly and the harness.
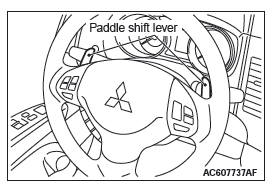
PADDLE SHIFT SWITCH CHECK
1. Check that the paddle shift lever is returned to the original position quickly when the lever is released after operation of the paddle shift lever (+/− side) (pulling to the rear side of the vehicle). In addition, check for abnormal looseness, friction and abnormal noise.
2. Remove the paddle shift assembly.
3. Check the continuity between the paddle shift switch connecter terminals.
Standard value:
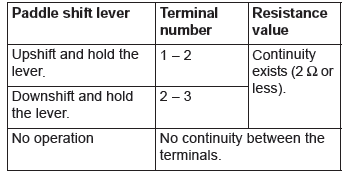

4. In the cases other than the above, replace the paddle shift assembly.
SELECTOR LEVER OPERATION CHECK
1. Put on the parking brake.
2. Move the selector lever to every range and check that the lever moves smoothly with secure feel of engagement.
3. Make sure that the engine starts when the selector lever is in the N or P range, and does not start when the selector lever is in other range.
4. Start the engine. Release the parking brake.
5. Make sure that the vehicle moves forward when the selector lever is moved from the N range to D range, or to the 1st to 6th speed in the sports mode. Also make sure that the vehicle moves backward when the selector lever is moved from the N to R range.
6. Stop the engine.
7. Turn ON the ignition switch, and move the selector lever from the P to R range. Check that the backup lamp comes on and the tone alarm sounds at this time.
NOTE: Since the vehicle is equipped with the CVT wrong-operation preventive device, the selector lever cannot be moved out of the P position without depressing the brake pedal after turning ON the ignition switch.
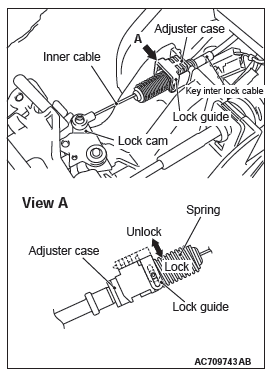
KEY INTERLOCK MECHANISM CHECK/ADJUSTMENT
1. Carry out the following check.
2. If the normal conditions are not obtained after performing the above operations, install the key interlock cable in the following procedures. (Automatic adjustment)
- Disconnect the key interlock cable connection (selector lever side).
CAUTION Leave the ignition switch in the LOCK (OFF) position until the key interlock cable installation is completed.
- Move the selector lever to the P position and turn the ignition switch to the LOCK (OFF) position.
- Install the tip of the key interlock cable to the lock cam of the selector lever assembly, taking care not to twist the inner cable.
- Install the adjuster case with its lock guide pulled up (unlocked).
- Securely push down the lock guide to lock it.
NOTE: The lock position of the key interlock cable is automatically adjusted by a spring.
SHIFT LOCK MECHANISM CHECK
SYSTEM CHECK
COMPONENT PARTS CHECK
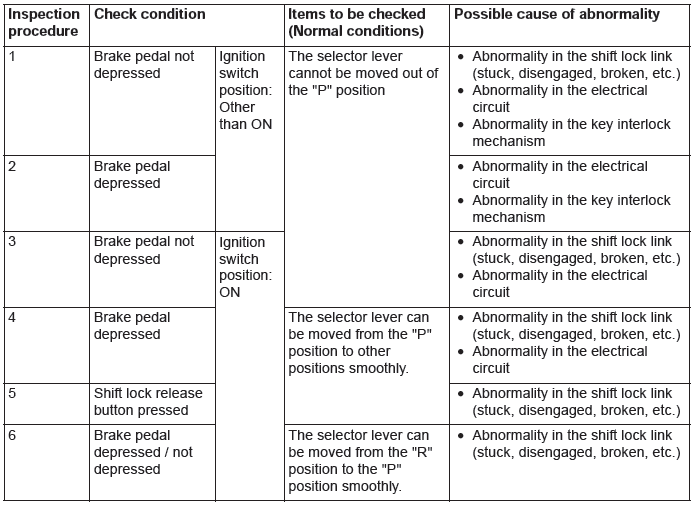
SHIFT LOCK LINK
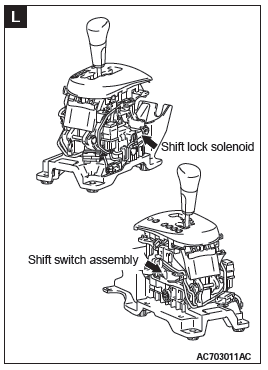
Check each part for damage and disengagement.
Check that the lock lever smoothly moves in the direction of arrow B in the figure when the shift lock solenoid plunger is pressed in the direction of arrow A, and smoothly moves back to the original position when the plunger is released.
SHIFT LOCK SOLENOID
1. Measure the resistance between terminal No.3 and No.7 of the selector lever assembly connector.
Standard value: 24 +- 1.2 Ω
2. When the resistance is outside the standard value, replace the selector lever assembly.
READ NEXT:
 Transaxle Control
REMOVAL AND INSTALLATION
CAUTION
Before removing the clock spring connector, refer to GROUP 52B − SRS Air Bag
Service Precautions
and Air Bag Module and Clock Spring.
Pre-removal operation
F
Transaxle Assembly
REMOVAL AND INSTALLATION
CAUTION
The parts indicated by the * are the bolts with friction coefficient stabilizer.
In removal, ensure there is
no damage, clean dust and soiling from bearing and threa
Continuously
Variable
Transaxle
Overhaul
General Information
TRANSAXLE MODELS
SECTIONAL VIEW <TRANSAXLE>
<F1CJA>
<W1CJA>
SECTIONAL VIEW <TRANSFER>
General Specifications
Service Specifications
Fastener Tightenin
SEE MORE:
Modification/alterations to the electrical orfuel systems
MITSUBISHI MOTORS CORPORATION has always manufactured safe, high quality vehicles.
In order to maintain this safety and quality, it is important that any accessory
that is to be fitted, or any modifications carried out which involve the electrical
or fuel systems, should be carried out in acco
DTC P0703, P0705, P0712, P0713, P0715, P0720, P0729, P0731, P0732,
P0733, P0734, P0735, P0736
DTC P0703: Stoplight Switch Malfunction
Stoplight switch system circuit
DESCRIPTIONS OF MONITOR METHODS
Drive the vehicle at 30 km/h (18.6 mph) or more
for 10 seconds, and then turn the ignition switch
to the "LOCK" (OFF) position. In this sequential
operation, no variation has been found in
