Mitsubishi Outlander: On-vehicle Service
DOOR FIT ADJUSTMENT
Required Special Tools:
- MB990211: Slide Hammer
- MB990243: Body Puller
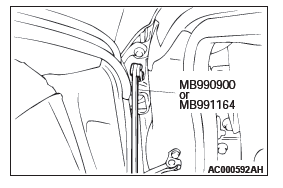
- MB990900 or MB991164: Door Adjusting Wrench
- MB990939: Brass Bar
CAUTION
- Do not rotate special tool MB991164 with a torque of over 98 N*m (72 ft-lb).
1. When the clearance between the door and the body is uneven
- Apply protective tape to the fender around the hinge installation position and door edge.
- Remove the splash shield front <Front door only>.
- Remove the center pillar trim, lower <Rear door only>.
- Use special tool MB990900 or MB991164 to loosen the hinge mounting bolts on the body side, and then adjust the clearance around the door so that it is uniform on all sides.
- Move the door to adjust until the clearance around the door is even.
2. When the door is not flush with the vehicle body surface.
- Loosen the door-side hinge mounting bolts.
- Move the door to adjust so that the door is flush with the vehicle body.
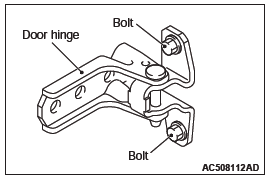
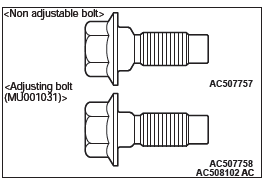
- If adjustment is not possible, replace the door-side door hinge mounting bolt with the adjustment bolt (MU001031).
- Move the door to adjust so that the door is flush with the vehicle body.
- Tighten the door-side door hinge mounting bolt to the
specified torque.
Tightening torque: 26 +- 6 N*m (19 +- 5 ft-lb)
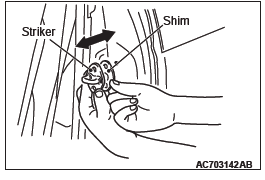
3. When the door is stiff to close and open
- Adjustment using the striker (toward the inside of the
vehicle and vertical direction)
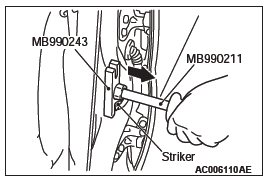
Install a temporary bolt instead of the striker mounting bolt, and use special tool MB990939 and a hammer to tap the bolt in the desired direction.

- Adjustment by using the striker (toward the outside of the
vehicle)
Use special tools MB990211 and MB990243 to pull the striker toward the outside of the vehicle.
- Adjustment using shims (forward and rearward)
Increase or decrease the number of shims so that the striker engages with the door latch properly.
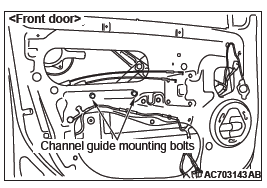
DOOR WINDOW GLASS ADJUSTMENT
Check that the door window glass operates smoothly and moves along the door glass runchannel when the door window glass is fully raised and fully lowered. If there is a problem, adjust by the following procedures:
1. Remove the door trim assembly.
2. Remove the waterproof film.
3. Raise the door window glass and loosen the channel guide mounting bolts to adjust tilting up/down of the glass.
POWER WINDOW CHECK
Check the power window as described below. If it does not work, perform troubleshooting.
- Turn off the power window lock switch of the power window main switch, and operate each of the power window switches to check that each power window operates.
- Turn on the power window lock switch of the power window main switch, and operate the front and rear passenger's power window sub switches to check that the power windows do not work.
- Turn on the power window lock switch of the power window main switch, and operate the main switch to check that the driver's power window works but the front and rear passenger's power windows do not work.
ADJUSTMENT OF FAULTY POWER WINDOW
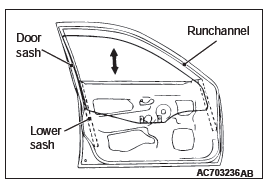
If the door window glass wrongly, automatically lowers while being raised, adjust or replace as follows:
1. Remove the door trim assembly.
2. Remove waterproof film.
3. Remove the window regulator assembly from the door window glass, and then raise and lower the door window glass by hand to check the operation force.
4. If the door window glass does not move up and down smoothly, check and repair as follows:
- Check the installation condition of the runchannel.
- Straighten twist in the door sash.
- Check the installation condition of the lower sash.
5. If repair or adjustment is impossible, replace the door assembly.
POWER WINDOW SAFETY MECHANISM CHECK <DRIVER'S SIDE ONLY>
1. Place an approximately 10 mm (0.39 inch) thick wood board as shown. Then, close the door window glass by one-shot up action of the power window switch.
2. Check that the window glass lowers by about 150 mm (5.9 inches) when it clamps the board.This is called anti-trap function (safety mechanism). If this does not happen, carry out troubleshooting.
3. Check that the window glass continue raising up to the door upmost position without activating the anti-trap function while the switch is kept pulling up (this is called forced closing function).
NOTE: If the anti-trap function (safety mechanism) is activated consecutively 3 times or more, carry out the learning procedures of the power window fully closed position.
POWER WINDOW TIMER FUNCTION CHECK
Check the power window timer as described below. If it does not work, perform troubleshooting.
- Close the door and turn the ignition switch to the LOCK (OFF) position, and then check that the power windows operate for 30 seconds.
- Close the door and turn the ignition switch to the LOCK (OFF) position. While the timer is on, open the driver's door or front passenger's door, and check that the timer is cancelled.
POWER WINDOW OPERATING CURRENT CHECK
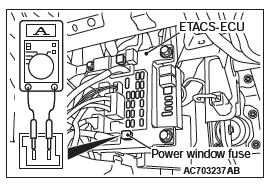
1. Remove the power window fuse to check that it is normal, and connect a multimeter as shown in the illustration.
2. Raise the power window to measure the current during operation.
Standard value: 7 +- 1 A [Power supply voltage 14.5 +- 0.5 V, at 25ºC (77ºF) ]
NOTE: If the power supply voltage does not meet the standard value, check and repair the generator and the battery.
Then carry out this check again.
3. If the operation current is outside the standard value.
LEARNING PROCEDURES OF THE POWER WINDOW FULLY CLOSED POSITION <DRIVER'S SIDE ONLY>
LEARNING PROCEDURES OF THE FULLY CLOSED POSITION WHEN THE POWER WINDOW SWITCH IS REMOVED, OR THE POWER WINDOW REGULATOR ASSEMBLY IS REMOVED OR REPLACED
1. If the anti-trap function (safety mechanism) is activated consecutively three times or more, the fully closed position that the power window switch has learned will be erased (initialized).
2. Operate the power window switch and fully open the door window glass.
CAUTION The anti-trap function will not activated until the learning procedures of the fully closed position have been completed (because the anti-trap function was reset).
3. Operate the power window switch and fully close the door window glass. The power window activates for 0.7 seconds and stops automatically when the power window switch is pressed once. Repeat this operation until the door window glass fully closes and release the switch once. Then, hold the power window switch to the fully closed side again for one second so that the power window switch completes learning the fully closed position.
NOTE: If the power window switch is operated to open the door window glass while the switch is learning, the learning will be cancelled. If this happens, return to step 2.
LEARNING PROCEDURES WHEN THE POWER WINDOW SWITCH IS REPLACED WITH A NEW ONE
CAUTION The anti-trap function will not activated until the learning procedures of the fully closed position have been completed (because the anti-trap function was reset).
Operate the power window switch to fully close the door window glass by one-shot up action so that the power window switch will complete learning (no initialization is required).
CENTRAL DOOR LOCKING SYSTEM CHECK
- Check that the central door locking system works by operating
the door lock switches. If it does not operate, perform
troubleshooting.
NOTE: When the inside lock knob is operated with the driver's door opened, the driver's door is not locked.
- Check whether the driver's door is opened when the driver's door inside handle is pulled with all the doors locked. If it does not operate, replace the driver's door latch assembly.
KEY-IN PREVENTION FUNCTION CHECK
Check that the driver's door is not locked when the key cylinder or door lock switch is operated with the driver's door opened. If it is locked, replace the door latch.
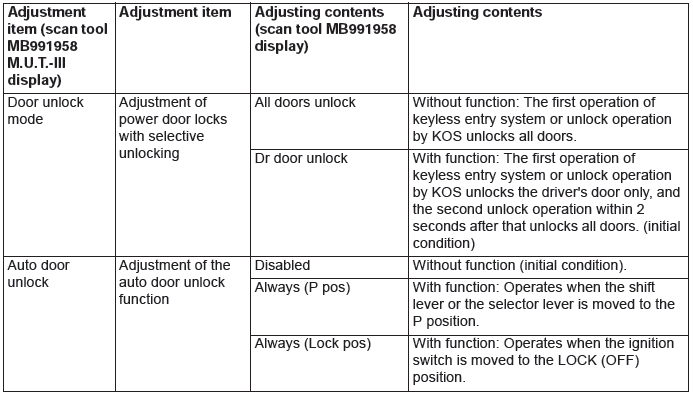
SELECTOR "P" POSITION-LINKED DOOR UNLOCKING FUNCTION CHECK
When the selector lever is moved to the "P" (parking) position with the ignition switch on, all the doors and the liftgate will be unlocked. Carry out troubleshooting if the door is unlocked.
NOTE: The selector "P" position-linked door unlocking function can be switched with the customization function. Confirm it before check.
IGNITION "LOCK (OFF)" POSITION-LINKED DOOR UNLOCKING FUNCTION CHECK
When the ignition switch is moved to the "LOCK" (OFF) position, all the doors and the liftgate will be unlocked. Carry out the troubleshooting if a door does not operate.
NOTE: The ignition "LOCK" position-linked door unlocking function can be switched with the customize function. Confirm it before check.
DOOR OUTSIDE HANDLE PLAY CHECK
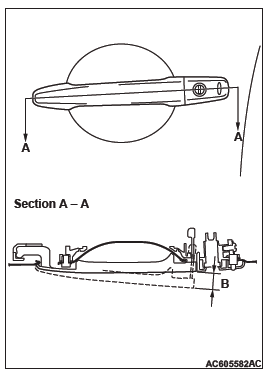
1. Check that the door inside handle assembly play meets the standard value.
Standard value (B): 0.1 − 5.2 mm (0.004 − 0.2 inch) [Target value: 2.5 mm (0.1 inch) ]
2. Check the door outside handle assembly and door latch assembly, and replace them if they are out of the standard value.
DOOR INSIDE HANDLE CHECK
DOOR INSIDE HANDLE KNOB PLAY CHECK
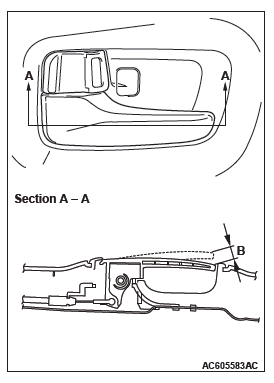
1. Check that the door inside handle knob play meets the standard value.
Standard value (B):
Front driver's side: 10.0 − 23.7 mm (0.39 − 0.93 inch)
[Target value: 17.0 mm (0.67 inch) ]
Except Front driver's side: 5.0 − 18.7 mm (0.2 − 0.74
inch) [Target value: 12.0 mm (0.47 inch) ]
2. Check the door inside handle and door latch assembly, and replace them if they are out of the standard value.
DOOR INSIDE HANDLE LOCK KNOB STROKE CHECK
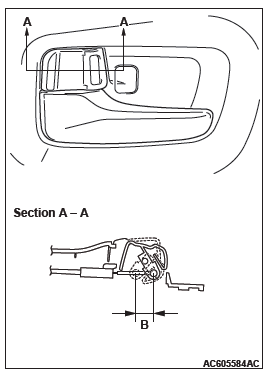
1. Remove the door trim assembly.
2. Check that the stroke of the door inside handle lock knob meets the standard value.
Standard value (B): 13.7 − 15.0 mm (0.54 − 0.59 inch) [Target value: 14.7 mm (0.58 inch) ]
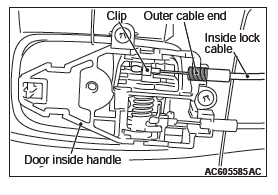
3. If it is outside the standard value, adjust the stroke of the inside handle lock knob by using the outer cable end, which connects the inside handle lock knob to the inside lock cable.
CUSTOMIZATION FUNCTION
Using the ETACS system of scan tool MB991958, the following functions can be programmed. The programmed information is held even when the battery is disconnected.
READ NEXT:
 Door Assembly, Door Glass and Regulator, Door Handle and Latch
Door Assembly
REMOVAL AND INSTALLATION
Post-installation operation
Door adjustment
<Front door>
Damper removal
Damper
Door assembly and front door
hinge removal steps
Front scuff plate,
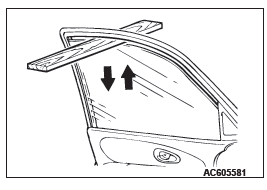
Window Glass Runchannel and Door Opening Weatherstrip
REMOVAL AND INSTALLATION
<Front door>
Waterproof film removal steps
Pull handle bracket
Waterproof film
Door window glass runchannel
removal steps
Door window glass runchannel
Door bel
Liftgate
GENERAL INFORMATION
LIFTGATE OPENER CONTROL FUNCTION
When the liftgate lock release handle is operated to
open the liftgate (the liftgate lock release handle
open switch turns ON) while the vehicle
SEE MORE:
DTC B1731, B1761, B1A08, B1A09, B1A0A, B1A0B, B1A0C, B1A0D, B1A0E, B1A0F,
B1A10, B1A11, B1A12, B1A13, B1A14, B1A15, B1A16, B1A17, B1A24, B1A25, B1A28,
B1A35, B2101, B2102
DTC B1731: Engine control module communication timeout
CAUTION
When the DTC B1731 is set, be sure to diagnose
the CAN bus line.
When replacing the ECU, always check that
the communication circuit is normal.
DTC SET CONDITION
WCM checks that the engine control module data
has been received via
Engine oil
To check and refill engine oil
The engine oil used has a significant effect on the engine’s performance, service
life and startability. Be sure to use oil of the recommended quality and appropriate
viscosity.
All engines consume a certain amount of oil during normal operation. Therefore,
